Review: Linhof Techno
Linhof Techno with wide-angle bellows.
This is a review of the Linhof Techno digital field view camera, but it's also intended as an introduction to technical cameras in general and some specific techniques. So if you are new to this type of camera you should hopefully get some sense of what it's all about.
I also make comparisons with other types of technical cameras, with advantages and disadvantages, so if you are thinking about buying your first technical camera I think this review can be very useful to you even if a Linhof Techno is not your first choice. While writing this I had in mind what I would have wanted to read before I got a technical camera myself.
My main interest is landscape photography (and not product photography as you might guess from the pictures), but I try to include analysis of needs in other types of photography as well.
The camera reviewed is my own.
I wrote the review originally in 2012, but have continued to update it when I've gained some new experience or important things have happened with the Techno system itself or the competing products. You can see a list of changes in the revision history section.
If you want to see some of my work made with this camera, you can go
to my dedicated web site: Anders
Torger — photographs.
Table of contents
- What is a technical camera?
- Why would you choose a technical camera instead of a DSLR?
- Where does the Linhof Techno fit in?
- A note on "silent upgrades"
- The look
- The precision
- Using the gears
- The sliding back
- Using the ground glass
- Shooting workflow
- Movements
- Lenses
- Digital backs
- Using with film
- Tripod and head
- Carrying the system
- Operating in tough conditions
- Concluding Discussion
- Appendix
- Revision history
What is a technical camera?
A modern technical camera is a fully mechanical camera body that takes a medium format digital back and "large format digital" lenses from Schneider and Rodenstock (in brand-specific mounts) and then provides shift and tilt movements. They are replacing the analog 4x5" view cameras used for professional technical photography in the past.
One can see a few different sub-categories:
- Studio-based view cameras, mainly intended for product photography.
- Sinar P3, Linhof M679cs, Arca-Swiss M-Line, Rollei X-Act 2...
- This camera type is the most flexible concerning lens/sensor movements.
- Less efficient using wide angles, typically do not support super-wides at all.
- Large and heavy, not for field use.
- Wide-angle field cameras (popularly called "pancake cameras" due
to their flat appearance) intended for architecture and
landscape.
- ALPA, Arca-Swiss R-line, Cambo Wide, Sinar lanTec/arTec, Silvestri Bicam...
- Can also take longer focal lengths, so they are not limited to wide-angle photography, but the most popular application is architecture which often requires very wide lenses.
- Generally more limited in movements than view cameras.
- Many can also be hand-held and used for zone-focused street photography for example.
- Digital field view cameras, a digital incarnation of the 4x5"
field camera, intended for landscape and architecture.
- Linhof Techno, Arca-Swiss F-Universalis, Cambo Actus, Arca-Swiss M-Line two mf, Toyo VX23D...
- Can generally do wide angles, but not always the widest ones.
- Typically more flexible movements than pancake cameras but less than the studio-based view cameras.
There is also a new camera type, an electronic pancake camera with focal plane shutter to accept various SLR systems' lenses through adapters, examples are Hartblei HCAM B1 and Alpa FPS, today typically used together with Canon TS-E lenses to achieve cost-efficient ultra-wide angle. They typically lack movements though (or get it through a SLR tilt-shift lens) so I have excluded them from further analysis. I have also excluded the older analog 4x5" and 6x9 view cameras which some are quite well-suited to be adapted with digital backs, such as Sinar P2 or Linhof Technikardan. Those can be found on the second hand market quite easily and can thus be a good budget alternative, but are generally not recommended for use with wide angles (may not accept them, and/or there may be difficulty to achieve adequate parallelism).
Among the listed types the studio-based digital view camera and wide-angle "pancake" cameras are well-established in their genres. The digital field view camera where we find the Linhof Techno is a smaller category and is actually questioned by many. The saying goes "why get a digital view camera when you can get a pancake camera instead which has better precision and is so much easier to focus?". I'll discuss this issue at length further into this review.
Recent additions to the field view camera category is the Cambo Actus and Arca-Swiss F-Universalis cameras. These can be used both with digital backs and 135 cameras (then no wide angles). The Cambo Actus is very compact but can't take a sliding back so it's intended for the newer live view capable CMOS backs. While live view and CMOS is the future (and takes away the focusing challenging, thus it's a revival for view cameras) there's still some severe limitations concerning wide angle compatibility. The solution is generally to use normal SLR retrofocus wides (which can be used via adapters), but then the image quality is generally not as good.
While all these type of cameras do provide unique features not to be found in medium format or 135 DSLRs it's today common that work previously done with 4x5" cameras is done with DSLRs, perhaps using tilt-shift lenses or compromising the result to gain speed and flexibility. This means that technical cameras are sold in small numbers, and the manufacturing companies are very small, in fact so small that they might not even have a proper website, or a very poorly updated one (Linhof is no exception).
While the typical user of the field models is a professional architecture photographer, there are also enthusiasts that generally use them for landscape photography, and I am one of those. If you are the type of photographer that would have used a 4x5" view camera in the past, you are probably interested in a modern digital technical camera today.
Technical cameras are primarily professional tools and are manufactured in very small volumes usually by a western workforce (=high labour costs). Obviously it becomes expensive, very expensive. Lenses to these systems are expensive too. However when compared to professional DSLRs and lenses the difference is not extreme, if you can afford professional DSLR equipment you can likely afford a technical camera and a couple of lenses.
But, you need a digital back too, and this is the big hit. It can cost more than the rest of the system. As an enthusiast an option can be to get an older second hand back, as described in my guide to second hand medium format digital backs. You don't need the latest to get very high image quality.
Finally a note on the terminology: there is actually no strict definition of what a "technical camera" is. Some put view cameras in a separate category and only label the "pancake cameras" as technical cameras. As seen in the description above I use a broader definition and I think it's better now when there are many crossover products. I exclude aircraft, reproduction and industrial cameras however, which some include. It seems like anything that's not a normal consumer camera and is designed for some specific use case can be called a technical camera.
Why would you choose a technical camera instead of a DSLR?

A 135 DSLR with a tilt-shift lens, an economical alternative to a digital medium format technical camera.
The "journalist" DSLR cameras (Canon and Nikon the largest brands) are today mature and well-developed into all genres of photography from fast-paced action to high resolution still life. You can do almost any type of photography with a DSLR, so why would you choose a technical camera?
The strongest arguments concerning the results are that you can get higher resolution, assuming you can afford the latest digital backs, and that you have higher quality and more precisely (and often more flexible) operated tilt-shift lenses. Actually the tilt-shift mechanics is usually built-in to the camera body like on the Techno, rather than in the lenses as for DSLRs. Professionals generally use technical cameras in for example architecture work where the higher resolution and extra flexibility in shifting can be critical.
However, for most work a recent DSLR provides adequate quality, and is a more flexible package at a considerable lower cost. So why choose a technical camera? Here is where the emotional arguments come in. The user experience of a mechanical technical camera is very different from a high-tech DSLR. Concerning tilting and shifting the whole camera body is designed for it, the Techno in this review has three knobs for shifting and two for tilt and swing, all precisely geared and self-locking. If your shooting style often involves movements you will notice a major quality difference in the controls. The look-and-feel of a high quality exclusive mechanical instrument can be a part of the joy using it.
Then there is the difference in workflow, technical cameras are slower to work with, which some actually prefer.
While some types of technical cameras are quite small and can actually be hand-held, it's not how you get the most out of them. They are primarily for the tripod, set up for carefully thought out shots of (semi) static scenes like landscape, architecture and still life. For these types of shots the camera excels, while for almost any other type of photography it's much worse than a DSLR, for many genres even unusable.
Making a photo using a technical camera usually means setting up the tripod, mounting the camera, mounting the back to the camera, mounting a lens with suitable focal length (there are no zoom lenses), shifting, tilting and focusing, take the shot, and then dismount and pack the system again. This cycle takes a couple of minutes at minimum. That is you don't do snapshots with this type of camera, you only set it up if you think it's going to be a fine photograph.
Depending on your personality as a photographer this way to work is either an advantage or a disadvantage. Those of us that see it as an advantage like that we come home with fewer but more thought through images than if we had used a snapshot-capabale camera, so we get less sorting to do in post-processing. Not being able to take quick shots helps concentrating on the particular work we are there to do. Out in the field we don't need to worry about having to react to some suddenly appearing wildlife, since it impossible to capture it anyway. The whole shooting experience is different, it's like slow food compared to fast food.
However, a DSLR can of course be used in the same strict manner, and gives you opportunity to react faster and more spontanously if you need to. It's up to you what you prefer.
For me personally I prefer using a technical camera for my landscape photography because I feel more focused and less stressed and I do get home with fewer but higher quality images, since the slowness of the workflow makes me really think twice about composition. One result of fewer images is that I also get more memories tied to each one which I think is nice. I also like the feel of the tilt-shift controls unlike the fiddly ones found in DSLR tilt-shift lenses.
Then there are some more specific technical aspects too. One of the more obvious is that the current DSLR lineups don't have tilt-shift lenses in that many focal lengths, for example the 35mm does not exist at all (which I find important in landscape photography, if I had only one lens it would be with that field of view), unless you put a 1.4x teleconverter on a 24mm tilt-shift lens but then quality is compromised. Past 30 megapixels it's also considerably harder to find lenses that perform well. Tilt-shift movements of DSLR lenses are often restricted in various ways, unlike on a view camera (note that some technical cameras are quite restricted too though, pancake cameras often have tilt limitations).
Today it's worth mentioning Sony's mirrorless 135 cameras. Using them with adapters and for example Canon's TS-E lenses is a popular alternative for high resolution technical photography. Those mirrorless cameras are not as all-around and "professional" in handling as a DSLR, but the image sensors have been class-leading in performance in the 135 segment for a few years. This type of camera may be what you compare against. With the Cambo Actus and Arca-Swiss F-Universalis you actually also have the option to run the Sony mirrorless on a technical camera (with wide angle limitations!) so today there are many more options to choose from.
These new options didn't exist back in 2012 when I wrote the first revision of this review. With a Canon 5Ds and a TS-E 24 II you have a very capable 50 megapixel wide angle camera with flexible tilt-shift, which actually exceeds the resolution capability of entry level medium format options. For the longer focal lengths there are still very limited choices though, and the emotional arguments haven't changed. But be warned, if you go for a technical camera only for the image quality you will constantly be chased by the progress in the smaller formats and that may be costly in terms of feeling the need to constantly upgrade your system to "keep the distance" from the best 135 systems.
Where does the Linhof Techno fit in?
The Techno is obviously an excellent choice for those already used to large format field view cameras and want a digital alternative. Compared to the competitors in the same genre (digital view cameras for field use) I personally prefer the Techno because it is more compact, has better precision and has good design tradeoffs concerning movements. (I don't know that precision is better for sure, but find it likely based on user opinions I've heard and analysis of the designs.)
In the field view camera genre the main competitor to Linhof Techno is today Arca-Swiss F-Universalis, and the older Arca-Swiss M-Line mf two (but most will prefer F-Universalis over M-Line mf two due to the lower weight and better movement tradeoff). The advantages of the F-Universalis is the lower price and it's flexibility (can be used with both DSLRs and digital backs), while the Linhof Techno wins on the more compact form factor and it also has gearing and degree markers on both tilt and swing (F-Universalis only has gearing on tilt and less comfortable knob, and no degree marking at all). When I bought the Techno the F-Universalis did not exist (it was annonced in 2014), but I still prefer the Techno for the mentioned reasons. The attractive pricing of the F-Universalis makes it a quite difficult choice though. There's also the Cambo Actus which can be a competitor if you don't intend to use a sliding back, that is use a CMOS digital back. Before there are any good wide angle options I don't consider the Actus to be a main competitor though.
However, if you're not specifically into view cameras but want a technical camera for field use, the typical question is then "why would you get a Techno instead of a pancake camera?". Let's look into that.
Pancake cameras have some advantages 1) even more rigid which means possibly even better precision, 2) can be focused precisely via a distance scale rather on the ground glass (not applicable to all models!), 3) can be hand-held.
Concerning the precision issue my own judgement is that Techno is good enough for even the latest backs, and I do know about professional photographers using it together with 80 megapixel backs. That is you will not notice any image degradation due to poor precision in the camera, but it's also rather obvious that pancake camera design allows for even higher precision due to their more limited movements and helical focus mounts. The Techno does have some limits in focusing precision which I will look into in detail further into the review. The need for absolute precision in plane of focus placement will depend on what you shoot though, in for example landscape scenes absolute precision is rarely needed to get sharp pictures if proper technique is used.
If you see hand-holdability as an advantage or not is personal. To me hand-holding a technical camera is meaningless. I use a DSLR for hand-held photography, but I know some actually do zone-focused street photography and similar with their pancake cameras. The ALPA system has dedicated compact bodies without movements which suits this purpose well.
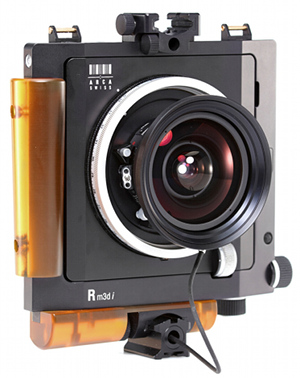
Arca-Swiss Rm3di, one of the leading "pancake" cameras, and the type of camera that is the main competitor to the Linhof Techno. (Picture by Arca-Swiss)
The big thing in the view camera vs pancake discussion is focusing. On a view camera you use the ground glass, and with that there are some challenges related to wide angles, magnification and poor light conditions. These challenges are discussed in detail separately. I think they can be overcome, but this is a bit personal. If you have poor eyesight or shoot a lot of wide-angles indoors (indoor architecture) a digital view camera like the Techno will probably not suit you. It's not that the camera is impossible in these situations, but it's much more cumbersome to use. So if you do wide-angle photography in poor light conditions only occassionally you can do it with the Techno, but if it's your main type of photography a pancake camera is a much better choice. There are those that do use the Techno for this anyway, then typically shooting tethered (and maybe having infinity stops) which makes it much more efficient to use in these conditions.
A pancake camera can be focused directly on the lens distance scale, and you typically use a view finder rather than the ground glass for framing. Due to parallax and focus breathing framing becomes a little bit approximate of course. You can use the ground glass with a pancake camera and some do, but they are mainly intended to be used with a viewfinder.
Since you can focus in the blind and have a viewfinder you don't get the wide-angle plus poor light condition problem. It's also possible to set the focus distance more precisely (at least with those systems providing high precision focusing rings) and more safely than with a view camera ground glass. Of course you need to know which distance to focus at, which is typically measured with a laser distance meter or set to hyperfocal from a table. When it comes to tilt (not all pancake cameras support it) focusing is less obvious, you would probably use a table and pick a formula rather than mounting the ground glass. A typical solution is tilting to get hinge line to the ground level (from table) and set the hyperfocal focus distance to get a nice upper half wedge depth of field. Apps for the mobile phone that provides help in tilt focusing has also started to appear (as a sidenote I naturally like to recommend what I use and have designed myself: the Lumariver Depth of Field Calculator).
As we see there are some rather strong points for pancake cameras, strong enough for many to choose them instead. However if you ask me the precision advantage is not critical in practical photography, and the issues with ground glass is exaggerated, so the digital view camera has its place.
A few strong points of the Techno are 1) much lower cost lens mount, 2) more flexible movements, 3) can do some macro/product photography, 4) more compact system when carrying some longer lenses. 5) if you do use ground glass it can be more efficient to use than some pancake cameras.
The Techno case gets a lot stronger if you often use lenses from 50mm and up (field of view corresponding to about 35mm and up in 135 full-frame terms). Then there are rarely issues with ground glass dimness, and pancake camera lens mounts gets rather unattractive in that range, because they get big and bulky (noticed if hiking with the gear) and finally the high mount cost is more noticed since longer lenses are cheaper. Wide angles are also significantly cheaper for the Techno due to the lower cost lens boards, but since wide-angles lenses are generally more expensive the percentual difference is smaller.
There is an additional factor if you use tilt frequently. It's typically rarely used in wide-angle architecture photography (thus it is common that pancake cameras lack tilt alltogether), but quite a lot in landscape photography, and even more in macro. For this I find ground glass really useful. While you can do a lot with tables (and nowadays apps) and you can generally equip a pancake camera with ground-glass and sliding back, it becomes considerably less attractive to spend the extra money and get the extra bulk of the helical mounts if tilt is often used. It should also be noted that pancake cameras often have various limitations related to tilt, such as small range, only in one direction, not for all lenses, a special very high lens mount cost etc.
The Techno's long range and flexible movements makes it usable for macro, some pancake cameras can be used for that as well but usually requiring some extra component and being less flexible. It should be noted though that the max tilt/swing movements is a bit limited also on the Techno to be a really good macro camera. Due to this I suggest using the shorter macro lenses rather than the longer which makes tilt/swings less limiting, but you still won't get as good macro capability as a studio-based view camera which has large tilts and swings on both front and back standard.
Some normal lenses work quite well at fairly close distances without being macro lenses, and since the focusing is not limited by a helical focuser the Techno allows you to push the near limit of the lens to your liking.
Some pancake cameras don't even have mounts for the longest lenses, and those that do have are of course rather big and bulky. If you hike with the camera and like to have longer lenses in your pack like I do you will like the lens board mount. One needs to make up for the sliding back of course (which you generally don't have if you use a pancake camera), but due to it's flat it's quite easy to pack.
The Techno is designed to be focused on the ground glass, and with the new bright ground glass available it has probably the best glass on the market (note: not tested!). Pancake cameras may not have as good ground glass or have a superfine multiturn focusing ring (Arca-Swiss Rm3di) which makes it more difficult to use for manual focus-peaking.
So if you ask me a pancake camera is a perfect fit for the indoor architecture photographer, and a digital view camera like the Techno for the landscape photographer that in addition to a wide or two likes normal to long lenses and frequently uses tilts. I also think it's a great camera for amateurs due to the lower lens costs and its flexibility to do many types of technical photography.
Today there are CMOS backs with excellent live view, and while wide angle compatibility is not that good it will hopefully be better in the future. This means that sliding backs and ground glass focusing will no longer be needed and I think this will mean that the popularity of view cameras will increase, and we've already seen it with the new models Arca-Swiss F-Universalis and Cambo Actus. In this review I focus on the use with ground glass as that is how I use the system myself, and CCD backs will still be around for many years especially in the second hand market.
The uncertain future
The first revision of this review was written and published in 2012. This section, the uncertain future was added in 2016. I have updated it slightly in 2019 thanks to some very needed technological breakthrough on the sensor side.
If you bought a large format camera system in 1975 you could still be using the same gear 30 years later in 2005 and produce the highest end image quality. Digital medium format still runs with the idea that the gear has a very long life span, and indeed there are many digital backs produced 2005 or even earlier that are still used today.
However, there are undeniably quickly moving trends affecting the technical camera genre. The key aspect is sensor technology which for each new generation seems to work less well with traditional technical camera lens designs. In 2016 a 645 full-frame CMOS was introduced with Phase One's IQ3 100MP, and indeed like the previous smaller CMOS sensor it doesn't behave well with the wide angle technical camera lenses. In late 2018 this negative sensor trend was at last broken, Phase One's IQ4 150MP uses Sony's new 150 megapixel CMOS sensor with BSI technology, and early reports suggests that it behaves even better than CCD sensors did concerning wide angle lenses with movements. This is great news. Worse is that the smaller more affordable sensor size 44x33mm is no longer used in digital backs, so if you want modern great technical camera performance you need to go for the highest end.
Copal shutters are no longer produced new, Schneider has ceased their large format and digital technical camera lens production. Rodenstock is still left though. Things looked plenty dark with the wide angle CMOS crosstalk issue even on these lenses, but now with BSI technology finally appearing the outlook is better, finally a modern sensor that actually is compatible. It should be said that BSI was not made specifically for improving technical camera performance, it's just a happy side effect on an overall more efficient sensor.
Many seem to believe that the future of technical cameras is cameras similar to Alpa's FPS, a focal plane shutter camera which can use standard SLR lenses. Instead of camera movements you use (strong) retrofocus ultra-wides and crop and use keystone correction in post-processing. Tilt may be to some extent be replaced by automatic focus stacking, already available in SLRs like Phase One's XF. With increasing similarities in behavior and performance between the normal SLR range of Hasselblad and Phase One technical cameras may lose much of their current relevance.
The Linhof Techno is in a way, a dinosaur, and Linhof as a company seems to be among the least prepared to tackle the changing future. Unlike Cambo, Alpa and Arca-Swiss they don't have any focal plane shutter unit or other supporting electronics. Linhof can probably survive on their traditional analog cameras alone, but I'm less certain that they will have up-to-date solutions for digital photography say 5-10 years from now.
This may all sound very negative, but note that camera systems continue to live more that a decade after the production has ended, just look at Contax, so I don't think one really should worry. Get the system that suits you today, but be aware that the long-term investments of the analog era is over. A techincal camera system that is popular today may quickly lose its popularity as some other solution rises to the top, not necessarily in terms of quality but in terms of a quality/convenience combination that suits the majority of users better.
The Linhof Techno is a drop in replacement for an analog large format field view camera. You work in the exact same way, use the same type of lenses, compose the picture with movements in the same way. The camera is completely mechanical, and the digital back just needs to capture what the lens projects. It's a "pure" traditional experience of photography which future high tech cameras is likely moving away from. I don't know if this genre of camera will exist in 10 years (other than in the second hand market), so this may be the last chance. Personally, I'm glad I've taken that chance.
A note on "silent upgrades"
The Linhof Techno was first released in 2008. Since technical cameras are purely mechanical the models can exist for many years without any major changes. However the Techno has undergone a few minor changes since release. These improvements are made without any announcements so I as a reviewer cannot really have full insight into what has been changed over the years.
The reviewed camera which I got second hand was (probably) manufactured in 2010, and I know that there was at least one version before it and exists one version after it (the current).
Changes I know about from the first version (2008) to the reviewed version (2010) are:
- Safer lock of (sliding) back (the first version could be detached by mistake).
- More dents on the focusing rail extension so it can be extended partly rather than only in full.
- Swing zero lock switch moved from right to left side.
- Lighter green color on the bubble levels.
Changes (which I know about) from the reviewed version (2010) to the current version (2012) are:
- More elegant clip-lock to attach (sliding) back.
- Clip lock to fasten lens boards, which press them more tightly (there is some minimal play in the reviewed system).
- Etched swing scale which had poor alignment has been replaced with sticker that is aligned after the camera has been screwed together.
- The cold shoe has been moved from right to left side of the front standard (which makes it possible to use Linhof's own quick-attach cable relase system).
These changes will be discussed further in the review.
So, if you buy a current Techno or an older one you should be aware of that some details may differ from my reviewed system. For example if I complain on something here it may have been corrected to the currently available version.
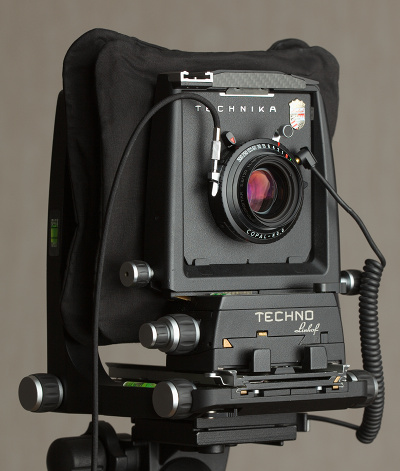
The look
Camera with sliding back attached.
The modern digital look à la Linhof: carbon instead of leather.
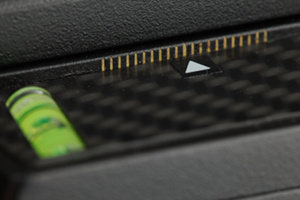
Lens shift scale has its own color scheme and the arrow is a simple sticker.
I think the Linhof Techno is a beautiful camera. Almost everything you see on the camera is metal, the L-shaped body is milled out of a block of aluminium and the fine-mechanical gearing are made from brass.
One can clearly see that it's a Linhof camera, and I like that look. One aspect was a bit harder for me to accept though - the faux carbon ornaments, or actually real carbon I've been told but it doesn't matter in this context it looks the same. I associate faux carbon with something cheap rather than exclusive. I think I know what the Linhof designers aimed for though, their classic film cameras have surfaces covered with leather and they wanted a modern look on the digital Techno, and in that sense the carbon is quite logical, so I think I'm starting to like it, or at least accept it.
I'm also glad that they do not try to be too exclusive, like Arca-Swiss with their calf skin bellows, but focus on function and use synthetic materials. Speaking about bellows, the wide angle bellows for the Techno actually has a bellows-like shape rather than the typical shapeless bag. This is a plus for the look since one will probably use it on the camera most of the time (works up to 120mm) rather than the long bellows.
While being a beautiful camera there are couple of things that I would not expect from a camera in this price range. The horisontal lens shift mm-scale has a brass coloring, while all other markings are gray, and the arrow pointing on that scale is a just a small sticker pasted to the carbon surface. I would have expected high quality etched markings with consistent style and color. On the latest version of the camera the swing scale is also a sticker, due to they had alignment issues with the etched scale (more on that when we talk about precision).
When the sliding back (also all metal) is attached the camera is no longer as small and compact, but I think it looks quite fine still, as the back does not look as large as it may seem before attaching it.
The camera really is quite small, on the images it may look a bit large as it looks similar to a traditional large format film camera, but it's a 6x9 camera and the size of the main body is only 12x16x20 cm.
The precision
It's often stated that digital cameras require higher precision than the old film cameras. This is true and there are a few reasons for this. One is the smaller sensor sizes which leads to larger apertures and shorter depth of focus (proper alignment of sensor plane more important). Another is that the shorter focal lengths require smaller and thus more precise tilt and swing angles, it's also more important that when tilt and swing are set to zero they really are zero. Perhaps the most important reason is however that we today simply expect higher technical quality than we did back in the film days. It's much easier to fully zoomed-in inspect image quality today than it was with film.
It's a myth though that shorter focal lengths change focus wheel precision requirement since it a zero-sum game with depth of field, but in general we expect better focus precision today than in the film days.
High precision is achieved through 1) design and 2) precise manufacturing. In design one tries to reduce the elements that make it hard to achieve high precision. In the view camera genre this is manifested through more rigid constructions with fewer movements in shorter ranges. Most/all movements are typically also operated with self-locking gears, while film view cameras could have quite many of the movements ungeared.
The most important aspects of precision in a view camera are:
- Smooth focus wheel with no play to be able to do very fine focus adjustments.
- No accidental tilts/swings, when at the zero dents there should be perfect alignment and no play.
- No focus shift, ground glass and sensor should be at exact same distance.
- No creep of focus or tilt/swings etc after a position has been set.
Reduced movements to gain precision
The Linhof Techno is probably the most precise camera in its class (digital view camera for field use). I dare to say this based on gathered user comments on the internet and analysis of the design compared to the competition. It has a more compact design and rigid body compared to similar offers.
Often reported problems with digital view cameras is poor ground glass alignment (focus shift) and rigidity issues typically leading to accidental tilts/swings.
To gain precision and rigidity without getting a crazy weight of the system the solution is to remove some of the traditional view camera movements. In the Techno this is manifested through that there is no tilt/swing of the rear standard, and the sensor can only be shifted vertically, not horizontally (except on the sliding back). The available movements are discussed in a separate section.
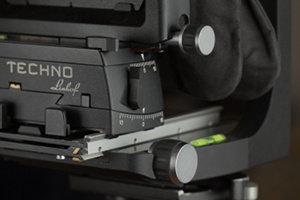
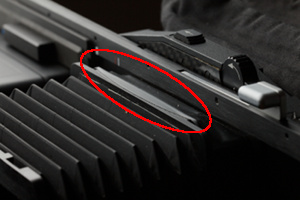
Front standard fastening
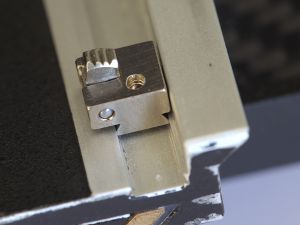
Pinch-lock for coarse position adjustment of the front standard on the focusing rail.
The weakest point in the Techno design is the front standard fastening. The front standard can be loosened with a pinch-lock to make quick adjustments on the rail. The pinch-lock is a spring-loaded dove-tail mechanism, so if just the pressure is large enough the front standard will be forced into parallelism (assuming high precision machined parts).
However, spring-loading is not strong enough to be 100% fool-proof, and it would not be reasonable to have such strong springs. This means that if you move the front standard using the pinch lock it may after release be put in a non-parallel position (about 0.6 degree swing in worst case), but it's easy to pull into position, and once there it seems to sit safely. To pull it into position you need to force out the pinch-lock levers (ie the opposite of pinching) and press the standard along the rail to feel that it's secure.
Although inelegant and easy to do mistakes for a new user I don't see this as a big problem once you know about it. I would however prefer a fool-proof mechanism with a screw instead of pinch-lock as you then could put more pressure and safely force into position, and compared to the extra operation you need to do to secure the pinch-lock it wouldn't be more cumbersome to use either. Another alternative would be to have two fixed clickstop positions with exact parallel stoppers, one in the front and one in the back of the rail.
Infinity stop mounted in the rail. The jagged part can be flipped down so the standard can pass the stop. Note the poor fit, it's not representative for the rest of the build, but does show that Linhof does not bring quality to all details. (The photo was shot after a year of field use so the paint loss on the front of the rail is normal wear)
Actually some buy two pairs of infinity stops and rather than using those the traditional way (as infinity stop for a lens) they have a rear position for short lenses and a front position for long lenses and thus can use these as stops to secure a parallel position of the front standard. I don't think this is strictly necessary but if you want the best safety this is a good method, and in fact I think some Linhof dealers recommend this configuration. If you are really "paranoid" you can also check the parallelism using a product like Zig Align.
After a year using the Techno I actually bought myself two pairs of infinity stops to put in this configuration, and after this first year of use I still claim that it's not strictly necessary but I have had a few images wasted because of non-parallel fastening. Even if you know about it you can do mistakes in a stressed situation so now I too strongly recommend this infinity stop configuration. I also think that Linhof really need to change the fastening design, it's not really acceptable to have it like this in a product at this level.
While at it a few words about the infinity stops. These are small metal pieces 5.5mm across with a tiny jagged lever which you flip up to create the stop. The are fastened in the rail by screwing down a tiny 0.8mm screw so you get a dove-tail pressure. I'm very disappointed with these. As all accessories they have a high price, but here it's combined with low qualily and poor fit. The tiny screw very easily break so don't fasten to hard. The poor fit make the stops twist and turn in the rail so it's extremely difficult to get them down in the sub tenth mm precision you need. The shape of the lever don't seem to be perfectly uniform. The pointy screw makes a mark in the rail so once you've fastened it in one position it's extremely difficult to make micro-adjustments as it will pop into the old mark.
They are asymmetric so be sure to get a matching pair, I got one matching and one mismatching pair when I ordered. It still works of course so I did not send it back, but it became even more complicated to fasten as the fastening screw got hidden under the front standard. That they are asymmetric means that if you actually use them as infinity stops you can get as close as 2mm separation between two stops by mounting a pair back to front, the third would have to be 5.5mm away of course though. It's complicated to fasten them the "wrong" direction though as said, due to the fastening screw getting hidden under the front standard.
I expected a much better fit in the rail, and a fastening mechanism that did not leave marks. If it would be possible to have a fineadjustment screw to move them with micron resolution it would be a welcome functional improvement, with the current design precise placement is difficult.
If I would re-fasten the inifinity stops I would fill the gap under the stop with shim tape, I strongly recommend to do that. That way you get a tigther fit with less twisting and avoid marks in the rail.
Focusing rail extension
Maximum focusing rail extension: front standard put at the end of the rail, the extra focusing rail segment is extended fully and the geared base segment is at the farthest position.
The geared range of the focusing rail is 76mm, and then the focusing rail can be extended manually with a further 76mm using the extra section. The front-standard movement range with the pinch-lock is 84mm, so in total we have a range up to about 250mm. Without using the rail extension we get up to about 170mm. I was a little worried that extending the rail would make it unstable, causing accidental tilts. I see no such problems. The mechanism is very tight, and it should also be noted that if there is less parallelism with maximum length of the rail it matters less since then also the focal lengths are longer.
Wide angle bellows up to 120mm and the focusing rail geared range and sectioning I think are very well chosen. After having using it in the field for a while I have got the sense that these lengths minimizes the need to change bellows and make rail length adjustments for the typical use. However, if your only two lenses would be a 23mm and a 210mm you would have to reconfigure quite often, but I don't see that as a likely use case.
In the original review text I said that changing bellows is easy. After a couple of years use I'd like to rephrase: the bellows fastening mechanism is ok, but it's a little bit cumbersome (especially in low light, as all parts of the camera is black it's hard to see what you do) and it's possible to incorrectly fasten the bellows so you get a light leak. Digital backs can produce strange results with light leaks, because it disturbs the readout. This means that the image may not look like it would with a film back, but rather like the back has had some electronic failure. So if something strange happens make sure the bellows is fastened correctly and is not damaged.
Note that with long and relatively heavy lenses which require rail extension (like the Schneider Digitar 180mm), the Techno becomes noticeably sensitive to vibration. Longer lenses due to their narrower field of view inherently becomes more vibration sensitive so they require excellent tripod and tripod head too. With the 180 I have noticed that I need to be careful when releasing the shutter, not push sudden and hard all the way to the bottom, but smoothly squeeze just until the shutter releases. So if you experience poor sharpness with a long lens make sure it's not due to vibration (or atmospheric distortion if focusing at something distant).
On the long end I have tested the Schneider 120mm and the substantially more heavy 180mm lens. There are no vibration issues with the 120, but you need to be careful with the 180 as said. I have not tested the 150 but it looks a lot lighter than the 180 and requires less extension so I think it will not have any vibration issues either. While an even more stable rail would not hurt with the 180 and 210mm lenses, I'm pleased with the stability vs compactness/lightness tradeoff. With top hat lens boards it's possible to mount analog lenses of even longer focal lengths than available in the digital lineups, but that's probably not a good idea due to the limitations of the focusing rail stability.
Lens board fastening
The Techno uses metal lens boards with the traditional Linhof Technika look. At the contact points there is no coating on the metal and it has obviously been machined with high precision. However these are completely flat, there is no dove tail type of locking as with the back adapter plates so there is no mechanism to press the lens board tightly against the front standard. This means that when you tap your finger on the mounted lens board you notice some play. I think this is a design mistake, systems being tight and without play is one of the main aspects of quality that potential customers look at. Obviously Linhof thought that too because this design has changed to the current version, where the fastening mechanism have changed so the lens boards are pressed tight.
Does the design in this older revision lead to any problems in practice? No. The lens will naturally rest in its place and will not move around when you work with the camera. I would estimate the play to be 1/20th of a mm which would lead to less than 0.03 degree tilt error in the worst case.
Sliding back precision
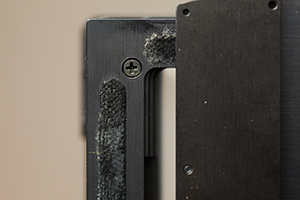
Macro shot of the sliding back in an extreme position exposing the textile strips which provide the sliding surface.
The sliding back is a tremendous precision challenge. To avoid focus shift it must be tight, but at the same time it must slide smoothly.
As discussed and tested later in this review there is no detectable focus shift so the manufacturing precision seems to be very good. It provides a play-free suitable tight slide. It's hard and costly to make these high precision sliding backs, but with ground-glass focusing there is no real alternative.
The sliding part and fixed part is (on one side) not pressed against eachother with the naked metal surfaces. Instead there are some sort of strips of textile material. These are not glued directly on the flat surface, but shallow trenches have been milled into the sliding part and there the textile strips are glued, resulting in a thin precise sliding surface. On the other side of the slide it's metal against metal though, but since it's only a narrow part of the edge touching it does not lead to it becoming overly tight.
Many worry about precision in sliding backs, but I think the design Linhof has made is about as good as it can get and I have no worries. Since one side is metal against metal and the textile side provides pressure against that surface the precision is as good as the precision of the metal parts.
The only other brand of sliding backs I've analyzed is the Kapture Group, which you can get for the Linhof Techno if you want. It has worse precision though, as it doesn't have any metal against metal but instead plastic glide strips on both sides causing a 0.05mm play or so. As manual focusing precision on the ground glass is limited anyway you are likely to not suffer from this play, at least if shooting at f/16, but still I would not recommend Kapture Group over Linhof's "play-free" sliding back. Silvestri is another third-party option, I haven't seen that so I don't have any opinion about it.
Spirit levels
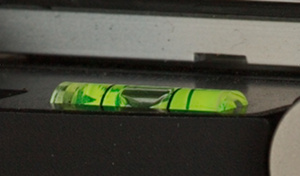
Spirit level on the right side.
The Techno has five spirit levels integrated into the body, one for base roll (keeping horizon level), two for base tilt (one on each side) and one vertical on the back standard, and one horizontal on the front standard below the lens.
The most used are those for keeping the base level of course, and these are large, easy to read and precise. You can fully trust them to get a level horizon. If you are used to DSLRs you know how hard it's to get a spirit level with satisfactory precision, so these feel like luxury. Recent DSLRs and digital backs have electronic levels though accessible through the screen, but I prefer having large visible precise spirit levels.
The small spirit level on the front standard can be used to tilt the lens to a level poisition when you have tilted the whole camera base to indirectly achieve "back tilt". It's a bit small though so I would not expect the same precision as for the large spirit levels (it's not necessary either).
The vertical spirit level on the back standard is used when you want to point the camera perpendicular to the ground, for some types of repro photography for example.
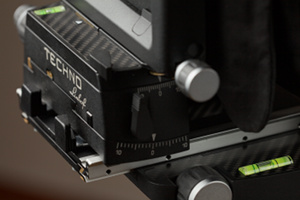
Precision errors
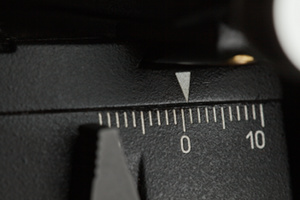
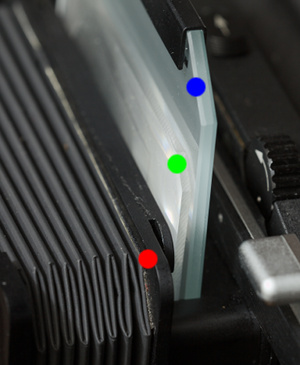
Swing scale alignment error: despite the swing being at the zero dent the scale shows 0.7 degrees. This has been fixed in later revisions of the camera by applying the scale after front standard calibration, unfortunately with a sticker so the finish is not as beautiful as this etched scale.
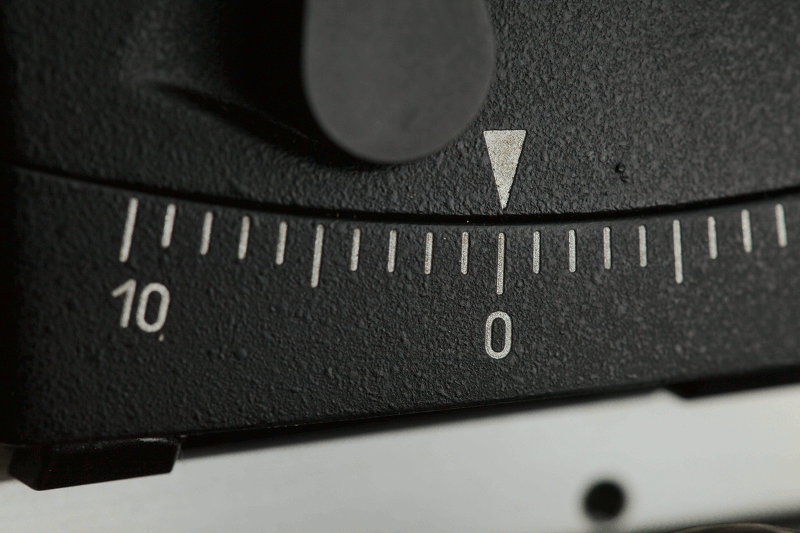
Tilt play with zero stop engaged, animation showing the endpoints of the play (about 0.09 degrees).
With a good design as basis for high precision one still have to manufacture it with high precision to get a precise product in the end. I don't have insight into how Linhof or any other tech camera manufacturers make their products but I do know that there are some problems. Not all copies fulfill the precision requirements one as a demanding tech camera customer may have.
I have heard issues reported for cameras coming from Linhof, Arca-Swiss and even Alpa, but the frequency of these issues are impossible to know. My feeling though is that it does occur a little bit too often concerning the price level. If you are a picky customer you should go through the camera and make sure everything seems okay, no play, proper alignment etc. If you discover an error contact your dealer or the manufacturer to get it corrected. A nice thing about these manufacturers is that they do support their cameras and service them years after you bought them, even discontinued models if parts are still available. A camera body that have been used for several years can get some play in it so then you can send it in for service and readjustment.
As it turns out, my copy had two conspicuous precision errors:
- Swing scale was 0.7 degrees off.
- Tilt mechanism had 0.1 degrees play when locked to zero position.
The swing scale alignment issue is actually more of a design error than a manufacturing error. The front standard consists of three blocks, the base, the tilt block and the swing block stacked on top of each-other. These are aligned for perfect parallelism when screwed together, but when doing so perfect longitudinal alignment cannot be guaranteed especially for the swing block causing an ~0.3mm offset. This offset means that the pre-etched swing scale does not line up.
To the current version Linhof has "solved" this by dropping the use of an etched scale and instead have the scale on a sticker which is fastened after the front standard has been screwed together. To be honest if I was Linhof I would find this embarrassing. At this price level I think one should expect the manufacturer to be able to align an etched scale, and stickers are not worthy the overall build quality.
How Linhof could release front standards with poorly aligned swing scales in the first place is a mystery to me and does affect my view of the company. While only being a cosmetic error it's surely damaging to the brand. It sends me the message that you cannot trust that Linhof takes precision seriously and that when you buy Linhof products one need to inspect them to see where they have cheated.
The tilt zero dent play is probably due to that the dent is a little bit too large for the pin that fits into it. It's worth noting that the tilt gear, like all other gears on the camera, has no detectable play so one can actually use the gear to adjust the position within the 0.1 degree zero dent play! On my camera the best position for parallelism happens to be at the end of the play so it's easy to set and sits securely there thanks to the excellent gearing.
0.1 degrees tilt error may sound small, and indeed if you look at the typical DSLR tilt-shift lens you probably won't get better precision than that in the zero dent. However, for a 23mm lens the hinge distance would be no more than about 13 meters so under certain conditions (focus distance close to hyperfocal distance) it could have practical implications. From a high quality technical camera I think it's reasonable to expect no detectable play at the zero dent.
The swing zero dent has no detectable play and zero alignment seems correct.
I have contacted Linhof directly via email and they responded quickly and said I could send it in for readjustment. Since that will probably mean I just get a sticker for the swing scale and a fixed tilt zero dent which I currently can work around I don't think I will send it in at this time.
I hope Linhof will update the front standard in future revisions so it will get well-aligned etched scales all the way around.
Testing focus shift
A distance difference between ground glass and sensor plane is a classic precision error in view cameras. Back in the film days Linhof had a good reputation of being one of the few that did not have such problems. Is this still true with the Techno? Yes, I have tested this (the test is in the appendix) and no focus shift could be seen. Note that this is also dependent on the precision of the sensor alignment in the digital back. I am not aware of how well digital back manufacturers are at aligning their sensors, but I do know they do shim them internally.
ALPA has the unique feature of user-shimmable adapter plates so you can adjust sensor alignment if it would be off. Linhof does not have that option, but you could use metal shimming tape on the ground glass or adapter plate to make adjustments. I have never heard of anyone making this adjustment on a Linhof Techno though so I don't think it is a common problem.
There are limitations to how precise you can set the focus distance with the focusing wheel, ground glass resolution is limited and you are also working with large depth of fields which masks minor sensor alignment errors. When we go through focusing technique we will look a bit closer into this.
I would still recommend that when you get a technical camera of any brand and model that you make a focus shift test to see that everything is in order.
In practice
In the years I have used the Techno I have not discovered any practical issues concerning precision, except for front standard fastening that can cause a visible parallelism error if you are not careful. In any case, a camera with movements will always have some residual precision error but if it's sufficiently small the depth of field will mask it. Based on my field experience, by looking at the design and making some calculations on possible errors I can conclude that the Techno is certainly good enough in the precision department.
The swing scale alignment error is surely conspiciuous and I think embarrassing for Linhof, but at the same time one can see that they do understand to maximize precision where it's important. The camera is when mounted finely tuned for as good parallelism as possible, and to fulfill that goal the swing scale alignment suffers (which has no impact whatsoever on photographic precision).
I think the tradeoff of movements and flexibility vs rigidity for precision is very well made. If you for large depth of fields work at f/11 I think the Techno is excellent, but if you for some reason would in these situations want to use large apertures like f/5.6 I would recommend an even more rigid pancake camera, at the cost of less flexible movements.
There is a limit to how precise you can make a camera with movements, it's impossible to get it exactly parallel. By having no back movements the Techno has can have a smaller residual error, but still I think that by principle a camera with this flexible movements is unsuitable for tasks like focusing at flat subjects at f/5.6, or focusing at infinity at f/5.6; with a high megapixel back and pixelpeep it's likely that a residual error will be visible, ie that the left side is a little sharper than the right side or the other way around. When you focus at a 3D object or focus close so depth of field becomes short it does not really matter if there is a very slight angle to the plane of focus, and when you shoot at f/11 the depth of field is large enough to mask errors.
Looking at depth of focus we can calculate how large parallelism error that is acceptable: say if we pixelpeep on a 6µm back (P65+, IQ260 etc) and set CoC to 2× pixel size ie 12µm and shoot at f/11 then depth of focus becomes 2 × 11.31 × 12 µm = 270 µm. We don't want to be at the edge of depth of focus, so lets set tolerance to ±50 µm. We have a 54mm wide sensor and with +50µm on one side an -50µm on the other we have a max allowed parallelism error of arctan(0.1/54) = 0.1 degrees. This and likely better is acheivable with the Techno, but you need to be careful with the front standard fastening. If you use infinity stops they must be placed within 0.1mm to achieve sufficient parallelism, you can use a high quality set square as a guide.
In general I think that precision requirements in the tech camera world are often exaggerated (to some extent as a part of pancake camera marketing), often on a basis of using impractically large apertures (like f/5.6). In practical photography there is a limit to what you need since depth of field will mask minor errors. The Techno is an f/11 (and up) camera, ideal for large depth of field photography where you will need tilt and occassionally swing to optimize placement of the available depth of field.
Using the gears
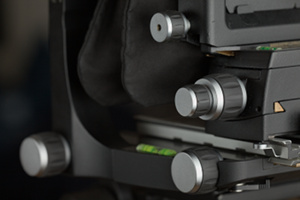
Gears on right side, clockwise: lens rise, swing (smaller knob), tilt (larger knob), focusing, back rise/fall.
Gears on left side: lens shift and focusing. The switches are zero dent locking for swing (top) and tilt (bottom), here in the locked position.
All movements are self-locking gears (excluding focusing rail section extension and front standard coarse adjustment on the rail). The focusing gearing does have a separate friction-based locking mechanism though to handle the special case with vertical orientation of the camera. In addition to locking the lens position it can also be used to apply some extra friction to the focusing wheel which I've heard some users do to make it easier to do very fine focus adjustments.
There is no detectable play in any of the gears. What usually happens with geared controls is that when you change direction you detect some small play, but not with Linhof. Immediate response even when changing direction, impressive precision.
The feel of the gears are affected by what parts of the camera they move (weight, direction of movement), so they actually feel quite different which surprised me a little. The focusing and tilt gears have the best feel, vertical back shift is also very nice. Vertical lens shift has a bit of a sloppy feel to it (a little bit too low friction), but horizontal lens shift feels solid. The swing movement has a little bit too high friction and the knob is smaller so it feels a little bit awkward (you need to pinch it hard) compared to the others (my guess is that this friction may vary a bit between copies). We need to put this in context though - if you are used to operate a DSLR tilt-shift lens this is heaven!
It's also worth noting that the most frequently used gears (at least for my shooting style) focusing, tilt and vertical shift also have the best feel. The focusing gear is absolutely excellent in precision and feel, which is critical to be able to focus precisely.
If you like me prefer to use a focusing cloth you will quite often find yourself having to operate the gears without seeing them. Here we have truly excellent design, gears are easy to find and and easy to feel which is which (the double-knob for tilt-swing is nice). When tilting and swinging one can also feel with a finger how (much) the front standard is turning. Most knobs are on the right side, only the lens horisontal shift knob and a duplication of the focusing knob is on the left. This is good design as it lets you operate the camera with one hand, while holding a viewing aid like a loupe in the other.
Maybe it would have been better to switch places of the lens vertical and horizontal gears since I would guess most users will use the horizontal more often than vertical (in the typical case all vertical shifting is made in the back), but as those are used less often I don't see it as a problem.
To be able to find the zero position with tilt and swing there is a locking lever for each. The lever works like when it's open you can change the tilt angle freely, and when you close it you can still do it but as soon as you get to the zero position it's locked there and you cannot move it until you open it up again. The same for swing.
This is more precise than the typical click-stop, the drawback is that the tactile feeling is not as great, you don't really hear or feel a click when you get into the zero position and the movement is locked, you just notice that the gear is stuck. For the swing movement which already have a bit high friction in the first place going from that to stuck has not the best tactile feedback. When used to the camera one gets to know excatly how much pressure you need to turn the swing though.
I hear some users would like to have lower gear ratio on the tilt, swing and focusing (i e more turns for a specific distance). I think that due to that there is no play in the gears it's not really necessary, but I tend to agree that they could have been a little bit slower.
To sum up, while not being 100% perfect the very fine and precise gearing is really one of the great aspects of using this camera, it's a joy to use.
The sliding back
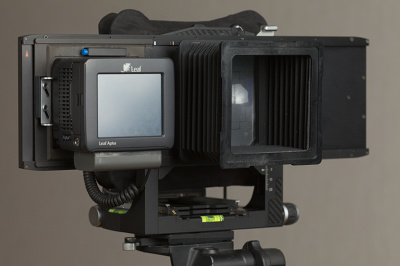
The standard full-length sliding back with the light-hood and a Leaf Aptus digital back attached.
The Techno body is delivered without back which is one quite large "hidden" cost. Either you get separate ground glass and digital back holders which you switch between when focusing and shooting, or you get a sliding back which has both digital back and ground glass holder on it and you can simply slide in what you need to use for the moment.
Those that work a lot tethered, that is have a computer attached to the digital back, with a back that has some sort of live view may choose to not use the sliding back, but for typical field use you will want it.
I know there are some users that actually detach/attach switch between ground glass and back even in field conditions, so it's not impossible but it becomes more cumbersome and there's an increased risk to get water drops and dust on the sensor (or drop the back to the ground).
If digital backs had as good live views as a modern DSLR noone would use the sliding back or ground glass, we would simply focus on the live view just as we do with DSLRs. The most recent backs do have some sort of live view but it updates very slowly and cannot handle bright or dark (=outdoor) light conditions very well so it's not a great focusing tool. Some consider it "good enough" to replace the ground glass, but I know others that still continue to use ground glass despite having the latest live view. Recent backs are quite fast to do 100% focus-checking of a shot picture and that in combination with ground glass is typically more useful than the live view.
The reason that live view is so bad is that the CCD sensor technology cannot do it well, while DSLRs use CMOS which can. The great DSLR live view function is actually a side effect of the video capability, live view is simply the video function in action. To be efficient in the field it's also required to have good ISO performance so it can work at high refresh rates in a wide range of light conditions, and the current medium format CCDs fall short in this aspect as well.
In January 2014 Phase One released the world's first CMOS back with DSLR-like live view, the IQ250. It uses a Sony sensor developed for DSLRs and later scaled up to a 44x33mm size. This means that live view came to technical cameras. The IQ250 isn't the full answer though, since all current CMOS sensors have very poor angular response meaning you cannot use shorter than 40-50mm focal lengths with movements. It's not easy to make a CMOS sensor with wide angular response and it's only technical cameras that need it, which meant that it was not certain that we would ever see it. In January 2016 Phase One released the 100 megapixel 645 full-frame CMOS back IQ3 100MP, which unfortunately had the same angular response issues as the older IQ250. Finally in late 2018 the trend was broken with IQ4 150MP which uses Sony's new 150 megapixel sensor with BSI (backside illumination) technology which improved the angular response to a level that in preliminary tests seems to be better than even most CCD backs despite the small sensels. If you can afford this back you have real live view and no problems with wide angle movements, so in this case you will not need a sliding back.
With a pancake camera you have a viewfinder for framing and focus using the distance scale so then you typically don't use the ground glass, while we must use it on the view camera.
Having to use a sliding back and ground glass is not popular among many, in fact so impopular that some choose a pancake camera for this sole reason. Working with the ground glass is discussed separately, here we shall look closer at the sliding back. What usually is impopular with a sliding back is that it's large and heavy, makes the camera much larger (and uglier) on the tripod and more difficult to pack. Many don't trust its precision either (focus shift), but that is no problem with the Techno.
I have the standard Linhof sliding back which is 40 cm wide. The reason it sticks out to the right is that when you shift in the back the ground glass is still protected (from rain for example). Had I bought new today I'd probably choose the short one (30 cm wide) though. The short one does not have the same weight balance and no ground glass protection but is a bit lighter and easier to pack.
Precision-wise the sliding back does what it should, and the feel of sliding is very good, a suitable amount of friction. I have often heard about focus shift problems from other manufacturers so that it actually does not have this problem is something that should be appreciated, and I certainly do.
Otherwise I'm a little bit disappointed, while the camera body is a great design the sliding back leaves a lot to be desired. Note that I look here at a version from 2010, the current version may have some improvements (I have seen the current body, but not the current sliding back).
Digital back holder
The digital back locking mechanism, a simple friction lock. This has been updated in later revisions of the sliding back.
First lets look at how we attach the digital back. The back is first attached to an adapter plate, and the plate is then mounted on the sliding back. The adapter plates has dove tail type of sloping all away around so it can be pressed very tightly against the back (necessary to achieve the required precision that avoids focus shift). This mechanism works very well, but the locking mechanism is a simple friction lock, there is no way to make it secure. Fortunately it's very close to the back itself so it's extremely unlikely that you would accidentally release it, but still it's puzzling how Linhof would think that it's ok to attach a digital back that may cost 20,000 euro with this mechanism.
The other aspect is back rotation. You cannot do it. To change between portrait and landscape you have to detach the back and re-insert it in the new position.
For me the simplistic "locking" mechanism and having to detach/reattach for changing orientation are not any problems. It feels secure enough to me, and I can switch orientation tightly and I work rarely in environments where dust is a problem. However I see over and over again users that find poor locking mechanisms and non-rotating backs as show stoppers. Linhof will lose business on this.
One problem with rotating back mounts is however that it's hard to make so precise that we can guarantee parallelism and no focus shift, and it would make the the sliding back larger and heavier. Therefore I actually prefer detach/reattach but I think most users do not.
Update 2014-01: I've noted from photos that more recent versions of the sliding back has an updated locking mechanism. I don't know when this change was introduced and I have not used it in person, but it does look nicer and seems to have a safelock button, so it should feel more safe than the older version I have. There's still no possibility to rotate the back without detaching it though, and I would not expect that to be introduced as it would increase the flange distance.
Ground glass holder
Lighthood (red), fresnel (green) and ground glass (blue) about to be inserted into the three slots of the ground glass holder.
I have covered up the ground glass holder light leaks with black electrical tape.
Then we have the ground glass holder (which is the same as on the separate ground glass back). To me the design is a mystery. Let's go through it. It has three slots, the innermost for the ground glass, the next for a fresnel lens (to brighten the image) and the last slot to attach a viewing aid, such as a flexible lighthood.
One idea of having a separate fresnel in its own slot is that if you shift the lens you can manually shift the fresnel so it matches the center of the lens and you get a brighter image. I've tried this, the effect is close to negligible, so I never move my fresnel.
Another feature could be to have a couple of different fresnels, one for wide angle lenses and one for longer lenses, to make the wides brighter. My guess is that if so one would only keep the wide in (because it will work good enough for the much brighter long lenses), and Linhof only provides one fresnel.
So in the current configuration I simply don't see any purpose of a separate fresnel, I would rather have a ground glass with integrated fresnel like the praised Maxwell Precision Optics ground glass (and indeed Linhof's own new bright ground glass).
A problem with the fresnel in its own slot is that it adds up quite a lot of distance (about 4mm) from the matte surface. This means that it is very likely that a focusing loupe cannot focus on it. I had to modify mine (shorten the base)! Linhof does not sell any focusing loupes themselves so I don't really know what they were thinking.
But then to a more obvious flaw - the slots are fully open from above and below, so stray light comes in there and severly degrades the ground glass image, especially when using the fresnel lens. This is very easily fixed though with black electrical tape which I have done on my sliding back. Light tight is a must out in the field, again I cannot understand what they were thinking.
My guess is that this was originally designed as a studio product (it is the same back as for the M679cs studio camera) where you have controlled lighting and light leaks would be less of a problem. The Techno is a field camera though, and Linhof should design its accessories to match those conditions.
Viewing aids
Linhof's magnifier lid attached to the light-hood.
To the last slot you can attach a viewing aid. What you will like there is a very personal choice. The alternatives are the self-supporting light-hood to which you can attach a magnifier (low magnification), the bag-like flexible bellows magnifier (also low magnification), and via adapters one can attach an Arca-Swiss bino viewer or an Hasselblad finder.
I have the light-hood and the magnifier. Again I'm a bit surprised by the design which I don't think is any good. I like the self-supporting light-hood, but not the magnifier. It's all metal, therefore heavy, it's very expensive and has light leaks around the rim. A much better solution would be a simple plastic lid. I also think the loupe could be more comfortable and tighter around the eye. The same type of weakness can be seen among other technical camera manufacturers - they are experts at machining high precision metal gear, so every single accessory gets the same treatment even when metal is not the best option from a design perspective.
Those low magnification magnifiers is not good for critical focusing, you use them for composition and then remove them and make the final critical focusing with a high magnification loupe.
The advantage is that you do not need a focusing cloth, and get a little bit of magnification when composing, and the disadvantage is that you have to remove it for critical focusing. As said, the low magnification loupes are the only alternatives Linhof provides, and I do know users that actually use these for critical focusing too, but to succeed with that you need to have some kind of super-human eyes. I get the sense that Linhof actually thinks that these loupes are good enough for critical focusing, or don't care since so many use tethered mode in the studio. I think their main product is the M679cs studio camera and therefore have not really yet fully understood the needs in field conditions.
In any case I think it's a big mistake by Linhof not putting maximum effort into the ground glass solution. Since my first revision of the review the new bright screen has been released and with that it has become considerably better, brighter ground glass and integrated fresnel. I'd like to see less glare from it though (actually more glare in that than from the standard fresnel), and while significantly better in terms of light leaks it's still not completely free from it. And there's still no tuned loupes provided as accessory. I think the digital view camera genre lose customers to pancake cameras due to these aspects.
Personally I don't use the Linhof magnifier at all, I just use the lighthood, and a focusing cloth for wide angles and/or poor light conditions. I think this works very well. I never remove the lighthood (and I would have to remove my strip of electrical tape around the slots to do so) because there is no need, it folds in well enough when doing critical focusing with a loupe. For the longer lenses (say about 70 mm or more) a focusing cloth is rarely needed, shading from the lighthood is enough (glare can be a problem though). The self-supporting aspect of it's very useful, just pull it out to suitable length, perhaps make one side a little longer if there is light coming from the side and it stays there so both your hands are free. It has a very nice feel to it.
Using an ordinary black t-shirt as focusing cloth. The neck fits nice and tight over the light-hood.
As a focusing cloth I actually use a small black cotton t-shirt(!). The t-shirt neck fits perfectly over the lighthood which supports it and avoids it from falling off. If I would have to get my hands in there I can put them in through the t-shirt sleeves. Hands are not really needed though since you can do critical focusing without it, the loupe base shades enough. In bright daylight I use it in the same way over my old Leaf Aptus digital back when I need to look at the screen (which is poor in daylight), and then I have use of the sleeves since it's a touch screen.
Linhof sells a traditional focusing cloth. I have not tried it but I can say that having just a large blanket will not be as good. There would be better materials and fine-tunings to do to my t-shirt solution, but it works very well so I have stopped searching for "the ultimate" focusing cloth. It's small so it can hang on the lighthood, and if there is some wind it works fine anyway, and it shades all the way around, no stray light from below. In strong wind it does become problematic though, in those cases the magnifier lid is better.
When you like me is not using the magnifier when composing you indeed have no magnification but you can look at the ground glass with both eyes (helps you see better!), and you don't need to adapt your head position in the same way as when looking into a magnifier which means that it's more comfortable, especially if the camera is mounted at a less-than-ideal height. I think the comfort aspect is the main advantage.
Which viewing aid solution that will work best for you will depend on your eyesight and if you have glasses, and if so how obstructive those are. I wear glasses which usually make loupes and magnifiers a bit more cumbersome to use. My glasses are quite small though so when I look into a loupe I look past them directly into the loupe, not through the glasses. I have an average nearsightedness vision problem, which in this case actually is an advantage. When I look at the ground glass I often find myself looking over my glasses because then I can look even more closely. It does work well looking through the glasses too though, so it's certainly not a requirement to be nearsighted. If you instead are farsighted you will have to use glasses, a pair of reading glasses is probably a good idea, perhaps stronger than you normally use.
Loupes
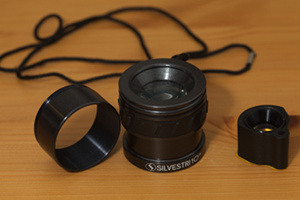
My loupes: a Silvestri 10x loupe with the base removed (base on the side for demonstration), and a Belomo 20x jewelry loupe with cover removed and a thin base added (tape).
Be sure to check out the new 12x Silvestri introduced in 2013 too.
Concerning loupes for critical focusing you need to find third party products, as Linhof does not provide any. Traditional focusing loupes for large format cameras have 4x - 6x magnification. Still today many claim that "it's all you need" and higher magnification just makes you see the ground glass grain, no more detail. This is wrong, very wrong.
For a digital view camera to work well you must have a high magnification loupe, or else precise focusing is impossible. To my big surprise I see that the typical choice people make for the Techno is a 6x or a 10x loupe. It does explain some of the criticism about view cameras being impossible to focus precisely. Those that sell the Techno did not sell stronger loupes than 10x either, but now in 2013 the new 12x Silvestri loupe appeared (made for the British dealer "Linhof and Studio"), which is a great upgrade from the 10x (which is actually more like a 6x).
It's however also a bit eyesight and skill dependent. With very good eyes and high skill you can probably do quite well with a 10x loupe, but it's surely not easy.
I use a 10x Silvestri loupe and a 20x Belomo jewelry loupe (Update 2016: today the 12x Silvestri has replaced the 10x, but the 20x is still my main loupe).
Beware of the cheapest jewelry loupes since the magnification may not be as specified (I first got a 30x jewelry which actually had lower magnification than the 10x Silvestri). In most cases I only use the 20x. However when I need to tilt the loupe to look into an edge I use the Silvestri. In addition it may in low contrast scenes be easier to focus with the larger field of view the 10x provides.
As discussed previously the fresnel adds too much distance so loupes don't get to focus on the matte surface. With the Silvestry loupe I have simply unscrewed the base, and by luck the loupe's lengthening function forms a new base of perfect length, with the additional feature that you can easily retract the base to shorten the loupe when you need to tilt it.
Jewelry loupes don't have a base but I added one to my 20x, it only required 1mm with the fresnel space there so I made the new base simply with a few layers of tape. High magnification loupes have the disadvantage that they are very short so you get very close to the ground glass, therefore you can only focus effectively in the center area with them (to fit your face in there). I'm considering trying a 20x - 25x pen microscope at some point which may provide better ergonomics (the Peak Pen Microscope 2056-25 may be worth looking into).
When I changed to the new bright ground glass in 2013 I had to lengthen the loupe bases as the separate fresnel was removed (it's integrated in the new bright ground glass). Taking your time and putting effort in precisely tuning the loupe distance is worthwhile; a 20x depth of field is very short. For my 20x I noted that the best use was to have the base say very slightly lower than ideal, still within the DoF, but when you slightly tilt it up and down for peaking you could get some tiny extra contrast. I get the sense that the slight back-and-forth loupe peaking (similar to focus-peaking) makes it easier to really see how sharp the picture is. I think it could be due to field curvature in the loupe. Do experiment with the loupe you choose, it's worth it.
Using the ground glass
Ground-glass viewing using a 120mm/5.6 lens is bright even in weak indoor lighting conditions. Note that the viewing area is considerably larger than the sensor coverage (portrait and landscape orientation shown with the black lines on the glass)
The picture shows the whole ground-glass as it looks when a wide angle 35mm/5.6 non-retrofocus lens is mounted in the same weak indoor light conditions as the 120mm example above. Dim and very strong light falloff despite fresnel lens. To see into the corners one must look in the direction of the incoming light rays. Note that if your computer screen is dark it may look worse than it is! It should be just about possible to read the "53.9x40.4mm" text at the bottom.

The exact same setting 35mm/5.6 as above, but viewing from the side to see into the corner. With wide-angles and poor light conditions you cannot see the whole image at once.
The ground glass is simply a piece of glass with a matte surface on it which is placed exactly at the film/sensor plane. When light from the lens hits the ground glass it will be diffused and form an image visible to the photographer which uses it for composition and focusing.
If you haven't used a view camera before the first ground glass experience can actually be a bit disappointing as one may come to it with high expectations. I had myself a rather romantic view of it. As a DSLR user one may think that it would be like a DSLR viewfinder, just much larger and therefore really nice to work with, sort of a live view but the real thing. In good conditions this is true. But conditions will not always be good.
Here's some basic ground glass properties:
- Since there's no prism or mirror the image is as formed directly on the image plane, that is upside down and mirrored left-to-right.
- If you do not have a viewfinder attachment or focusing cloth stray light will make the image dim and with poor contrast.
- Since large format lenses typically have a maximum opening of f/4 or f/5.6 they are not as bright as many DSLR lenses which darkens the ground glass image.
- Since large format wide angles are not retrofocus design or only weakly retrofocus there is large natural vignetting which makes the sides of the image dim.
- The wide angles also have a low angle of the incoming light off center which means that it becomes very dim there if not changing the position of your head to look right into the light rays, i e you cannot see the whole image at once in the worst cases.
- Medium format digital backs are only 44x33, 48x36 or 54x41mm that is considerably smaller than 4x5" or 8x10" film so while larger than a 35mm digital viewfinder it's not really the old-school grand ground glass.
Before getting used to the upside-down-mirrored orientation one may do composition mistakes like putting an object to the wrong side. In other words it takes a while to be able to visualize the composition in the final orientation. If you have a digital back with a decent LCD you can see the result and readjust of course.
If you like me compose on an unmagnified ground glass image it can for a busy scene (say a complex forest scene with lots of trees) be difficult to see what you are looking at. Even if light conditions are good so you see the whole image very sharply and you have good eyes the small size still makes visualization of the final result difficult for those scenes. If you only compose from what you see on the ground glass mistakes often happen. Therefore you also need to look beside the camera at the scene directly when composing. This is nothing new, view camera users have always done this, but if you like me are used to an excellent DSLR live view it may be a new way to work.
Then there is the dimness. Say you want to shoot a 35mm wide angle indoors a late evening in standard home lights, then you'll see the bulbs clearly but everything else will be so dark that it's almost invisible. If you instead shoot with a 90mm lens outside in daylight the image can be so bright you don't need a viewfinder or focusing cloth. And everything inbetween.
All this leads up to the fact that you cannot use the ground glass as a "live view". It's a tool to finalize composition and do critical focusing, but in many cases you need to make the major compositional work before you look at the ground glass, and when you look at the ground glass you may now and then need to take a glimpse beside the camera to identify what you actually are looking at (which because of the small size can be hard to identify on the ground glass).
While the brightness have been significantly improved with the new bright ground glass released 2012 there are still situations when it's too dim to see the whole scene at once.
Composition
Before even setting up the camera the composition is most easily visualized by placing your eyes where the camera lens should be. If you have objects nearby and it's important how they relate to eachother camera placement needs to be precise. In those cases I first mount my tripod "under my chin" to estimate the final position of the camera as good as possible.
Another popular tool to use is a small compact camera with a zoom lens, so you can take test pictures at the targeted focal lengths to find the best position. Sometimes I use a compact camera, but I use it less now when I have got a bit better at estimating the field of view. I still do better estimations if I have a camera, but like the old-school way of visualizing without the aid of technology. Visualizing images becomes a sort of meditiation which to me is one of the more important aspects of the photography experience.
After setting up the camera and you start looking at the ground glass to adjust movements you will notice that for wide angles and/or poor light conditions you cannot see the whole image at once. Only a smaller circlular area is bright enough to see. The problem is that the light rays are projected as a cone out from the lens aperture meaning that at the edges these come in at a low angle. The fresnel lens is supposed to bend this light back into the viewer's direction but it does not help enough. What you need to do in these situations is to move around your head so you look directly into the light of the area you want to investigate. If you then visualize a ray going from your eyes through the lens aperture and out through the lens it will point directly at what you are seeing on the ground glass. This is actually good in cases when it's a bit hard to see what you are looking at, just take a glimpse beside the camera in the same direction.
As a beginner or in really bad conditions it's very helpful to have a fdigital back that has a reasonably good LCD so you can see what the final result is.
The Linhof Techno has a ground glass size that supports 6x9 film (and you can indeed mount film and shoot if you want to) which means that the image surface is considerably larger than the digital sensor coverage, which is good since it makes edge-looking a bit easier (the light-hood framing the whole ground glass does not get in the way). You need to get a ground glass which has the proper sensor size marked. I have a Dalsa 48x36mm sensor which Linhof unfortunately thinks is close enough to the Kodak 49x37mm size so they have not made an exact scoring for the Dalsa. It's acceptable but I think it's a bit poor service not providing the exact scoring.
The observant reader will however notice in my photos of the ground glass that mine is made for "full-frame" 645 sensors like the IQ160, the scoring is 53.9x40.4mm, so at the time of writing I have the wrong size entirely. I will eventually get the proper size (got it July 2013), but I'm not in a hurry. I have noticed that framing the corners just roughly and making final adjustments after looking at the test shot on the LCD (which you do anyway to evaluate exposure and focus) works fine in most situations. If it weren't for that I was waiting to see if a new improved ground glass would appear (heard a rumour) I would have got the proper size long ago though, I'm not saying that proper scoring is not helpful. "Shooting in the blind" and re-adjusting if necessary after seeing LCD result is not too uncommon though, many experienced pancake camera users do that from time to time, don't even care to mount the viewfinder.
With the Techno one needs to look at the ground glass for focusing of course, but say if the camera is mounted at a difficult position where it's hard to get your head into position to look around into possibly dark corners it's generally feasible to finalize the composition by test shots, only 1-3 is usually required when one has a bit of experience.
Focusing
Ground glass with circles showing coverage (field of view) of the Silvestri 10x loupe (blue), and the Belomo 20x jewelry loupe. Note the very small field of view with the high magnification loupe, it's thus only used for critical focusing at a single point, while the 10x loupe gives a fair overview.
Actual photo of the ground glass, then cut down and vignetted to as accurately as possible simulate the view of the 20x loupe (see the picture above to see which area of the scene we are looking at). On a normal computer screen it also quite well simulates the actual detail you see in the loupe. Note that the ground glass grain structure is somewhat visible.
100% crop of the resulting photograph from a 33 megapixel digital back. The picture is unsharpened. Shot at the largest aperture (f/5.6). Note that normal working aperture is f/11 yielding a larger depth of field.

Canon 5D mark 2 live view in maximum zoom, here shown in 1-to-1, but cropped to half width to fit on page. The same framing of the scene as for the Techno was used to allow direct comparison. Ground glass does not reach the resolution of a modern DSLR live view.
Critical focusing is made with a loupe, and since it shades enough by itself you do not need to be under a focusing cloth when doing it (actually "composition cloth" would be a better name because it's in that stage it's used).
As discussed previously the largest misconception about digital view camera focusing is that you don't need more than 6x or 10x loupe. With such low magnification precise focusing is almost impossible. With very good eyes and/or high skill you may succeed anyway, but the general recommendation must be that you should use a 20x loupe. You should clearly resolve grains on the ground glass to maximize the potential of it.
With such a loupe you will see only 3-5mm circular section of the ground glass so it becomes a pure focusing tool. If you want to you can have a 6x or 10x wide angle loupe in addition if you want a wider magnified view for looking around and do coarse focusing. Personally I use almost exclusively the 20x loupe, and I would have preferred even 40x if I could find one. The thing is that the main limit of focusing precision is that it's hard to see a difference between "in focus" and "almost in focus". You may think that focusing wheel gearing would be a limiting factor, but that is not the case. The challenge is seeing. The magnification is one aspect, but a probably equally important factor is that the largest aperture is typically only f/5.6 which makes the focusing depth of field quite large, making the focus-peak softer and harder to pinpoint (due to the larger sensor area and therefore longer focal lengths f/5.6 is comparable to f/4 on a 135 DSLR in terms of depth of field).
The Techno does not have dual gearing of the focusing rail, i e there is no extra-fine tuning gear. I know some would have liked it, but since there is no detectable play in the gear it's not really necessary. The focusing rail is moved 15mm in one full turn. This means that when we are down at critical focusing we are turning with very small amounts, the fingers on the 20mm in diameter knob will move only 0.2mm for a 50um adjustment (gear ratio 1:4). Seeing the numbers it may seem like almost impossible, but the human hand is very precise, and the perfect amount of friction in the focusing gear helps maximize this. However, I think that focusing comfort would be better with a little bit lower ratio, say 1:6 or 1:8. Too low gearing is not good either because it becomes harder to focus-peak if you need to turn far to make the image go out of focus.
You need to be aware that when you are focusing you should strive to maximize your precision. If you are sloppy visible focus errors will occur, at least at the pixel-peep level. To find the best focus you do a rocking forward-backward motion to find where focus peaks. Becoming fast and safe at focusing takes a while. Before that you will be noticably slower than focusing on a DSLR live view.
Okay, so focusing is challenging, but how precise can we actually focus?
In the appendix there is a detailed test on this. The summary of that test is that you cannot focus as precise as with a modern DSLR live view, but for f/11 the precision is adequate, while dropping down to f/8 is pushing it a little. This is no big surprise for people used to traditional focusing, the somewhat extreme expectations on focusing precision has come with digital and the ability to pixel-peep. I'd say though that this is mainly an f/11 camera, if you are into shooting with shorter depth of fields you may get disappointed with accuracy. I think there are many more strong points for shooting at f/11 (discussed elsewhere in this review) so I don't really see it as a problem.
It should be noted that some type of scenes are harder to get right than others. The hardest to get right is focusing on a flat surface like a painting for repro photograhpy or a wall. The reason for this is that focusing errors are more easily detected than in a 3D scene. In a 3D scene and large depth of field it also typically not too important exactly where the plane of focus is placed - in the normal case you don't need very high focus precision which is the reason why some people continue to use a 4x or 6x loupe and is happy with that.
Tilt focusing is generally easy to get right (see how to focus a landscape scene for more information on how to focus with tilt), but there is one challenging element to it, namely fine-tuning of tilt. In this case you often end up having to look at the edge of the image with the loupe which means that if you have a wide angle we have too low angle of incoming light and it will be too dark to see.
The solution is to tilt the loupe so you look in the direction of the incoming light. A 20x loupe is so tight to the glass that it will not be possible to tilt. I therefore use a 10x loupe (with base retracted) for this task which can be tilted, but also rely on Hinge/Scheimpflug distance tables.
If a scene calls for infinity focusing you should generally not focus at the farthest object but at something closer which still sits clearly ahead of the hyperfocal distance. That way you minmize the risk of focusing "past infinity" which will cause the whole image to become blurry.
Since a view camera lacks a distance scale, you cannot really set the hyperfocal distance directly. You always need to focus at something in the scene (or use tilt). I don't find this way to work particularly limiting though. My "How to focus a landscape scene" article has more details on how to relate to the hyperfocal distance when you don't have a distance scale.
Linhof provides infinity stops for the focusing rail as an accessory. They are traditionally used to get a fixed stop-position on the rail for infinity or hyperfocal distance, but on the Techno more often simply is a parallelism guide for front standard fastening (I use them for that). If mounted in the same direction you can have infinty stops 5.5mm from eachother, if two pairs are mounted front-to-back that stop can be 2mm from eachother. Theoretically you could have stop on only one side too and them overlap but I would not recommend that, too high risk to get non-parallel front standard fastening. Anyway those 2mm should make it possible to have stops for both a 28mm and a 25mm simultaneously. Mounting infinity stops exactly at infinity is a difficult task, aiming for somewhere between hyperfocal and infinity is more realistic.
Most of the time focusing is easy, but in poor light conditions with wide angles you will have to know some tricks. One is to focus before you compose, meaning that you point the camera directly at the target you want to focus at (or other target at the same distance, pick the highest contrast feature!) so you can focus in the center of the lens where the light is strongest and coming right at you. If you use a laser distance meter you can point the laser where you want to focus and focus at that. Instead of a distance meter you can have a laser pointer. Due to scattering I've noted that it's extremely important to have an exactly tuned loupe base (focus exactly on the grain) when viewing a laser dot.
I also strongly recommend getting a digital back that has a good enough graphical user interface so you can do a 100% pixelpeep post-capture focus check. In tougher conditions the uncertainty "did I nail that?" will occur, and then it's great to be able to check. In my workflow I almost always focus-check my images regardless of conditions, even if I feel certain on focus, there could have been some vibration issue or other disturbance.
How good is the Techno ground glass?
The ground glass and fresnel lens.
Magnification of the above image showing the fresnel lens pattern. When viewing the ground glass you don't see it since the depth of field of the loupe only covers the matte surface of the ground glass, not the fresnel lines.
At the time of writing I have only experience of the Techno standard ground glass with fresnel and vintage film view cameras. I have carefully looked at other users' opinions though. From this I think it is safe to say that concerning resolution the Techno glass is likely among the better (but not best), and brightness is probably in the middle of the pack.
Linhof did have a very expensive "Acute" ground glass in their 2011 price list which should be brighter (and probably have integrated fresnel), but I have not heard any opinions about it, and it was removed to the 2012 price list so currently there is no such option. I have heard rumours that Linhof is investigating a new and improved ground glass option. I find that likely and I do hope so, because there is no reason for Linhof to have anything other than the best possible since the ground glass experience is so central of using the camera.
Update: Linhof released a new ground glass on Photokina 2012, I review it here. The short story is that resolution is same, corner brightness is 1.6-2 stop better for wide and normal lenses.
Still it's not likely that "the best" ground glass would change the experience significantly. A ground glass with f/5.6 non-retrofocus wide angle lenses will never show a bright image so it is something you will have to relate to.
So what do I think?
Prior to the Techno I had never used a view camera, I come from the DSLR world with live view, last in the form of Canon 5D mark 2. When you use DSLR live view you can visualize the final image by simply looking at the screen. When the ground glass is at its best (longer focal lengths and good light conditions) it does work for that too (although mirrored upside down), and it actually is faster to work with since you can move around freely with the loupe, no need to scroll with buttons.
When you are using wides and light conditions are poor it of course becomes drastically worse though. Then the ground glass is no longer showing you the resulting image, but is reduced to a focusing and placing-the-image-corners tool. This means that with the view camera you must become good at visualizing the image without the help of the camera, that is by looking at the scene with your eyes, imagine the framing, and then set up the camera to realize your vision. Sometimes the ground glass will give a bright enough image to preview the result, sometimes not. When shooting digital there is some help though since you get to see the result directly on the LCD, and you can react if you got it wrong. This makes the learning cycle much much faster than it was back in the film days. Note that with the new bright ground glass reviewed separately the workable light conditions are extended, but it does not fundamentally change anything, the ground glass challenge is still there.
This way to visualize in your mind rather than look directly on a screen can be seen in two ways; either you just think it's a more difficult method forced upon you due to less capable equipment, or you actually find enjoyment in the challenge, perhaps even see it as a more pure way to do photography.
Personally, I do find enjoyment in this "old-school" photographic process, but it's also important to me that it does not become so difficult that I would often fail to make shots I otherwise could do. I find working with the ground glass to be easy enough, when I set up to take a picture it succeeds. I'm not a "purist" though, if digital backs get capable live views I would use it instead, but I will then probably be happy to have strengthened my capability to visualize compositions without the camera - it's a nice skill to have even when you have live view.
Concerning "shootable conditions" there are some limitations. For very dark night photography, for example making shots of the Milky way I would use the DSLR. Many digital backs are limited to 30 seconds exposure times, and I also think that quite well matches the limit of which light conditions you want to use the ground glass in. Past that you need some laser pointer or similar focusing aid for sure.
Shooting workflow
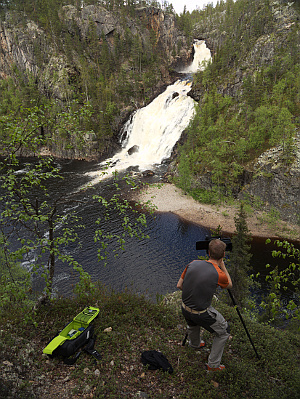
Photo: Fredrik Torger.
Here is an example shooting workflow to get an idea of how the camera is used.
- Scout for best camera position. Having a compact camera with a zoom range that covers your lenses is a good tool so you can quickly test different compositions. A mobile phone with a viewfinder app can also work for that.
- Set up the tripod and mount the camera, and attach the sliding back (which has the digital back mounted on it already). Most compositions are made with a level camera (looking up/down is achieved with rise/fall).
- Mount the lens, attach synch cable (from digital back) and cable release to it. Some have short cable releases permanently attached to each lens to speed up this step (I have and I warmly recommend it). If you need the same lens as used for the previous shot the lens is already mounted in the camera of course.
- Open up the aperture to max and open the shutter with the switch. It may be wise to always pack the lenses open so you can skip this step at setup.
- Compose on the ground glass. Look at the glass either through a viewfinder attachment or use a focusing cloth, or just shade with your hands (which works sufficiently well most of the time, especially with the new bright ground glass). Focus roughly and make rise/fall/shift.
- Focus critically and adjust tilt/swing with the help of a loupe. Tilt/swing start settings is suitably taken from tables or estimated. In difficult light conditions or when using a very wide lens (dim ground glass), you may want to focus critically first and then compose, that is point the camera straight on some focusing point so you can focus in center (brightest spot on ground glass), and with the focus distance set you then go ahead and compose.
- If you need to change the digital back to/from landscape/portrait position, do that by unmounting the adapter plate turning the back and mount it back again. Be careful and keep close to the opening to avoid getting dust on the sensor.
- Boot up the digital back, close the shutter, set working aperture, estimate and set shutter speed, and slide the digital back in position. You can use a light meter or use a compact camera as light meter but estimation works well too. Note that some digital backs have quite long boot time, say up to 10 seconds (it's not instant like DSLRs), so it may be wise to start the back a bit earlier in the process.
- Make a test exposure. Review histogram, adjust shutter speed if necessary. If the back is modern enough to have a useful 100% view use that to verify focusing. Some backs require a wakeup button to be pressed just before the shutter is released.
- Take the final shot and check that it was ok.
- Lengthen shutter speed with one stop and take a flat field calibration shot with the lens calibration card (milk-white diffuser card) directly against the front of the lens. Long lenses typically don't need calibration since there is almost no color cast, but since the process also corrects for possible dust on the sensor it's a good habit to always make one.
- Dismount the camera and pack it into your bag again. Always reset your tilt/shift settings before packing the camera, otherwise you will sooner or later make shots with some setting applied from a previous shot.
Compared to working with a DSLR on a tripod and tilt-shift lenses this workflow is slower, but actually not so much. Setting up a DSLR on a tripod and live view-focusing and ETTR-tuning takes time too. With the DSLR you can however for some shots skip that and take an auto-exposed snapshot if you need to. With the Techno hand-holding is not an option, all shots are made from a tripod.
The most time-consuming part of making a picture is for me usually to figure out the composition. The longer shooting workflow does however lead to that I shoot fewer pictures, i e I don't care to make a shot if I don't think it will be good. So compared to DSLR shooting I end up with fewer pictures but with overall higher artistic quality. I like this, but I also think it was good that my first camera was a DSLR since I learnt a lot from the "snapshots", i e I got some pictures which I did not realize that they were good until I got back home and looked carefully at them.
So when using a technical camera it's best if one has a little bit of experience and confidence in composition, because you cannot be as experimental and spontaneous as with a DSLR. One solution to that is however to bring a compact camera with you in addition, it will not add much weight to the rest of the system. One of the larger sensor compacts with zoom lens and where you can see/set focal length (usually shown as 35mm-equivalent) somehow I think is the best combination, then you can use it to test compositions and focal lengths before setting up the technical camera, and thanks to the larger sensor you get images that make decent prints.
Dealing with color cast
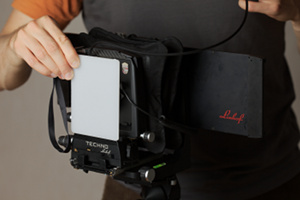
Making a calibration shot to cancel out sensor color cast in post-processing.

Example of a calibration shot made for a shifted 47mm lens. Contrast has been increased to make the color cast more visible. The lens have been shifted up so you see more vignetting in the lower part of the image.
Note the dust spot in the upper right corner and the "centerfold", the faint vertical line in the middle (only visible due to high contrast increase). The centerfold is due to that the digital back used has slight difference between readout amplification on the left and right side. All these registered effects are cancelled out in post-processing.
Technical cameras do not have a mirror box which means that the rear element of the lens can be very close to the sensor. For normal and long focal lengths this does not matter since the longer focal lengths inherently means that the lens is far away from the sensor. However for short focal lengths this opens up for using normal designs also for those (which makes it easier to provide high optical performance), while you in a DSLR need to construct them as reverse telephoto lenses (retrofocus).
This means that the wide angle lenses are very close to the sensor, which in turn means that towards the sides of the image circle the light falls in at very low angles. Unfortunately this affects the response of the digital sensor such that the red green and blue channels get different sensitivity and thus a color cast occurs. How the sensitivity changes varies over the chip too so the color cast is not a direct function of the angle of incoming light.
The solution to this problem is low tech, but works very well. One puts a milk-white diffuser card directly on the lens and shoots a picture, if the response would be perfect the picture would be all white. Instead it will have some magenta and green casts over it, and vignetting will show too of course, as well as possible dust spots (if you open this file in a raw converter it usually will look worse than it is since most raw converters auto-increase contrast of them). Then this file is used in the raw converter together with the real picture to cancel out the color cast, vignetting and possible dust spots so you get a neutral response. It also helps in tuning white balance.
All these factors are affected by focal length (of course), aperture, tilting and shifting and even focus distance to some extent. None of those factors are recorded in EXIF data since the camera is mechanical, which means that it's not really feasible to make a pre-recorded library of calibration files which then would be auto-selected. So you have to live with making calibration shots for each picture you shoot.
In a crisis it's possible to cheat though, so if you do happen to forget sometime one can guess the camera settings and make a calibration shot and get good results, but with this type of camera system it's natural to strive for the best result and then you should make a specific calibration shot each time.
I hear many complain about having to do this step, making it more cumbersome to shoot. Personally I think it's ok because it adds only 15 seconds or so to a workflow that typically takes several minutes, most of it composing. I also appreciate the added bonus of dust and vignetting correction so I make a calibration shot also for the longer focal lengths were color cast is negligible. (In some cases I also make a calibration shot when I have used gradient filters to cancel out them in post-processing, but that is an other story.)
In a way I think it's great that we have this. Only for technical cameras this procedure can be accepted due to how this type of camera is used (tripod-mounted carefully framed shots), and thanks to this we get unique lens designs which allow for very high optical performance of wide angle lenses, which is a tough challenge for every camera system.
Movements
"Movements" is the main feature of a technical camera. It refers to how the sensor and lens positions can be adjusted relative to eachother. The application of movements is to control perspective and the focal plane with Scheimpflug principle. Here are some typical "recipes":
- Image vertical features upright such as buildings — keep the camera back perpendicular and shift back or lens up/down to adjust the position of the horizon.
- Increase depth of field in a near-far compositon — tilt the lens forward.
- Avoid camera reflection or shadow in picture — stand to the side and compensate by shifting in the opposite direction to get the same framing.
- Creative use of wide angle "edge stretch effect" — tilt the back to enlarge/reduce foreground.
- Subtle adjustments of camera position to align foreground and background objects to avoid or get suitable merging and then use shifts to get desired framing.
How much you use movements depends on what type of photography you do and your style. In architectual photography most use shifts very frequently, to reproduce buildings and walls upright. In open landscape scenes tilt often improves the depth of field with larger apertures so one can make sharper pictures. In macro and product photography the depth of field is very short so placing it at angle with tilts/swing can be essential. Various subtle perspective controls can also be important in product photography.
Today it's possible to re-project an image in post-processing so you can achieve the shifting effect (perspective control) without actually using shift when shooting. This will however require a wider angle lens or stitching since some of the frame is lost, and the stretching of pixels in post-processing lowers the image quality (only few software packages do true reprojection too, most just do simple trapezoid stretching). Perhaps the largest advantage of using shift is however that you do the compositional work on site when shooting which many, including myself, consider to be a more enjoyable way to work.
Tilts and swings cannot be achieved in post-processing though, other than simulating the gimmicky "miniature" effect or other coarse selective focus effects.
A design tradeoff a modern technical camera designer must do is to minimize the number of movements to improve rigidity/precision (and keep down weight and bulk to allow fitting ultra-wide lenses) while keeping as much flexibility as possible. This means that modern technical cameras are often more limited concerning movements than yesterday's 4x5" cameras. Only the studio view cameras have kept the full flexibility, at the cost of not being able to use ultra-wides efficiently, and being large and heavy. For a field camera the designer imagines some typical use cases and what movements are needed for those and provides that, but no extras.
The Linhof Techno is in the middle of the pack concerning movements. It's more flexible than the typical pancake camera but less than a studio view camera. It has the following movements:
- Back (=sensor) vertical shift ±20 mm
- Back horizontal shift only available if sliding back is employed and then only three fixed positions: +17, 0 and -17mm, designed primarily for stitching. Not so useful if you have the new smaller bright ground glass.
- Front (=lens) horizontal shift ±10 mm
- Front vertical shift +20 mm (rise only)
- Front tilt ±10 degrees
- Front swing ±8 degrees
- Max relative vertical shift with both back and front movements employed: +40mm/-20mm.
- Max relative horizontal shift with both (sliding) back and front movements employed: ±27mm.
- Focusing rail range: 40mm to about 250mm (fully extended), recessed boards used under 50mm flange distance.
The lack of back tilt
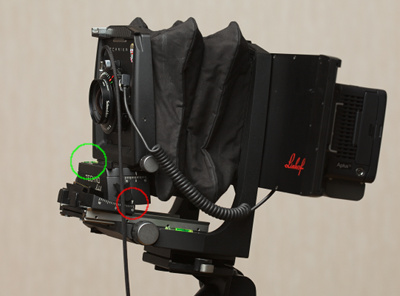
Back tilt without having back tilt: the whole camera is tilted up with the tripod head (preferably geared), and then lens tilt is applied in the opposite direction to get the lens back to vertical.
Note the bubble spirit on the front standard (green circle) which helps to get the lens level, and then we can read the effective back tilt on the tilt scale (red circle). I did forget one detail though in this picture though - the back needs to be shifted up to be centered in the lens image circle as it would be with back tilt.
Not being able to tilt or swing the back is today the default solution for all technical cameras for field use. This improves precision and also makes the body less bulky which makes it possible to use ultra-wide lenses (since front standard can be brought closer to the rear standard).
It may be the most controversial removal though, since back tilt was frequently used in traditional view camera photography. With the "drop bed" (or incline bed) technique, that is when you tilt the whole camera base and make lens and image plane stand upright by tilting them, the purpose was to achieve vertical shift between lens and sensor with a larger amount than possible with shift alone. This use case was however only a way to make field cameras more compact as large shifts would make the camera bulkier than the combination of shifts and tilts. Since modern sensors are much smaller than 4x5" it is feasible to do shifts with shift alone so in this aspect we have not lost anything, but rather gained speed and ease of use.
There is another use of back tilt though, you can use it to exaggerate or reduce the size of the foreground in a landscape scene. Movements is of course all about a relative difference between sensor and lens, so it's possible to achive a "back tilt" effect through aiming the whole camera up/down and re-align lens with vertical shift and tilt in the front instead, but obviously this is trickier. Note that this use of back tilt is in conflict with the goal to render vertical features like tree trunks exactly vertical since then the sensor needs to be upright, so it only works if the scene does not need that.
For a landscape scene it may not be that difficult to make a quick adjustment and tilting the whole camera, but in product or macro photography it can be messy since moving the lens around just a little has a large effect on composition. Therefore I think where you may miss the back tilt (and swing) feature for real is mainly in macro photography. In macro photography in general it's often smoother to work with swinging and tilting than shifts - by swinging/tilting both front and back the same amount one can achieve shifts without changing the framing at all.
For a field camera I think removing back tilt is the right thing to do though. In my own shooting style I have not missed it.
Shifts

Maximum vertical shift engaged (-20 mm on back, +20 mm on lens).
At Linhof they have decided to remove horizontal sensor shift. This may be a bit surprising since most digital view cameras have horizontal sensor shift, and also the pancake cameras. The Techno does have horizontal lens shift though so the relative shift between lens and sensor can be achieved, but since the lens then is moved it is not so well-suited for stitching (parallax issues if there is close-range objects), and can also be a bit cumbersome if used when composing macro images (where you may want to hold the lens still and adjust the the sensor position a little). The sliding back has a horizontal stitch function though, described separately.
So what do I think about the lack of horizontal sensor shift? I think it's both a brave and a wise design decision. As described in the stiching section I think geared movements for stitching is too slow, so the back stitch is better solution for that. Then it comes to the frequency of use of horizontal shift for compositional adjustments. In landscape vertical shift is used for almost every picture while horizontal is used quite rarely, and then lens shift is fine. In architecture horizontal shift is a little bit more useful but still I think lens shift is ok also in that genre.
What about the ranges? For vertical shift it's ±20mm, is this enough? Yes. For most uses only ±10mm needs to be used. I think ±15mm would perhaps been the ultimate tradeoff for the lens image circles / sensor sizes we see today, but that would not have made the camera noticably smaller or more rigid so 20mm is fine and provides some margin. The horizontal lens shift is "only" ±10mm which may seem a bit narrow, but as horizontal shift is so little used and the range can be extended to as much as ±27mm when combined with the sliding back I think it's a good tradeoff. Note that with the new bright ground glass the back ±17mm positions are not as useful as it requires a ground glass that can view these positions and has scorings for it (because the sliding back can only shift the sensor, not the ground glass). That is you need to use those positions "in the blind" if you have the bright ground glass.
So far I have never needed to use the lens rise function - the purpose of that is to achieve extreme vertical shifts, up to 40mm (+20 on the lens, -20 on the back), which I have not yet required. Shooting architecture it may become useful in some situations, when you need to get a shot above your head with a longer lens (which has up to 120mm image circles) and keeping the sensor upright for perspective control.
Tilts and swings
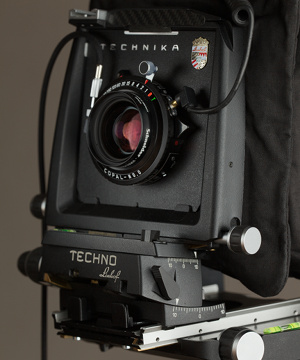
Maximum tilt and swing engaged.
What about the tilts and swings? For normal landscape photography the range used is typically 0.5 - 5 degrees, so the range of ±10 degrees is certainly more than enough. However, for serious macro photography using a 120mm lens you may find the tilt/swing range a bit limiting (in some cases also shifts), using the shorter 80mm macro lens improves the situation but still it's not as flexible with macro as a a studio view camera such as Linhof's own M679cs. If you're used doing close range photography with Canon's 90mm tilt-shift DSLR lens (or Nikon's 85mm) I estimate that maximum tilt is a little bit more limiting with the Techno (it's a bit hard to compare, the Techno has a couple of degrees more range but since you'd probably want to magnify more due to the larger sensor and thus move lens farther away and need more tilt).
Preferably I would have liked a little wider tilt/swing range, but I think it would be hard to combine with allowing short focal lengths and/or high rigidity so I think this is a necessary design tradeoff. It has through the relatively large range (much larger than in the typical pancake camera) got some macro capability, but not at the cost of its main area of use.
If the macro capability of the camera is really important to you I think an Arca-Swiss M-Line two MF is a better choice which provides a wider range of tilts and swings, but best is of course a studio monorail camera with tilts and swings in both front and back.
Macro photography
I have already commented some on macro photography, mainly that lack of back tilt/swing and limited tilt/swing range makes it less flexible than the specialized cameras, but is still more flexible than the typical pancake camera.
In the studio you can make some simpler macro work. Out in the field it's not so great to work with. The problem there is that macro work is nearly always close to the ground, and the height of the cameras makes it hard to get it there. Also looking at the ground glass with the camera 20 cm from the ground is obviously not a comfortable experience. Even a bad digital back "live view" would probably be preferred in this case.
I have shot some occassional pictures of low-sitting flowers, but if I would do field macro more often I would probably like to use a DSLR because it's easier to get close to the ground and the live view display can be viewed at a more comfortable angle. The lack of flexible tilt/shift DSLR lenses with macro capability is a bit of a problem though.
Stitching

Animation showing the different positions of the sliding back. First the ground glass in position, then stitch left, center and stitch right.
Shifting the sensor around and stitching inside the lens image circle was a quite popular use case, but I think the popularity is declining due to better availability of wide angle lenses and higher resolution sensors. Personally I'm not at all a fan of this use case. If you use stitching a lot I think a pano head (possibly motorized) with a recent DSLR and dedicated automated software is a better way. Stitching inside the image circle also have limited advantages compared to turning the whole camera, although one might prefer it for artistic reasons (less post-processing). In close range photography (product photography) stitching inside the lens can also be more practical.
One of the reasons I personally got a medium format system with movements was to get away from the need to stitch. From an artistic perspective I prefer one-shot images and I have so far never made a "production" image using stitch with the Techno.
For stitching to work efficiently, you should be able to move quickly between positions with very little effort (so there is little risk to disturb camera position). Self-locking high precision gears is not great for this, they are too slow in field use, therefore I'm quite skeptical about stitching on the cameras that only have gears for this.
The Techno has only the geared movement for vertical shifts so it's not great to use for stitching, but if you have the time it works fine, there is low risk of disturbing the camera. For horizontal stitching you must have the sliding back, which has two extra dents for fixed offset stiching positions. The idea is to take three shots and you get large overlaps. This is quick to operate and make stitching feasible in the field, but it's of course limited concerning configuration.
The spacing between the fixed positions are 17mm, that is -17mm, 0mm and +17mm. With a horizontal 48x36mm sensor you get sufficent overlap to get away with only two frames. With vertical orientation you would get only 1mm overlap with two frames so you will generally need to shoot the center one to be safe, but then you get overkill overlap. I think that 20mm offset would have been better, to get wider two-frame horizontal stitch with a little bit less overlap and require three frames in portrait orientation.
Together with the front lens shift one can adjust the relative horizontal shift in the range ±27mm. It's a bit cumbersome though since you need to use the front shift to either add or subtract from the fixed positions in the back.
Note that the sliding back can only shift the sensor to the ±17mm positions, the ground glass can only be kept in the center position. This means that you need to have a large enough ground glass to cover the shifted positions, and also scorings for it. The newer bright ground glass will not work. Linhof only have the standard ground glass for the 47x39mm sensor size with stitching scoring.
Stitching can be nice to have as a fall-back when out in the field and you don't have a wide enough lens available, but when I compare this type of stitching compared to my nodal ninja pano head and DSLR I find that more effective. If you are of a different opinion and intend to use the Techno for a lot of stitching you could look into getting a Kapture Group sliding back instead of Linhof original since it has many more stitching configurations. I have less good experience concerning precision of their backs though (some play in the film plane direction) so I wouldn't buy one in the blind.
Movements with short wides
The Techno can do movements even when lenses have the shortest flange distances. This is not something that can be taken for granted with a view camera. For many cameras the front and back standard must be pushed so close together that movements gets restricted. The Techno does get a bit restricted in maximum tilt and swing combinations (front and rear standard touches in extreme positions), but wides need very small tilts/swings (due to the short focal length tilt/swing angles have larger effect) so that should not be a problem. Full shifts can be engaged even with the wides.
I don't have the widest lenses so I have not been able to test them all, but the widest ones have recessed lens boards so there should be no problem.
Actually the lenses with the shortest flange distances is not always those with the shortest focal lengths, since those usually are retrofocus constructions. The shortest I know of is the Schneider 24mm, but it has only 60mm image circle so you can't do movements anyway. For the larger image circles the Schneider Digitar 28mm XL has the shortest with 35.5mm (the Schneider Digitar 35mm is close with 37mm). The shortest focal length available, the Rodenstock Digaron-S 23mm, is more retrofocus and has 44.8mm flange distance. Everything less than 50mm flange distance is put on a recessed lens board to avoid front standard coming to close to the rear.
For studio view cameras it's typical that many lenses need recessed lens boards. With the Techno is that the front and rear standard can get very close natively so only a few need recessed boards, which is an advantage since recessed lens boards are significantly more expensive than the flat ones.
The reason one needs a special "wide angle bellows" is to be able to do movements when front and rear standards are close. The longer standard bellows gets too compressed so you can't really shift anything. Since Techno's wide angle bellows is long enough for 120mm lenses (if not focusing at macro distances) it's more versatile than usual with view cameras. I think this is an attractive feature and should be taken into account when comparing to other alternatives.
If you don't do movements with the wides or very minimal ones (say only a few mm) you can also use the standard bellows. The exact limits are hard to define though; you can stretch it a bit but you will eventually wrinkle and cause damage to the bellows. The recommendation must be to not do movements at all when using wides with the standard bellows.
Lenses
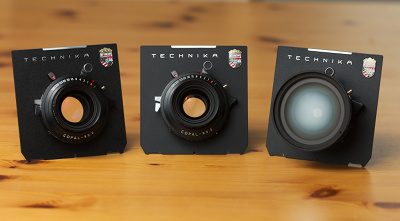
Three Schneider Digitar lenses on Linhof lens boards, 120mm, 90mm and 47mm. Note the center filter on the 47mm which looks foggy from the light reflection.
The digital lenses used for Techno is like for most/all other technical cameras Schneider Digitar and Rodenstock HR Digaron-S and HR Digaron-W lenses. There are no branded versions. The lenses to this system is thus no better or worse than to any other technical camera system, so most of what I write in this section about the lenses is applicable to all technical cameras.
This genre of lenses is called "large format digital" because they are designed in the same tradition as the 4x5" large format film lenses and are meant to be used in the same type of applications, but the image circles are smaller and meant to be used with medium format digital backs.
The Schneider Digitar lenses typically optimized for f/11 while the Rodenstocks are often a bit more advanced designs and can do f/8 or even f/5.6 very well. My opinion is though that if you are aiming to shoot at f/8 or f/5.6 a lot you would want a pancake camera with a high precision focusing ring and laser distance metering. The depth of field becomes a little bit too tight for ground glass focusing. The Rodenstocks perform well at f/11 too of course so you may want to choose them for some focal lengths anyway.
The Digaron series was previously called "Apo-Sironar digital HR" (HR is for high resolution) which is good to know if you buy second hand. There is also a series called "Apo-Sironar digital" (without the "HR") which has lower resolving power and therefore is less interesting.
The elegance of the Schneider Digitar lenses is that they are simple designs which therefore become small and low weight which is great for hiking. They are also typically cheaper (sometimes much cheaper) than corresponding Rodenstock Digaron alternatives. However, the Digitar lenses has existed for quite many years so there are both newer and older designs, the newer are generally a bit more expensive.
Although not officially announced(?), it's said that Schneider will cease producing Digitar lenses (too small market) so in the future Rodenstock may be the only producer left in this segment. Due to the extremely low sales pace it's likely that Digitars will be available new for a few years still, and then live well on the second hand market for many years. That is I don't consider this to be a reason to choose Rodenstock ahead of Schneider.
I have personally only experience of Schneider Digitar lenses. For this review I would have liked to have tried one of Rodenstock retrofocus wide angle lenses, but I have not got the opportunity. Since they are retrofocus and f/4 wide open instead of typical f/5.6 they should be brighter on the ground glass than normal wide-angles from Schneider. Due to this there might be a significant difference in ease of use in poor light conditions. My guess though is that the difference would be clearly noticable but not so huge that you would choose Rodenstock just for the ground glass advantage. While they are of retrofocus design they are far from being as much retrofocus as SLR lenses.
The Digaron-S series of lenses have small image circles (70mm) and thus do not provide much margin for movements, and therefore I do not think they are a good match with a Techno which has movements as one of its strongest features.
Macro lenses exists at 80 and 120mm. I would suggest using the shorter one as the Techno does not support huge tilt/swings (longer focal lengths requires larger tilt angles).
Lens image quality
100% crop of an f/11 90mm Schneider Digitar shot mid-frame using 33 megapixel 7.2um pixel pitch. The image has been sharpened with typical settings. This is as good as it gets.
100% crop from the same 90mm image at the extreme corner which also have been shifted 10mm. There is very little sharpness falloff, undetectable in a print.
100% crop midframe of an f/11 shot using 47mm Schneider Digitar. 7.2um pixels (33 megapixel back).
100% crop from the same 47mm image in a corner after about 20mm shift, right at edge of the 90mm image circle. Some loss of sharpness can be seen. Wider angle lenses don't have the same flawless performance as the longer ones (note that we shift more in this example than in the 90mm example, 20mm shift is quite extreme). Schneider has also introduced a new(er) 43mm Super-Digitar that performs better than this (cheaper) 47mm.
These lenses are generally used for large depth of fields so the main characteristic that we want from them is high resolving power. I personally consider other aspects such as contrast, colour neutrality, lack of distortion less important since they can nowadays be effectively compensated for in post-processing. This type of lenses do excel in many of these aspects too though.
In the film days the lack of distortion (which can actually be zero in the lenses that are not of retrofocus design) was a really important characteristic especially for architecture or repro applications. Now it has lost some of its importance when it's easily corrected digitally, at least in theory. With technical cameras there is no recorded data of any lens movements so you need to figure out where the center of the lens is and make those corrections manually, which typically means that you simply won't do any corrections and thus the lack of distortion becomes an important feature anyway.
High optical performance of a lens today does generally not stem from some vastly superior quality of lens elements compared to other manufacturers. Instead it's about design, which set of tradeoffs that have been used. It's optically impossible to make a lens that is excellent at everything, so you need to make tradeoffs.
In the large format digital category one can do some tradeoffs that makes it easier to make sharp lenses. There is no need for a large aperture, very short flange distance is possible (no mirror box), and also for longer lenses a normal lens design is possible because a long flange distance is accepted by cameras. This allows for other lens designs, usually simpler if compared to a DSLR system. This is best represented by the Schneider Digitar range where most are symmetrical normal lens designs with f/5.6 as largest aperture and intended to be used at f/11 for best performance. There is one aspect that makes large format digital tougher to design though, and that is that we need larger image circles to accomodate shifting. But that is also true for DSLR tilt-shift lenses.
A negative result of the lens designs used is heavy vignetting of wide angles, so they are preferably combined with dedicated center filters permanently mounted to the lens. This of course increases the shutter speed with a stop or two. Another negative is that due to the low angles of incoming light the digital backs gets colour cast issues, which adds the lens calibration step to the shooting workflow.
So how sharp are these lenses?
The usual saying is that if you want the sharpest system then it's large format digital you should use, it's said to be sharper than any 135 DSLR system and also any medium format DSLR. Is this true? The lenses are indeed sharp, but recent developments in DSLR lens ranges has also made the competition tougher.
When I began looking into large format digital I have heard a lot of exaggerated user opinions so I thought the lenses were so sharp that it would be impossible to see any quality reduction near the edges of the image even after shift at 100% pixel-peep. This is not the case, except possibly for some of the longer lenses. Still the lenses are very sharp and I think it's safe to say that the system is indeed the king of resolution. One just has to realize that "perfect" does not exist. Also this only counts when you compare the same field of views. If you take the sharpest DSLR lens, say a 300/2.8 telephoto lens, and compare that to a shifted Schneider Digitar 35mm (a wide angle) you will see that the Schneider has more issues with sharpness loss towards the edge. That wide angles are harder to make sharp is also a fact in the large format digital world.
While longer lenses are possible to make with simple designs and get high performance, wider eventually requires more complex designs. The Rodenstock Digarons use a more complex design for the wides which provides great performance, at the cost of higher weight and price. The Schneider Digitar use more traditional designs and can therefore show some optical problems.
For example, the Schneider Digitar 35mm mentioned above has due to field curvature only about 75mm of high quality image circle at f/11 despite that it's claimed to have 90mm. As an alternative one can get the Rodenstock Digaron-W 32mm which has excellent quality but is the most expensive (and heaviest) of all large format digital lenses, more than twice of a Schneider Digitar 35mm. When you are planning which lenses to get first evaluate the wide angles. This is were the high cost is and possible performance issues can be found.
I am myself a little bit disappointed of the wide-angle options. I'm not into ultra-wides, but want a 35mm lens with a 90mm high quality image circle which has a good tradeoff between optical complexity (=weight and price) and performance. The 32mm Digaron-W is too heavy and expensive, and the Digitar 35mm has a bit too much field curvature to allow for as large movements as I'd like. Hopefully Schneider will eventually introduce a "Super Digitar" version of the 35mm like they have at 28 and 43mm (the Super Digitars are a bit more complex designs with better optical performance, but generally not as "overkill" as the Rodenstocks).
If you do like ultra-wides there are options down to 23mm, but you may not be able to shift much with those (only 70mm image circle).
On the normal and longer end I have not seen any performance issues or lack of options. The longest lens is Schneider Digitar 210mm, which corresponds to about 150mm on a 135 full-frame system, which I think is adequate for landscape photography. It has happened that I have shot landscape with even narrower field of views with my DSLR though, but you cannot have it all.
When at the subject of sharpness, we all know that "sharp enough" is not really that much. All large format digital lenses are way better than that. However, most of us photographers using this kind of system appreciate sharp images very much (probably a little bit too much) and therefore have very high demands. Keep that in mind when you hear/read opinions from technical camera users.
Sample variations and "lemons"
100% crops of an f/11 90mm Schneider Digitar with faulty behaviour, extreme left and extreme right from the same image, the left side is a bit blurry. If something is bad with the lens or lens mounting this can be how it looks. Anyone used to typical entry-level lenses for smaller systems know that corners looking as "bad" as this is normal (and at lower resolutions), but technical camera users are generally of the demanding type.
Some pancake camera makers individually measure/calibrate their lenses when mounted in their focus mount, which according to their marketing makes sure that you get a lens performing up to the specification. With the Techno the lenses are simply mounted to a lens board (which you can do yourself) so you don't get this service. If it makes any real difference I cannot say, but I do know that it does happen once in a while that lenses do not live up to the specifications, it also happens for those very lenses from pancake camera makers. Most are aware of that this can happen to DSLR lenses, and obviously the all-metal constructions from Schneider and Rodenstock are not immune either. My guess is that even if quality control is reasonably good it's normal that this occurs. Statistics is impossible to get of course, so I cannot say how common it's that you get "a lemon".
This might sound like some minor quality scandal, but I think it's more about the extremely high expectations owners of large format digital equipment tend to have together with the incredible resolving power of the digital backs. If there is the slightest error it will be detected by a picky photographer. If you're not of the picky pixel-peeping type the likelyhood that you detect some problem is very low. What you hear from users is that most have never ever had to return a lens, while a few have returned more than one. This is probably due to different quality expectations rather than some having much more bad luck than others.
Anyway, if you are of the picky type, then you need to be prepared that this can happen, and you should test lenses when you get them.
If you like me prefer to buy some gear second hand it's reasonable to assume that it happens more often that something has bumped out of place. Fortunately, with any Schneider or Rodenstock lens it's possible to send it in to get it readjusted (at a fee, say 350 euro for a mild alignment error), so if you do get a problem with a lens it can be fixed. Therefore I think it's quite safe to buy second hand too.
The shutter

Copal shutter. The shutter release (red) with cable attached, aperture setting (green), cocking lever (blue), flash synch socket (yellow) with cable attached (needed to trigger digital back), and shutter open/shut lever for focusing (white). The shutter speed is set by turning the dented outer ring. The setting in the image is "B" (bulb mode). "T" is an alternative to bulb mode when you press once to open and a second time to close, more comfortable for really long shutter speeds.
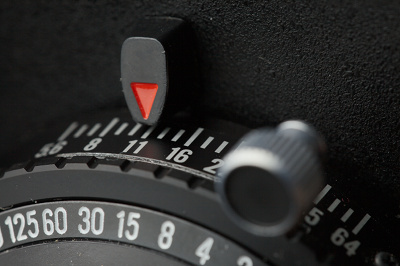
Aperture scale on top. Note that it's not super-easy to see that the aperture sits on f/11 rather than f/10.
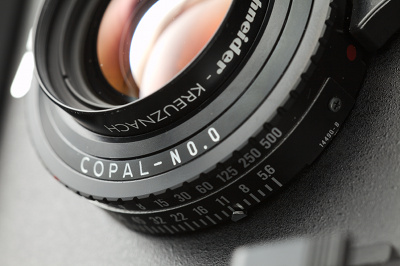
Aperture scale and shutter speed setting is shown at bottom of shutter too so you can see the settings from below.
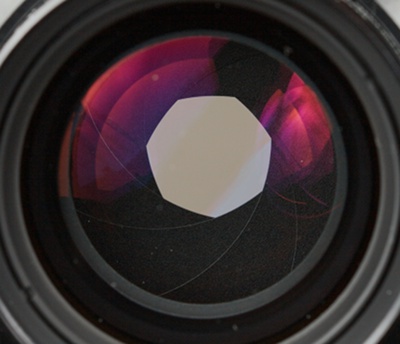
The aperture has only 7 blades, which means that bokeh highlights are not rendered perfectly round when the lens is not wide open.
Technical cameras use leaf shutters located in the lens. The main advantage over focal plane shutters is less vibration, which is relevant when it comes to as large sensors as medium format ones. It also allows for higher flash sync speeds, but technical camera shutters don't have that high max shutter speeds (as medium format DSLRs have).
Maybe a bit surprising the lenses use traditional mechanical shutters which you need to cock manually before releasing with a cable release. This gives the whole system an old-school feel which I find rather charming. It's possible to get electronic shutters but these are very expensive and intended for studio use only (big and bulky remote controls etc), so all field cameras use mechanical shutters. Note that if you are using a multishot digital back you must have an electronic shutter.
When large format cameras were common there were several brands of mechanical shutters, but today it's only Copal left. Shutter speeds provided is typically 1/500 to 1 second in full stops, and in addition a bulb mode and an open-shut mode (press once for open, a second time for closing).
These are fine mechanical instruments like a fine watch, but mechanical as they are shutter speeds are not as precise as for electronic shutters. It can be as much as 1/3 stop off the actual speed. Also, since 1 second is the maximum a stopwatch is a necessary accessory (I have a mechanical one to keep the charming old-school feel), but for 1 - 4 seconds I usually just count and estimate the time.
Coming from the DSLR world with 1/3 stop increments up to 30 seconds and perhaps being used to make extremely precise ETTR exposures, the mechanical full stop shutters may seem a big step backwards, and the thought of estimating multi-second exposures just crazy. However, since exposure is exponential (doubling of time for each stop) being as much as 30% off does not matter much. With my Canon DSLR I usually do/did very precise ETTR exposures using 1/3 stop increments (using UniWB trick and all), and I would estimate that with the mechanical Copal shutter my ETTR exposures are only 1/3 stop darker on average so I'm not really concerned.
Actually, if I got to choose I'd still prefer full stops since it speeds up the handling. Often one sets/changes the shutter speed without looking at it and just uses the tactile feedback from the click-stops, and then it's nice that they are quite widely spaced, i e changing two stops is just two clicks instead of six.
The minimal shutter speed is only 1/500 (a DSLR you can get 1/8000, it is "fake" though since it's a rolling slit at that speed). This is not a problem though, so far I have never used this minimal shutter speed out in the field. The shortest I have used I think is 1/125. With a technical camera you shoot with small apertures at ISO50 or so, which means that shutter speeds rarely get very short. The solution in the unlikely event that 1/500 would not be fast enough is to apply an ND filter to the lens.
Unlike the shutter speed the aperture can be set in 1/3 stops, or stepless depending on configuration. I prefer the click-stop configuration for tactile setting, but even then it's a bit hard to adjust without looking at it. For example, a typical adjustment is changing from wide-open at f/5.6 when focusing to f/11 for the final shot (there's no mechanism to auto-reduce the aperture at the shot as with a DSLR), which becomes as many as six clicks and also less distinct than for the shutter speed setting. I most often look at the aperture indicator to get it right. There are indicators both at the top and bottom of the lens so you can see them even if the camera is mounted high. The pointer is a bit spaced from the scale though so there is some parallax which can make it hard to see which f-number it points at until you get used to it.
If I had designed the aperture control I'd probably have it stepless f/5.6 to f/11 and then 1/3 clickstops, it would then be more easy to work tactile with it for the common use case.
While you focus you open the aperture in full and open the shutter, and there is a lever for that. For some unknown reason this lever is shaped like a soft triangle which makes it a bit hard to grip, especially when the flash sync cable is mounted (which must be mounted since it's used to synch the digital back with the exposure).
The aperture has 7 blades and thus not as round as the best DSLR lenses which may seem a bit poor for this price range, and I do think that but since we specialize in deep DoF photography that aspect of bokeh is not really important. If we shoot wide-open the aperture blades are not visible so we get a perfectly round aperture of course. I'm no bokeh connaisseur but I'm quite happy with it when it comes to use (in macro) for the lenses I have tested.
For multi-shot techniques like HDR, focus-stacking or stitching you will of course need to manually cock the shutter between each shot. Fortunately the force required is very small, so if you have a high quality tripod and head it's very likely that the camera will not be disturbed noticeably. You will in some cases be required to realign the shots in post-processing though, since you touch the camera there's always some risk that you move it slightly. I do HDR in some difficult lighting situations, and that usually requires only two shots spaced 3 stops. Recocking the shutter and changing the shutter speed for that is quite smooth, it does not feel awkward. For extreme HDR with long series a mechanical shutter is obviously not great though.
A fun hack: by taping a ruler to the base one can do focus-stacking. At f/16 moving 0.5mm between each shot is suitable.
There are no products for wireless shutter release, but some have built home-made remote triggers using a small radio controlled servo. For a self timer there are no current products either, but you may be able to pick up a vintage Walz self timer (mechanical of course) on the second hand market.
The Copal company has recently announced that the manufacturing of this classic mechanical shutter will end during 2013, also spare parts so repairs will depend on used parts. There are however very large amount of shutters in circulation so there's no reason to panic just yet. Sometime in the next few years we'll probably see an electronic shutter as the standard shutter in technical cameras though, hopefully less bulky and more outdoor-friendly than the currently available offers. It will in any case most likely be a significant cost increase. In 2014 Arca-Swiss introduced a new electronic shutter and also a focal plane shutter module which looks promising for the future. Linhof has not yet made any similar options available for the Techno system but I think it's only a matter of time.
If you need to replace the shutter completely you should be aware that the manufacturing precision in Copal shutters are limited which means the lens may need reshimming, which exists as a service provided by the lens manufacturers (costs about 100 euro or so).
Important note on usage: only cock the Copal shutter when it's closed and shutter speed is set. It's very hard on the shutter mechanics to change shutter speed when the shutter is cocked, and it will prematurely break if you do so on a regular basis. Make it a habit to cock the shutter as the very last step just before making the shot. Never store the shutter cocked.
Comments on specific lenses
A few comments about Schneider Digitar lenses, or Schneider-Kreuznach Apo-Digitar to use the full name. The comments are based on own findings (testing, reading specs etc) and from comments I've gathered from other users:
- New lenses:
- 28/5.6 XL: 90mm image circle. Some softening when shifted, as can be expected by an ultra-wide. Rodenstock Digaron-S 28mm is sharper but more expensive and has only 70mm image circle. Introduces substantial crosstalk on many small pixel backs when shifted and may thus not be a good option for those.
- 43/5.6 XL: 110mm image circle, sharper than the older 47mm. Very good all-around lens.
- 60/5.6 XL: 120mm image circle, very sharp (except for the outer limits of the image circle). Large image circle allows for stitching.
- 100/5.6 Aspheric: 100mm image circle. Replaces the older 100-N. Not studied, guessing similar difference as between 120-N and 120 Aspheric.
- 120/5.6 Aspheric: 150mm image circle. Very slightly sharper than the older 120-N at normal focus distances, noticably sharper up close but still not sharp as a macro 120-M. Larger image circle.
- Older lenses (most still sold new):
- 35/5.6 XL: 90mm image circle. About 75mm image circle with really high quality then noticable softening due to field curvature. Normal lens design: very short flange distance, and distortion-free. Not an optimal lens, but compared to alternatives (Rodenstock Digaron-S 35mm only 70mm image circle, Digaron-W 32mm twice as expensive and very heavy, Apo-Sironar digital 35 weaker optical quality) it's still an attractive choice. Some that upgrade from a 36x48mm to a 54x41mm back switch to a Digaron-W 40mm instead which is only slightly more expensive.
- 47/5.6 XL: 113mm image circle, very slight chromatic abberation and some softening with large shifts. Still good all-around lens. Some choose the 43 instead to get a sharper lens.
- 72/5.6: 90mm image circle. Quite low contrast off-center wide-open which makes it a bit difficult to focus (off-center), but good image quality at shooting aperture (f/11). Actually I often experience the shorter 47 to be easier to focus.
- 80/4: 90mm image circle.
- 80/5.6 Makro: 75-80mm image circle at macro distances.
- 90/4.5: 90mm image circle.
- 100/5.6 N: 90mm image circle.
- 120/5.6 N: 90mm image circle.
- 120/5.6 Makro: 110mm image circle at macro distances. Allows more shift movements but longer focal length requires more tilt, so the shorter 80mm is probably more suitable for the Techno.
- 150/5.6: 110mm image circle.
- 180/5.6: 120mm image circle.
- 210/5.6: 120mm image circle.
- Older lenses with only 60mm image circle (ie no movements!):
- 24/5.6 XL.
- 28/2.8, not to be confused with the new 28/5.6.
- 60/4, not to be confused with the new 60/5.6 with 120mm image circle.
The 24 - 60 focal lenghts have center filters, which are mandatory even without movements up to 35 (very large vignetting), but with the 43 - 60 you may do without depending on digital back and how much you shift. The 28 and 35 will work very poorly with backs with strong color cast and/or crosstalk issues like IQ180 and P30+, and the 28 will not work that well when shifted even with IQ160. The very low angle it presents to the sensor when shifted causes crosstalk issues on many sensors which cannot be corrected with a normal LCC process (you will get desaturated colors and possibly other artifacts). Of the smaller pixel backs the Kodak 50 megapixel sensor used in many Hasselblad digital backs is an exception, which work well with the 28 despite its small pixel size, thanks to better pixel shielding and lack of microlenses. It's not unaffected by the low angle though and will vignette about 2.5 stops at the image circle edge despite using the center filter, but crosstalk is negligible.
All these lenses aim for f/11 as working aperture.
Corner sharpness is not a problem with longer lenses, from 60mm and up although one generally doesn't want to use the image circle to the edge if not absolutely required. On the wide end some loss of sharpness is detectable when pixel-peeping. The 28, 35 and 47 are lenses that could potentially disappoint a user with very high expectations, but with more reasonable wide-angle expectations those lenses are good.
Some of the older lenses are very economical (relatively speaking), the 80, 90 and 100 lenses are 900-1100 euro + VAT new with copal shutter at the time of writing.
Compared to the competition the Linhof Techno becomes most attractive when you have quite many lenses (cheap lens mount, low bulk) including a few longer ones. At the time of writing I personally have Schneider Digitar 35, 47, 60, 72, 90, 120-N and 180 in my Techno system, that is roughly about 30% FOV increase between focal lenghts up to 120 and then an extra long on top (the 180).
Some simply wants "the best". Regardless of brand, what are the most well-regarderd (in terms of resolving power) lenses currently? Here's a list based on "user buzz" in the medium format forums:
- Rodenstock Digaron-W 32mm
- Rodenstock Digaron-W 40mm, often used as the "24mm 135-equivalent" by 645-full-frame digital back users. Considerably cheaper than less heavy than the Digaron-W 32mm.
- Schneider Digitar 60XL
- Rodenstock HR Digaron-SW 90mm, not to be confused with the older Digaron-W version.
- Schneider Digitar 120mm Aspheric
Note that the Rodenstock Digaron wide angles are retrofocus designs and as such introduce distortion. It will probably not be a problem for landscape photography, but for architecture photography you may need to apply distortion correction in post-processing.
Comments on wide angle performance
Technical cameras are often said to be particularly strong concerning wide angles. This is indeed true and the reason is that the small aperture symmetrical or weak retrofocus lenses can be made sharper and with less distortion than the wide aperture retrofocus lenses used on smaller formats.
However if you expect to have a very large shift range you may become disappointed. In that area the smaller formats can have advantages. In fact a Canon 5Ds (50 megapixel) with a good copy TS-E 24II lens will clearly outperform my current Hasselblad H4D-50 with SK35XL for large shifts. Although the SK35XL states a 90mm image circle the sharp part of it is only about 75mm, and there's a drastic falloff in performance outside that. Inside the 75mm image circle the sharpness is indeed better than the smaller format, and of course the distortion is lower overall as it's a symmetric design.
The SK35XL is an old design though. If you go for something higher end you will have a full-frame 54x41mm CCD and the Rodenstock Digaron-W 40mm to match the classic 24mm 135-equivalent field of view. That lens has a high quality 90mm image circle all the way to the edge, but it clips hard there (if shooting a clear sky you may get penumbra issues from this hard clip say at 85mm or so) meaning that the shift range relative to the format size is more limited than that of a TS-E 24II on a small format camera for example.
If you need a larger shift range in relation to the format size the natural choice would be to use a smaller sensor meaning 44x33mm in medium format. That size with 90mm image circles gives almost exactly the same movement range as the Canon 17/24 TS-E lenses, however only in theory. The wide angle compatibility of the current 44x33mm sensors are not good enough to use the full image circle, the CMOS is most affected. There is no technical camera lens and medium format sensor combination that gives the same shift range as Canon's TS-E 17mm.
To say something general the technical cameras have very sharp wide angles, but the shift range is more limited than for the best smaller format (Canon's TS-E II lenses currently, often used via adapters with Sony mirrorless cameras).
Is the smaller shift range a problem? In architecture photography it may be in some situations, but you can solve it with getting an even wider angle lens and crop to your desired view. In landscape photography I'd say that the smaller shift range helps you to keep better taste in your images, as large shifts with wide lenses lead to hefty perspective distortions. So no, I don't see it as a problem. However I'm aware of that Canon's 17 and 24mm TS-E lenses are very popular in the smaller formats and it's quite likely that someone moving to a technical camera have used them, and then it's good to know in advance that you will have to give up some shift range.
It can be worth noting that technical camera lenses are not digitally corrected in the raw converter, as there is no EXIF data with movement information. SLR lenses, both smaller format and medium format Hasselblad H and Phase One M wide angle lenses can get advanced lens corrections of both distortion and some aberrations. So will a corrected medium format SLR wide angle lens be sharper than an unshifted uncorrected technical camera lens? Generally they will not, the symmetric or weak retrofocus small aperture design is able to outperform the wide angle and wide aperture retrofocus lenses despite not depending on digital corrections.
Note: the latest Capture One does have some lens corrections for some technical camera lenses, but you need to enter movements used in the shot manually.
Digital backs
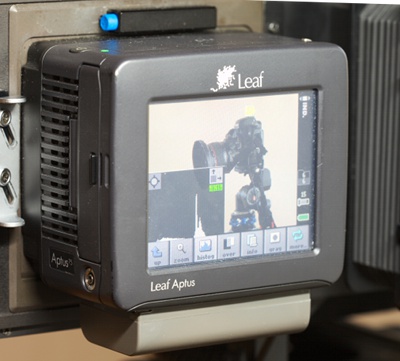
A Leaf Aptus 75 digital back, released 2005.
The digital back is the only electronic part of the camera and is sold separately. It's quite rare that technical camera manufacturers make own digital backs, instead they just provide adapters to make it possible to use almost any digital back from any manufacturer with their camera. Linhof is no exception in this case.
If you did not already know you will soon discover that the a digital back is a very expensive component, to a degree that's almost offensive when you compare it to what the best DSLRs can do today for a fraction of the cost. If you are an enthusiast user buying a digital back on the second hand market may be the only reasonable option. If so I recommend looking into my guide to second hand medium format digital backs.
The most important aspect of the back is that it should be "tech camera friendly". This means first and foremost that it should have low color cast issues. I think a key aspect of making the most out of a Techno is to use movements and for that a back with low color casts is extra important. Second it must integrate well with flash sync cable from the lens shutter. Some older backs are not properly designed for tech camera use and have synchronization problems.
Note that regardless how tech camera friendly your back is you won't get any EXIF information about the shot embedded in your files. The camera is 100% mechanical and thus won't transfer any information. So focal length, aperture and tilt/shifts are not registered. You need to write that up yourself if you want to save it to later. This is true for all technical cameras with mechanical shutters, and even with an electronic shutter you won't get the tilt/shift settings recorded.
In addition to low color cast I think that for the Techno or any other view camera it's valuable to have a good enough screen to make reliable focus check of captured images. The reason is to deal with the uncertainty feeling you can get when using the ground glass in difficult conditions.
How the back is to use will play a central role in the user experience of the camera system. The technical camera use case is however less sensitive than when mounted to a medium format DSLR, the reason is that the whole workflow is slower. So if the back is a bit slow (like old backs often are) it's still not too disturbing. Also one usually shoots few images so there's no need for a great image browsing or edit function. A useful histogram and 100% focus check is all you need. Note that the focus check capability is a deal breaker for many of the older backs, it may not exist at all or be so poor that it's not really useful. Generally it's not the resolution of the LCD that is a problem, even the lowest resolution screens (older are usually around 240x160) are actually adequate for the task, the problem is rather that the built-in demosaicer may not render the image sharp/detailed enough at 100% zoom. The older screens may also have a bit low contrast so it becomes hard to see nuances in the micro-contrast, especially in sunlight (looking at the screen under the focusing cloth in bright conditions helps).
As far as I know it's only the Leaf Aptus series of the older backs that have a decent focus checking, so you may need to compromise on this point if you buy an older back. The more I've used the camera the more confident I've become and less needing of focus checking, so I'd say that it's not a strict requirement to have this function. But I still make active use of it now and then, typically in low light situations.
Suitable pixel and sensor size
Technically speaking the more pixels you got the better. Even if the sensor has so small pixels that the image is heavily blurred by diffraction you will get a sharper print in the end compared to if you had fewer megapixels. However, the gain gets smaller and smaller with higher pixel densities and since pricing is very much dependent on pixel count (and sensor size) it means that you'd rather get something well-balanced, not too low density and not unnecessarily high.
Digital backs lack moiré (anti-alias) filters which means that you can get very sharp pixels at the cost of risking false colors and moiré patterns (aliasing). Moiré patterns aren't common in landscape scenes as it requires patterns in the objects photographed (much more common in architecture), but false colors do occur since it only requires small details of different color or shades. The reason for the false colors is that the sensor have a bayer array filter pattern and registeres only red, green or blue in a pixel rather than all three, and the missing color information is then interpolated by a demosacing algorithm in the raw converter.
An example of color moire (100% crop), the small cyan and magenta colorings on the stone was not there in reality. This is 7.2um pixel pitch on f/11 (15 um diffraction). Note that color moire reduction was disabled in the raw converter, when enabled it becomes less visible, but also some color resolution is lost.
A favourite subject in technical forums is to debate if being without AA filter is good or bad. My view on it's that for small aperture photography (large depth of field) it's okay or even an advantage to be without, since the resulting diffraction reduces aliasing and the resulting image becomes sharper an the pixel level. I think it's good to shoot with some diffraction onset, and then use post-processing sharpening to enhance pixel-level sharpness. It's however personal what you think is worse, a bit softened image on the pixel level or false color moiré. It's actually quite common that people prefer false color issues ahead of slight softening. I think that's because many are not aware about the false color issue. It should also be said that sensors that do have AA filters have weak ones to keep most resolution so they are not entirely free from aliasing issues either.
So what do I think is a good balance in terms of diffraction and lens performance? Looking at the Schneider lenses these are typically optimized for f/11. This gives an Airy disk diameter of roughly 15um. A well-balanced pixel size for that is a bit less than half, so I think a 6um pixel pitch is good. Many may react to this and think it is too small pixel size for that kind of diffraction, but you need to take into account the lack of moiré filter and the efficiency of post-processing sharpening.
I also think it's an advantage that "the optimal aperture" is f/11 because then the depth of field for medium format sensor sizes is large enough to be usable in a wide range of scenes, especially with tilt involved.
The strengths of the Techno is best utilized if we can do large movements and solve DoF problems with tilt. If we drop down to f/8 or even f/5.6 as our target aperture (to minimize diffraction visibility on ultra-high resolution backs) DoF becomes hard to work with, and the small pixels also leads to more color cast issues (at least in current backs) so movements become limited. Limiting possibilities to do movements and reducing the applicability of tilt as a depth of field solver makes the case stronger for a pancake camera. I think it also takes away some of the joy of technical photography. For these reasons I don't think that the best product is the highest resolution back.
What about sensor size? If you are used to 135 DSLR tilt-shift lenses with 12mm shift (I used Canon 5Dmk2 with a TS-E 24mm II a lot) and you really use that kind of shift amounts, a 48x36mm sensor size with 90mm image circle will not give you the same relative shift. Since one typically gets more picky about image quality when one gets a technical camera one rarely wants to use the full image circle, at least of wider angle lenses. Typically one wants to keep within 10mm shift which corresponds to 7mm on a full-frame 135 DSLR. This is well-balanced I think, therefore I like the 48x36mm sensor size. I don't see the highest end 54x41mm sensor size as an advantage with the current large format digital lenses, because movements become a little bit limited. It's generally still okay though, and many of the longer lenses have larger image circles than 90mm.
The smaller 44x33mm size I think is a bit under-sized for a 90mm image circle, and a little bit over-sized for the Digaron-S 70mm. Some of those sensors also have more color cast issues since they have been optimized for MF DSLR use. For a pancake camera with less movements and Digaron-S lenses they can be a good match though.
When choosing sensor size be sure to look at the wide angle lens options and which field of views you want. Wide angle choices from 35mm and down are a bit limited and costs can be high. In the lenses section I discuss wide angle options in more detail.
A few suggestions
So which backs to aim for?
A really good starter back I think is a 33 megapixel Leaf back (no surprise, I had one myself, an Aptus 75). It has a reasonably high resolution, even the old ones like my Aptus 75 have good (enough) screens for focus checking, requires no wakeup procedure and combines very well with the wider Schneider lenses due to low color cast and crosstalk issues. The sensor size is 48x36mm, twice of a 135 full-frame DSLR. The pixel pitch is 7.2 um which I think is quite well-balanced for f/11 although I consider a bit smaller better. Still I think this is one of the best combinations with the Techno, especially if building a system with Schneider Digitars. The largest disadvantage to many I think is the psychological pixel envy effect - 33 megapixels does not feel that cool after the 36 megapixel Nikon D800 DSLR came out - but in absolute numbers you can make very fine large prints. At the time of writing Canon is at 50 megapixel and even higher pixel counts will surely come in the 135 format so I do strongly suggest that you make a calculated judgment based on actual image quality of your prints rather than just counting pixels.
The 22 megapixel backs with 9 um pixels are okay, but I personally think is a bit too low for f/11, there's too much moiré and aliasing. But I know some like them, and at the time of writing Leaf still sells one model with this resolution and I know about professionals that use them with technical cameras simply because they don't need more pixels for their prints. Even if so I think it's better to step up to 33 and print at higher ppi, simply to reduce moiré and aliasing issues.
I should say that that since the first revision of this review I have myself borrowed and used a 22 megapixel Hasselblad CF22 back with my Techno, and actually I liked it more than I thought I would. Indeed there are more moiré issues, but for landscape I think they are manageable. Do expect to now and then work with moiré reduction in post-processing when you make a fine art print though. Rather than shooting at f/11 the standard aperture becomes f/16 with the 22 megapixel back (since f/11 don't really look sharper with the 9um pixels), so thanks to the lower resolution you get a larger apparent depth of field and the focusing becomes more forgiving. This means that a working focus check on the LCD (very few of the older 22 megapixel backs have that) is not as critical with a 22 megapixel back as with higher resolution backs. Thus, if you want in cheapest possible I think a 22 megapixel second hand back actually is a good choice.
CCD sensors are typically very bad at long exposures without advanced cooling, and many backs are therefore limited to 30 seconds. While the Techno due to ground glass focusing certainly is not an ideal night camera, long exposures may still be an interest by using "big stopper" filters. The number one choice is then the 39 megapixel 48x36mm (actually 49x37mm) Phase One P45+ which has a unique long exposure capability, up to 1 hour in colder weather. I consider it overpriced though, and the color response is not as good as I think one should expect from a medium format system, but if you need long exposures there is not much choice (in 2013 the high-end 60 megapixel back IQ260 was released which supports long exposures, but it's actually not as good as P45+ in that regard).
Phase One IQ160, what I consider to be one of the best matches with the Linhof Techno today. (Picture by Phase One)
A very good high-end back I think is the 60 megapixel 54x41mm Phase One IQ160, today surpassed by the long-exposure capable IQ260 and IQ3 60MP (if you don't need long exposures the IQ160 should be just as good though). It has the 6 um pixel pitch which as previously discussed I think is very well-balanced for f/11. The color cast is worse than for the older fat pixel backs (like 33 megapixel Leaf backs), but you can still use the full Schneider non-retrofocus range if equipped with the center filters, although with limited image circles on the 35 and 28 due to crosstalk (very limited on the 28). With this back many users choose retrofocus alternatives from the Rodenstock ranges for the 35 and 28. To be honest, I'm personally a bit disappointed with the wide angle performance of the Dalsa-based 6 um backs like the IQ160, I'd like to recommend a high end back that would perform well with the Schneider 35 and 28 but the hard truth is that today there is none with this resolution. If you think you can live without the focus check and the modern interface the older P65+ uses the same sensor and provides virtually the same image quality. If you can do with a little bit less resolution and smaller size, do consider Hasselblad described further down.
I know many went for the 80 megapixel IQ180 (IQ280/IQ380 today) because it's the top model (until IQ3 100 came along), but then the widest Schneider lenses approaches the unusable (when shifted) due to color casts and crosstalk, so you need to go for the more costly and heavy retrofocus Rodenstocks. The gain at f/11 in terms of resolution over a IQ160 will be minimal too, so one probably gets a bit tempted to drop down to f/8 just to get more out of the back, and then DoF starts to become an issue. IQ160/IQ260/IQ360 is simply a better match.
The next highest end back, the 100 megapixel Phase One's IQ3 100MP with a Sony CMOS sensor is unfortunately a disappointment in terms of wide angle compatibility, it has the same problems as the older IQ250. Some will still use it for sure, but I cannot recommend it.
With Phase One's IQ4 150MP the break finally came, a CMOS sensor that works with wide angle lenses thanks to BSI technology. At the time of writing this minor update (January 2019) the back is very new and bugs still remain in firmware but everything points to that this will for sure be the absolutely best you can get, and I would strongly recommend to skip over the "inbetweeners" (80MP CCD, 50 or 100MP CMOS) and go directly for this (sometimes stepwise upgrade is wiser economically speaking though). You will still need to make LCC shots with this back, but color cast issues are much smaller compared to earlier sensors. Unfortunately to get this BSI technology the only alternative to this very expensive back is probably going to be an equally expensive Hasselblad back using the same Sony sensor. 44x33mm versions of the sensor exists, but it will likely never be seen in a digital back.
Leaf backs with rotating sensors also deserves a mention, the Leaf Aptus-II 10R uses a 6 um Dalsa sensor like the IQ160 but has a wide 56x36mm format. Thanks to the rotating sensor you will not need to detach/reattach the back when changing between landscape and portrait format which some consider to be a very important feature. Personally I'm not into wide formats though so I would crop out a large part of the sensor most of the time which hurts when you know how much you need to pay for sensor area.
An ideal balance I think would be a 48x36mm 6um back (48 megapixel) like the Hasselblad CFV-50 or Sinar eXact or Sinar eVolution 86 H. The Sinar backs are unfortunately teather-only multi-shot backs intended for studio use.
Then we come to a possibly controversial suggestion. Do look at the Hasselblad backs based on the Kodak/TrueSense Imaging KAF-51000 47x39mm 50 megapixel sensor. This is 6 um pixel size, a sensor size which is well-balanced, and much better at handling technical wides than backs based on the Dalsa 6 um technology. The reason the suggestion could be seen as controversial is that Hasselblad is quite rarely used among tech camera users, while Phase One and Leaf backs has the vast majority of the market, so it's not a mainstream suggestion. If you know you want to use Rodenstock Digaron wide angles rather than the Schneider Digitar, the Dalsa 6 um backs are good, actually a little bit better concerning color separation and dynamic range. However, if you like traditional symmetric large format lens designs as found in the Schneider Digitar range you will with the Dalsa backs be limited in movement range due to crosstalk issues. The Kodak 50 megapixel sensor doesn't have the same problem, a fact which is not well known in the technical camera community due to the Phase One dominance. So I'd say that the Hasselblad backs are under-appreciated. That said some still prefer the improvements in dynamic range and rather have more limited lens movements on the wides, so it's a personal choice.
The Hasselblad CFV-50 is a natural out-of-the box choice as it can be bought separately and has battery power in the back, while the H4D-50 is bought with Hasselblad camera body and will require external power (like a Quantum Turbo 3 battery). The H5D-50 has a battery adapter as an accessory so you don't need a third-party power solution. At the time of writing Hasselblad has stopped selling cameras with the Kodak sensor so you need to find these in the pre-owned or second hand market. The CFV-50's screen is not really good enough for focus check though (I've heard), while the H4D and H5D are. On the second hand market you may find a H3DII-50, which also will require external power. Note that the CFV-50 was in 2014 discontinued and replaced with the CFV-50c using a smaller CMOS sensor which works poorly with wide angles, there's the same difference between H5D-50 and H5D-50c.
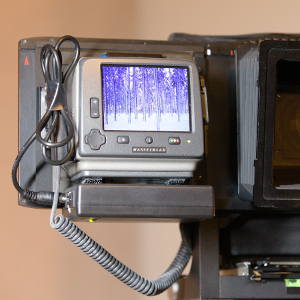
Hasselblad H4D-50 digital back with an 35 euro e-bay battery attached with duotec band so the battery can be detached. The duotec glue can be removed so there's no damage to the back either. This battery is small enough so the back fits also in the vertical orientation without colliding with the ground glass holder.
I think it's a big advantage in setup speed to have the battery attached directly to the back rather than having one more cable to attach. The H5D series and the H4D-60 has external battery adapter natively, but the older Hasselblad H backs needs a solution like this (all Hasselblad V backs have batteries in the housing). A Leaf L-plug is used to get the power into the firewire input. Of course you could shorten the cable to make it look a bit nicer.
In any case I think the need of external battery should not necessarily disqualify the use of a Hasselblad H back. On the second hand market the value for money is often very good of the Hasselblad cameras, even if you only use the back and never the H body that comes with it.
In 2014 I sold my Aptus 75 and bought a second hand H4D-50 which I use together with a small no-name external battery directly attached to the back. I'm very pleased with this solution. Note that the automatic flash sync of the Hasselblad doesn't work well for 1/125 and faster shutter speeds though, but it's no real problem in practice as shutter speeds are much longer when shooting at f/11 and f/16.
In January 2014 Phase One relased the 44x33mm IQ250 which was the first medium format back with a CMOS sensor and associated high quality and fluid live view. This live view is so good it takes away the need of the ground glass and sliding back and would thus be a perfect match for a Linhof Techno (apart from the a bit small size). Unfortunately the sensor has like most current CMOS sensors a poor wide angle response, even worse than an IQ180, meaning that color cast and crosstalk becomes quite severe when using shorter lenses than about 50mm with any movements. However, quite good real-world results can still be had, so if you really want live view do investigate this option (CFV-50c is then by far the most cost-effective alternative at the time of writing), but make sure you check the whole wide angle range and the full shift range you intend to use and watch for color stability and demosaicing artifacts (crosstalk leads to desaturation and severe levels also to mazing in demosaicing).
Personally I would not recommend this combination, but depending on your needs it may still be good compromise for you, and there are dealers that sell for example the CFV-50c and Linhof Techno in a package. As you don't need to buy the sliding back or ground glass you save some cost on the camera body. On the other hand you will on the wide angle side need the Rodenstock Digaron lenses (which can become expensive!) and you will not be able to use the full image circle with retained image quality.
And finally, as probably the last update I will make on this article: in late 2018 IQ4 150MP came which solves the angular response problem. After the usual initial quirks have been fixed this will most likely be the best alternative if you have the funds, but to most of us one of the older backs makes more sense economically.
Matching 4x5" film
4x5" film is interesting as a benchmark, as that was the most popular format for making high quality large fine art prints not many years ago. The Linhof Techno can also be seen as a digital direct replacement of a 4x5" field view camera.
Naturally we would like to achieve a similar or better quality level. What do we then need? New photographers that have never used analog film may not be aware of the very high image quality 4x5" film is capable of, and may be surprised how much is required to match it.
Concerning the resolution the 39 megapixel Phase One P45 (later P45+) was for many the point where digital became good enough to replace 4x5" film for their commercial and/or artistic work. Technically speaking the large format film has higher peak resolution, but if we want a grain-free result they are quite close. The resolution of a 4x5" drum scan is typically 2000 ppi which leads to about 80 megapixel images, but you do then capture some film grain (digital files are cleaner). Comparing these two some think they get slightly better result with 4x5" film and some slightly better with 39 megapixel digital. Obviously the 33 megapixel Dalsa chip based backs are not far behind, but I would say that it's a little bit on the low side to be fair to 4x5".
Film usually has an advantage for very large prints since the grainy film look is more pleasing at close range than a digital image where you may see pixel structures. To look very good at nosing range I think a digital print should not be printed at less than 200 ppi, which is 90x70cm (36x27") for a 39 megapixel back. 4x5" could be enlarged a bit more thanks to the more pleasing grain structure. The digital files can be printed at much lower ppis than 200 of course, but the message is that if your target print sizes is 80-90 cm wide or smaller you will probably think digital 33-39 megapixels provides as good or better image quality, while for larger prints you may want higher pixel count to match or exceed film. Again I think a 48/50 megapixel sensor would be a fine balance to match 4x5", it gives 100x75cm (40x30") prints at 200 ppi. I upgraded myself from 33 to 50 megapixels (Leaf Aptus 75 to a Hasselblad H4D-50) to better match "large format" resolution.
Here I have only considered the resolution and structure look at close range. The color response of film is very different, and some like it and while you can simulate it digitally you cannot get the exact same response. With digital you can get more accurate color though and there is more flexibility in changing the look in post-processing.
Adapter plates
Adapter plates to mount in the sliding back (or back holder) exists for most formats (Hasselblad H and V, Mamiya etc). These are high precision plates (must be high precision to avoid focus shifts) and are therefore rather expensive, probably a fair bit more expensive than they need to be as usual with camera accessories. To save some money one can buy adapter plates for the Phase One flex adapter, this is the exact same adapters manufactured by Linhof but with Phase One logotype instead, which makes them considerably cheaper. Or if it's the other way around, not sure if it's Phase One or Linhof that makes these plates today.
A warning about the H-mount adapter plate: many Hasselblad backs have a centered safety-catch button, which the adapter plate is not designed for. This means that the button may collide with the centered housing for the detach button on the adapter plate. If this happens, you may need to sand down the housing 0.2mm or so to fit the back (I had to do that with my H4D-50). The next problem is once fitted the back can be difficult to remove as the safety-catch button on the back is difficult to grab when half-hidden under the detach button housing. Other brands that make H-mount backs don't have the safety-catch button, and the latest Hasselblad series (the H5D) has the safety catch button moved to the side, so there's no problem with those.
Using with film
Although not mainly intended for film use, you can use the Techno with a film back. It's a 6x9 camera and that's also the largest film format you can use. You will have to use the standard ground glass to get scoring for your film format.
For the larger 6x9 format the available movement range (which is tuned for digital formats) will probably feel a bit limited.
With film you don't have a sliding back, but instead you swap the ground glass and film back by detatch and attach. Maybe you could fit a Hasselblad 6x6 rollfilm back on the V-mount digital back plate and use the sliding back (haven't tested!), but for the other rollfilm backs you will need to do a swap.
Digital lenses work very well with film assuming the smaller image circles covers the film area, so you can get a film back to complement your digital system.
Note that I have not shot film with the Techno myself, I just included this brief section about film for the sake of completeness.
Tripod and head
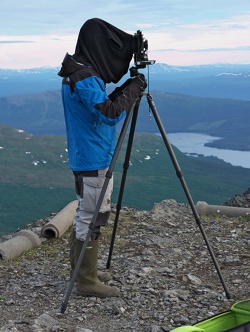
Photo: Fredrik Torger.
Compared to a typical DSLR configuration the Linhof Techno is heavier. With sliding back, digital back and lens the total weight is around 4 kg (9 lb). Not extreme, but obviously a higher end tripod is needed. I'm satisfied with a series 3 carbon Gitzo, but I know some use even more stable tripods.
An other factor is that the camera with sliding back is a bit tippy, like a DSLR with a tele lens (but instead tippy sideways). I don't find this to be a problem, but I would not use the camera with a ball head. A geared head with self-locking gears is what I recommend. I also like it to be easy to operate like the camera itself so I can make fine adjustments from under the focusing cloth.
I started out using the budget alternative Manfrotto 410 which works okay but my copy became a little bit sloppy (position can shift slightly when cocking the shutter). It's also among the heavier heads, and it's bigger brother Manfrotto 405 is even heavier (so I don't consider that a real alternative for field use). I eventually upgraded to an Arca-Swiss D4 head which I at the time of writing have used for more than a year and I warmly recommend it for the Techno. It's also a great companion for your DSLR.
Other geared heads to look at would be the Arca-Swiss Cube, Linhof's own 3D micro, KPS T5 (a geared ballhead) and Photo Clam Multiflex (Arca-Swiss Cube copy, still almost as expensive). That's as far as I know a complete list, there aren't that many (reasonably light) geared heads on the market. I don't recommend the Sunwayfoto GH-Pro (an Arca-Swiss D4 copy), I haven't tested it myself but users that have report that it's no better or even worse than the Manfrotto 410 in terms of sloppiness/coping with the weight. So if you are on a budget the Manfrotto 410 is probably the least bad choice, otherwise I'd recommend the Arca-Swiss D4. The Arca-Swiss Cube is very popular among medium format users in the forums, but as it can't be unlocked and weighs more I still recommend the D4 for field use.
Carrying the system
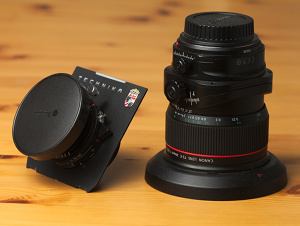
The camera body is heavier than a DSLR, but lenses are generally lighter evening out the odds somewhat. Here a Schneider 47mm vs a Canon 24mm tilt-shift lens.
As a hiking landscape photographer being able to carry the system is important to me. At first glance one would think that the weight would be much higher than for a DSLR system, but it's actually not that bad. The reason is that large format digital lenses are generally small and light-weight, at least the Schneider Digitar ones which I prefer.
It also depends on how we compare the systems. A Techno system weighs about 8-10 kg (17-22 lb) and you cannot change the configuration much to get below that. With a DSLR you could do fine results with just an image-stabilized zoom lens and not even bring a tripod, but if you want to shoot at the same level as the Techno you need a tripod and tilt-shift lenses, and then it looks differently.
Weight examples
This tripod and head I use both for my Linhof Techno and DSLR system:
- Gitzo 3541XLS: 1970 g
- Manfrotto 410 geared head: 1250 g
3.2 kg in total. An Arca-Swiss D4 head (800 g) would make it 2.8 kg. The Gitzo 3541XLS is an extra high tripod, which I like to have. I get to use all four sections surprisingly often, then typically one leg only when on sloping difficult ground. It also becomes extra stable at normal height since then only 2.5 sections are out.
- Linhof Techno body: 1930 g
- Linhof sliding back with ground glass and light-hood: 1130 g
- Digital back with battery: 600 g
- Extra battery: 100 g
- Schneider Digitar 35 mm: 350 g
- Schneider Digitar 47 mm: 320 g
- Schneider Digitar 72 mm: 260 g
- Schneider Digitar 120 mm: 260 g
In total 5.0 kg (11 lb), with tripod and head 8.2 kg (18 lb).
Here's a DSLR example configured for technical landscape photography:
- Canon 5Dmk2 with battery: 950 g
- Extra battery: 80 g
- TS-E 24mm II: 850 g
- TS-E 45mm: 650 g
- TS-E 90mm: 580 g
- 1.4x Extender III: 230 g
The extender is there as a well-known Canon-system trick to get more focal lengths out of the limited TS-E lenses. One could discuss the inclusion of the TS-E 45mm (poor quality) and exclusion of TS-E 17mm, but I wanted the focal lengths be similar to the Techno configuration in this example. The weight is in total 3.4 kg (7.5 lb), with tripod and head 6.6 kg (14.5 lb), that is 1.6 kg (3.5 lb) lighter. One could argue that we could use a bit lighter tripod with the DSLR, my point though is that the difference is not huge, and the Techno system is surprisingly light. At 10 kg you get a very competent system. Actually I was already used to carry 10 kg camera gear since my Canon lens configuration is a little bit different than the example listed above and I usually carry my 70-200/2.8 (1750 g).
Linhof's own Techno case
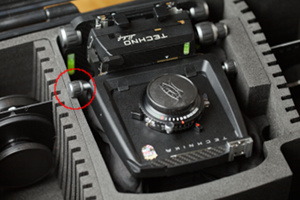
Yes the Linhof hard-case is expensive, and no the camera does not fit into it.
Linhof provides a hard-case as an accessory. It's actually a rebranded B&W Outdoor case with a custom foam insert, and with the Linhof logotype comes a silly high price. As you may suspect I don't recommend to buy this. The B&W Outdoor case is a great product, but why not buy the original brand and make your own foam insert which will be both cheaper and better.
The problem with the foam insert that Linhof provides in their case is that it's not well cut. There's no opening for the horizontal lens shift knob, so one has to shift the front standard a bit to fit it. When you do that and have the standard bellows mounted it will get ugly wrinkles, and if you have the wide angle bellows it does not really fit so you need to force it down which cause surface wear on the bellows. Actually my standard bellows have wrinkles on it because the previous owner had packed it in this case.
To be fair it takes five minutes with a knife to fix it though (if you don't pack it with the wide angle bellows), but it says something about Linhof as a company when they release a product in this state. It has obviously not been tested at all, or with a Techno prototype without the lens shift knob, and not thinking about the wide angle bellows that most will be using. I find it worrying. Hopefully they have fixed the problem to the current revision.
Okay, I said "silly high price" but actually I don't mind paying extra for a brand, if the brand name means something, for example that you get an guarantee that the product's design have been tested by the company and fulfill the quality level the brand stands for. But this is just Linhof being lazy.
Third-party bags
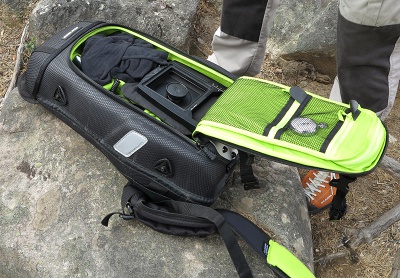
A Techno system with three lenses inside a Boblbee Procam 500XT, you cannot go smaller than this. (Photo: Fredrik Torger)
I'm not a big fan of camera bags. Here in Sweden we have a strong hiking tradition with well-designed backpacks with adjustable carry systems so one can carry heavy gear comfortably. In comparison to these outdoor and expedition backpacks most camera backpacks fall short.
With my DSLR system I have actually not cared to get a specific camera bag, the rounded body and cylindrical lenses can be easily packed in pouches and wollen socks or whatever and then be put into a one of those well-designed hiking backpacks. With the Techno system this is not possible. Although weight is not too bad a Techno system is more difficult to pack due to the shape of the parts. The L-shaped body with knobs sticking out here and there and the square lens boards requires that the system is properly packed in padded spaces. To that comes the long sliding back which of course is a bit of a pain to pack.
I started out with a Boblbee Procam 500XT, and into this backpack I could pack the system with three lenses, with some effort. This is as small as it can get. You won't fit four lenses in there, so when I expanded to six lenses after the first revision of this review I added sidewinders to the bag to carry those. Since the space is so tight it is also a bit less efficient to unpack and pack than I would like to - to fit the system into the bag the largest lens must sit on the camera body before packing, so if I'm not using it for the moment I still need to unmount and mount it for every unpack / pack. With the extra sidewinder bags it became a little bit more flexible.
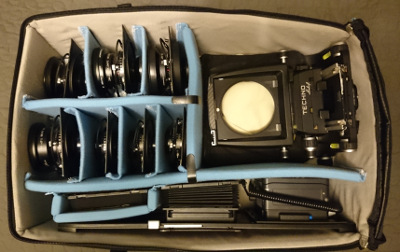
F-Stop XL Pro ICU with custom home-made interior. Filters are stored under the camera, extra batteries and CF cards under the lenses.
Normally one lens sits on the camera body. When packed there's also a focusing cloth draped inside (makes the camera body lay still) a dust blower and a neck pouch with loupe, LCC card, distance meter and other small things used when shooting. Everything except the tripod and head fits inside.
At the time of writing I have expanded the system to seven lenses (35 to 180mm) and switched bag to an F-Stop Satori EXP backpack. A special feature of the F-Stop bags is that they have internal cases ("ICUs") which can be removed. I use the F-Stop backpack for day trips, and I stove the ICU in a Bergans Powerframe 130L expedition backpack for longer trips with camping equipment. To fit the full-length sliding back I had to get the largest ICU F-Stop has (the XL Pro ICU).
All camera bags are designed for standard DSLR gear, and this means that the dimensions of the configurable interior doesn't work well. I started out with the standard interior patched with some extra interior parts from another bag, but the fit was not good so eventually I made a custom interior. You need velcro, velcro fabric a sleeping pad (which you cut to pieces to form the interior walls) and a sewing machine. Another problem is that the box in standard camera bags is generally deeper than the Techno system needs making it harder to use space efficiently. I solved that by storing filters under the camera and extra batteries and other small parts under some of the lenses.
I fit the complete camera system with into this ICU which makes it easy to move between bags. The total weight of the ICU with all parts in it is 8.7 kg. The tripod and head is on the side though of course. I currently use an Arca-Swiss D4 head and Gitzo 3541XLS tripod which weighs 3 kg, which means that it's a bit too heavy to carry on the F-Stop Satori bag (it becomes too back-heavy if the tripod is carried on the back, and too side-heavy if carried on the side), so I usually carry it in my hand or over my shoulders. With the large Bergans expedition backpack there's no problem to carry the tripod and head on the side though. The reason I chose the Bergans backpack of the many expedition backpacks I looked at is that it has a separate bottom compartment and the ICU fits comfortably in there. This means that the camera gear can be accessed easily without unpacking other gear.
Personally I prefer to have many focal lengths to choose from when I shoot and I think it's worth carrying the extra weight. It's quite rare to have these many lenses though, especially when hiking. The typical system will take less space and weight.
To conclude I will say that you will need more adapted and specialized solutions to pack a Techno system than the typical DSLR system. If we compare with a pancake camera those can also typically be packed in tighter spaces, but only if we don't use long lenses. As soon as we do that the lens mounts get large and bulky, and the Techno wins.
Operating in tough conditions
Cold weather

On a cold windy mountain top, here using my Canon DSLR system. As long as it's not windy cold conditions are quite okay with the Techno too, did not have any good action shot to show here though. (Photo: Fredrik Torger)
For me cold weather is the main type of tough shooting condition I can get into. I've shot quite often in temperatures down to -15 degrees Celcius (5 degrees Fahrenheit), and occassionally down to -30C (-22F).
The all-mechanical camera won't break from cold weather of course, but the oil in the gears get thicker, and thus the resistance becomes higher. For the focusing gear this is alright (you can release the friction lever to a minimum), but the rear vertical shift becomes slow and cumbersome to use, and the tilt/swings also get a bit tough. It does not become hard to set the desired position, so precision is the same, but it takes more effort to work with the camera. At -15 it's okay, but noticably slower, at -30 the tilt is very tough and the swing is nearly unusable. If you don't need to swing it's still workable though.
However, for me personally the limiting factor is to keep my hands warm. All parts are of metal so you don't want to handle it with bare hands. I have sensitive hands and the most effective solution for me generally is to use mittens, which are much better at retaining heat than gloves. I've tried battery-heated gloves, but mittens are still better. Leather mittens with not too much isolation keeps some minimal dexterity, and with those on I can actually do most operations with my DSLR. With the Techno (or rather the Copal shutters) it's harder, but quite much can still be done with the mittens on. So I can work with it in cold weather, but I work much more slowly, and since it's a relatively slow workflow to start with it can in some situations become frustratingly slow. I sometimes need to take a couple of breaks during the workflow to get my hands warm again, and those breaks is what makes it real slow for me. With the DSLR the workflow is faster so I can often get the shot before I need a break to warm my hands.
I recommend to have a somewhat roomy backpack so you can unpack and pack quickly with the mittens on. I would also recommend to have short cable releases attached to each lens so you don't need to remount it when changing lens. Wind makes a huge difference of course, windy conditions in -15C is generally more difficult condition to work in than -30C with no wind. In -30C I've only been out when there's no wind and then it's enjoyable to work with the camera despite the challenge with the stiff gears.
You also need to work fast when focusing, and perhaps holding your breath to avoid your breath fogging the ground glass (or your own glasses). Overall you want to be extra speedy through your workflow when in cold weather, to keep yourself warm.
I've noted that Schneider Digital push-on lens caps are not very temperature stable, in hot weather they enlarge and become too loose, and in cold weather they shrink and can become very tight and a bit difficult to remove. I've replaced those witho standard pinch lock lens caps where possible.
Another factor to consider is how well the digital back is at handling cold. Not all digital backs work well in freezing temperatures, check that before buying.
Hot weather
I do not generally get in contact with very hot weather conditions (desert) so I cannot make an evaluation here. I would expect that it works as good as any other system but that you may want to shade it when shooting and have well-isolated bags so the metal does not get uncomfortably hot.
Wind
The sliding back catches quite some wind, but the camera is also reasonably heavy so up to about 10 m/s seems to work fine. Using a focusing cloth in strong wind can be a bit messy though of course. In extremely windy conditions I would rather use a system without sliding back and no need for ground glass focusing, but I personally very rarely face conditions where I need to shoot in stronger winds than 10 m/s so I have not really found this to be a limitation.
Rain
When it comes to rain the digital back would be the limit. Typically digital backs are not as well-shielded as professional DSLRs, but there is usually some decent protection. If it starts to pour down rain I cover the camera, but if there are only a few raindrops I just go on normally. One rarely has the same need to shoot in rain as when doing journalist type of photography, so I really don't see a need to test the limit.
Concluding discussion
The Linhof Techno is a natural digital evolution of the 4x5" field view camera, and I think Linhof has made a good job. It's not perfect though. While I don't have much to complain about overall concerning the body (excellent design and ergonomics!), there are a few aspects that I would like to see corrected in future revisions: 1) front standard fastening, today infinity stops are strongly recommended to secure parallelism (and the infinity stops are poorly made by the way), 2) alignment of swing scale: it's ugly to have the scale mounted on tape because it can't be aligned in manufacturing, 3) higher speed of rise/fall gearing (actually all shift gears would gain from a little higher speed).
Then there are a number of smaller things that could be improved, like the light leaks around the ground glass in the sliding back (so you don't need to cover up with tape). Overall I get the sense that Linhof has some improvement to do when it comes to "attention to details", and I think they lose customers due to that, as tech cam customers tend to be picky. Since I reviewed my camera there's been some silent upgrades, improving the sliding back, lens and digital back fastening mechanisms for example, so some details have been fixed. If they would fix only one thing it would be the front standard fastening, but I think it will stay the same due to that there's much Linhof tradition in that design. Oh well, with infinity stops it works fine.
There's also a number of things that are better than the competition. The tilt/swing are both geared and have degree scales (which is nice when using tilt tables, which you often do in landscape photography especially for wides), on an Arca-Swiss F-Universalis you don't have any scales and only tilt is geared. The form factor for packing is as good as it can get for a view camera, much better than many of the alternatives.
The sliding back precision is "as good as it gets" (there are sliding backs out there with a fair bit of play), and the new bright ground glass is probably the best both regarding wide angle brightness and resolution (haven't found any competitor that is better). Ground glass focusing in the digital era doesn't get better than this. Still I think there are improvements to make, the new bright screen is a glare machine so some surface treatment would be nice for us that like to compose without focusing cloth.
Simply put, despite a few imperfections I think this is the best field view camera out there, especially if you will be using a sliding back, but also if you will be using CMOS live view I think you should seriously consider the Techno. The largest drawback of the Techno compared to the competition in that regard is that Cambo Actus and Arca-Swiss F-Universalis are so much cheaper, but once you start adding lenses that difference evens out.
CMOS live view is by the way the best thing that could happen to Linhof. This revives the view camera genre, and makes the competition from the pancake cameras (with ultra-precise focusing directly on the focusing ring) less threatening. The current CMOS backs have compatibility issues with wide angle lenses tohugh, so to really become a breakthrough a full-frame CMOS with good wide angle compatibility is required. Hopefully it arrives soon.
Meanwhile it's ground glass focusing that's the thing, and before CMOS live view was an option at all the main question users posed was "can I live with the ground glass, or should I get a pancake camera with high precision focusing rings?". Ground glass focusing has inherent limitations due to limited resolution, but I think I show here that you indeed can focus with adequate precision (including wide angles) so I think the common statement that ground glass in general is near-impossible to focus accurately is greatly exaggerated. However, to gain this precision you really must have a high magnification loupe, and while there is the 12x Silvestri now it's a special dealer kit, Linhof themselves actually do not provide adequate magnifiers in their accessory list at all, which I find remarkable. I think they should provide a precisely tuned ~8-10x overview loupe and a ~15-20x critical focusing loupe for both their new bright screen and the standard ground glass + fresnel, that is fixed focus and separate bases depending on ground glass used. It would be nice to find a well-designed focusing cloth for field use too.
Reviews on the internet are in general positive in tone regardless of result, so compared to that I may sound overly critical in this review. However, I'm in fact somewhat of a view camera fan and love the camera. I just want Linhof to make an as good offering as possible so it can compete better with the other alternatives out there, and I get quite upset when I see sloppy details like that misaligned swing scale or poorly made infinity stops, and a bit sad when they ignore key details like providing tuned high magnification loupes. In today's competitive climate it's not only about actual function, view cameras and ground glass has in general got a lot of FUD thrown at it from pancake camera makers/users (usually indirectly) so they have that to tackle as well, that is they need to prove themselves. To have sloppy fastening mechanism of the front standard when one of the main view camera criticisms is parallelism issues is a major mistake. Seriously interested users will find out the workaround (special care when moving and/or infinity stops), but I'm sure they lose users to say Alpa or Arca-Swiss due to this.
Speaking about brands it's worth noting that Arca-Swiss, Cambo and Alpa brands all have stronger representation on the (English-speaking) internet (reviews, forums etc), which I think is mainly due to weak representation of Linhof in the US. I think Linhof and the Techno deserves more attention than it gets, it should be evaluated on the same terms as the other brands.
In the end the choice of technical camera is very personal. If the Linhof Techno is right for you depends on if its mix of features matches your (desired) shooting style, and I hope this review has provided you with enough information to make such a judgement.
Appendix
Focusing rail and depth of field
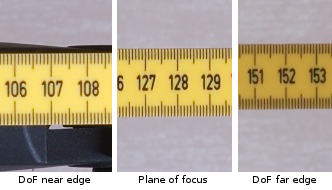
"Pixelpeep" depth of field (DoF) example. Circle of confusion (CoC) set to Airy disk diameter for the given aperture. The example shows f/11 (Airy/CoC 15um), 100% crops from 33 megapixel 36x48mm digital back (7.2um pixel pitch). Plane of focus is barely sharper than DoF edges, even here on screen at 100%. (The difference in brightness is due to uneven lighting.)

Depth of field with traditional CoC size, set to 42um for the 36x48mm sensor. Excuse me for the very dark far edge, the light did not really reach there. Near and far edges are equally blurred though so one can look only at one of them.
To understand precision requirements on focusing with the view camera we need to look into how depth of field relates to our focusing rail.
When we turn the focusing wheel the whole lens is moved closer or farther from the sensor, that's all it is to it. From this it becomes obvious that instead of looking at the traditional depth of field formulas and re-arrange them to calculate lens position, we can simply look at depth of focus which is how depth of field works behind the lens at the sensor.
If we would go into the exact optical mathematics the formulas become quite complex to deal with, but fortunately most factors have very small impact on the result, which leads up to a very simple approximate formula for depth of focus:
<depth of focus> = 2 × <f-number> × <circle of confusion>
This formula works well as long as we are not in macro range. Should we get there the depth of focus increases so the formula never over-estimates it. A very interesting aspect of this simple formula is that neither focal length or focus distance are variables (since they have extremely small impact they have been removed), leaving only f-number and circle of confusion (CoC). The CoC is a fixed choice set to your liking, so this means that for each f-number the depth of focus is fixed regardless of focus distance or focal length (excluding macro distance).
Let's look at an example; for medium format digital a typical shooting aperture for large depth of field is f/11, and for that the actual aperture is 11.31 (square root of 128), and since I prefer small circle of confusions I set it to the Airy disk diameter which is approximately 1/750th of the f-number, 11.31/750 = 0.015 mm, so our depth of focus becomes 2 × 11.31 × 0.015 = 0.34mm.
Another important aspect is that the depth of focus is centered around the exact focus, so our 0.34mm is distributed as ±0.17mm around it.
Naturally this can be translated directly to the focusing rail. If you shoot at f/11 and want a subject to be "acceptable sharp" as defined by depth of field, you need to be within ±0.17mm on the focusing rail.
Using traditional CoC sizes, a medium format sensor of 48x36mm would get as large as 0.042mm leading to a depth of focus of 0.95mm or ±0.48mm, but I don't think that has much relevance for the modern digital photographer, especially if we use the depth of field to evaluate our focusing precision.
Ground glass resolution and focus shift test
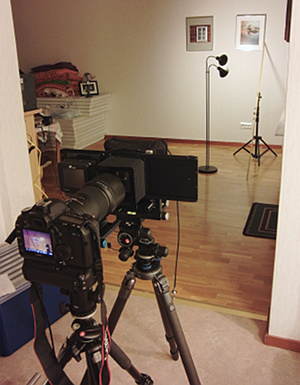
Canon DSLR with macro lens photographing the Linhof ground glass.
The figures shows an experiment when a Canon 5D mark 2 with a 1:1 macro lens was focused on the Linhof Techno ground glass, and then live view turned on to use the it as a very high magnification loupe.
The Linhof Techno was then focused to the 130 cm mark on the 45 degree slanted folding rule 3.5 meters away, and then the 33 megapixel digital back (Leaf Aptus 75, H-mount) was slided into position (standard sliding back was used) and a picture was taken on the wide open aperture f/4.5 of the 90mm Schneider Digitar lens.
After studying the resulting image the actual focus seems to be closer to the 138cm mark. No focus shift can be seen though, the focusing error is due to that the depth of field is fairly wide and ground glass resolution is limited, so it's hard to see on the ground glass where the exact focus is. This error (about 5.6 cm depth distance) corresponds to about 40 um on the focusing rail.
Note the surprisingly high resolution of the ground glass. With some effort each individual dash on the mm scale on the ruler can be seen, but due to variying grain size the exact resolution varies a little. The ground glass resolution is roughly 50 lpmm, or about 18 megapixels in the 48x36mm area.
Ground glass photographed with macro lens together with resulting 33 megapixel image at 100% view. Ruler (in cm) is slanted 45 degrees up against a wall meaning 1 cm on the ruler corresponds to about 0.7 cm in depth. Focus distance 3.5 meters, 90mm f/4.5. Focus is at about 138cm on the ruler. Note that there is some dirt on the ground glass causing the 140 mark (and a few others) to be a bit blurry. The strips from left-to-right shows the ruler from up-and-down that is from far distance to close distance.
What can we conclude from this test?
- Focus shift could not be seen and if existing it's very small, irrelevant even for a f/4.5 depth of field.
- The ground glass resolution is not high enough for us to be absolutely sure if we are looking at the center of the depth of field or closer to an edge, but through a rocking focus-peaking focusing technique the focus error should be small.
- The f/4.5 opening gives a rather soft focus-peak (compared to DSLR lenses of f/1.2 - f/2.8) which makes it harder to pinpoint it regardless of ground glass resolution.
- A 10x lupe does not have high enough magnification to reach the maximum potential of the ground glass focusing precision. Seeing grain is not the end of seeing details, as clearly visible in the photograph.
Focus precision test
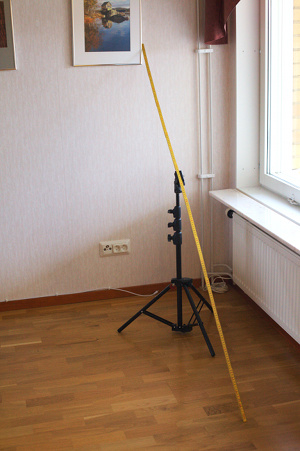
Folding rule slanted 45 degrees, used for focus precision and depth of field testing.
Later I set up the focus shift test again to make some testing of focusing precision.
Using a 45 degree slanted ruler (same as focus shift test), I put the cameras 4.0 meters away and tested a number of different focusing methods with the Linhof Techno and the Canon 5D mark 2. On the Canon I used a 85mm f/1.8 lens, which gives the same field of view as the 120mm f/5.6 on the Linhof Techno with the a 48x36mm sensor (1.4x larger diameter than Canon's 36x24mm). Having same field of view makes the comparison fair.
On the Linhof I did manual focusing with a 10x and a 20x loupe. On the Canon I focused manually using live view maximum magnification, and then contrast detect autofocus in live view (in maximum magnification) and finally the standard high speed phase detect auto focus.
I repeated each test 10 times. It would be better with a larger number of repeats to get better statistics but I did not have more patience than this.
- Canon 5D mark 2 85mm f/1.8 manual focus live view:
- Max 5.7 cm, mean 2.2 cm
- Focus deviations (on slanted ruler, 1 cm = 0.7 cm in depth): −1, +4, +8, +1, −7, 0, −2, 4, +2, +8
- Canon 5D mark 2 85mm f/1.8 auto focus live view (contrast detection):
- Max 7.1 cm, mean 1.4 cm
- Focus deviations (on slanted ruler): −2, 0, −4, +2, −2, +10, +2, +2, −3, 0, +4
- Canon 5D mark 2 85mm f/1.8 auto focus (phase detection):
- Max 12 cm, mean 3.6 cm
- Focus deviations (on slanted ruler): +3, −2, −17, −3, −5, −15, −4, −15, −11, −5
- Linhof Techno 120mm f/5.6 ground glass 20x Belomo jewelry loupe:
- Max 12 cm, mean 6.4 cm
- Focus deviations (on slanted ruler): −11, −9 −9, −3, +5, −9, −4, +17, +4, −13
- Linhof Techno 120mm f/5.6 ground glass 10x Silvestri loupe:
- Max 35 cm, mean 15.6
- Focus deviations (on slanted ruler): +8, −16, 0, +10, −12, −10, +24, −15, +35, −4
As we can see of the manual methods the Canon live view is the best. Since it very clearly shows 1-to-1 pixel the only reason of error is that the zoomed in window shows so little of the depth of field so it's not fully certain that one looks at the center of it, even for an f/1.8 lens.
All manual focusing methods here require full concentration, since there is a very small difference between perfectly in focus and slightly out of focus, both in terms of movement on the lens focusing ring (or focusing rail) and in visual appearance.
For the phase detect the narrow focusing target was possibly a little bit too small, maybe the occasional quite large deviations is due to that.
Detail of ALPA high precision focusing (HPF) ring, here set to infinity. Every fifth scale step has the value engraved plus the last five up to infinity. The distances of the in-between steps without numbers on the ring can be found in a table. At 4 meters the smallest step represent about 5 cm. (Picture by ALPA)
It would have been interesting to also test a pancake camera with a high precision focusing ring, which is widely regarded as the most precise focusing there is to find (when distance is known). Unfortunately I did not have an ALPA camera to do this test. Distance setting on the HPF ring would probably be within 2 cm, (smallest scale steps is about 5 cm at 4 meters) the precision would be more dependent on how one performs distance measurement (usually using a hand-held laser distance meter). At closer distances like here it will be important to align the distance meter with the camera.
It's no big surprise that the Linhof with traditional ground glass focusing is not as precise as the others. The problem is not the gearing, but the limit in loupe magnification and ground glass resolution, and the softer focus peak that f/5.6 gives make the plane of focus harder to pinpoint than with an f/1.8 DSLR lens.
The gearing on the focusing wheel is 1:4. One turn on the 20mm in diameter knob is 15mm on the focusing rail so when you turn only 1 degree or 170 um the lens moves 42 um which can be a significant part of the depth of focus. Some think it's a bit tight, and I would probably have chosen 1:6 or 1:8 if I could, but I don't think it would improve precision. The gearing is play-free and the human hand is actually rather precise, but a lower ratio would improve comfort a little.
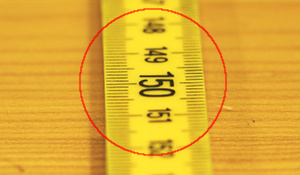
Small crop of a macro shot, 60 cm focus distance with a 90mm lens at f/4.5. The red ring shows the small field of view of a 20x loupe, but since the depth of field becomes very short at this close range we still see both in-focus and out-of-focus areas simultaneously a which makes pinpointing the peak focus easier.
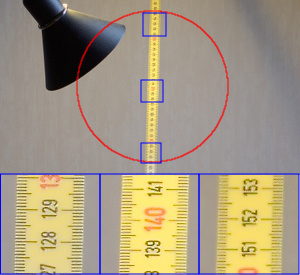
Situation in the focusing precision test, the loupe's view cover so small part of the depth of field that everything within the view appears equally sharp, which makes pinpointing the peak focus harder. The small crops show 100% from 33 megapixel back, i e higher resolution than we see through the loupe.
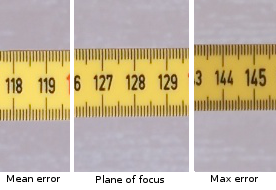
100% crops of focus deviation errors with 20x loupe on Linhof ground glass for f/11. At the test's focus distance of 4 meters the mean error is 6.4 cm and max 12 cm. Mean error represents a 60um misplacement on the rail, and max 110um. In circle of confusion terms it's zero when we hit the target exactly, and the mean error is 5.0 um and max 9.2 um. Diffraction Airy disk diameter at f/11 is 15 um, that is larger than the errors making it hard to detect them. (The difference in brightness in the picture is due to uneven lighting in the test shot, so the max error can look a bit less sharp than it is.)
We see that the 20x loupe gives an advantage over the 10x loupe, which also is clearly visible when using them. You see more detail with the 20x. One can still do quite ok with the 10x loupe by doing rocking focus-peaking. Despite the worse ergonomics (dimmer, smaller field of view, face closer to ground glass) I prefer using the 20x loupe whenever possible. I also tried a cheap low quality 60x pen microscope, I could see even more detail there but the ergonomics using it was so extremely poor I could not really perform better than with the 20x. Possibly the ideal loupe would be something high quality in the 30x-40x range, but with the limited ground glass resolution I do not think it's possible to perform as good as 5D mark 2 live view for example.
Note that the spread of both undershoots and overshoots indicates that there are no systematic errors, i e no focus shift.
If you can see the plane of focus wander through the loupe's field of view when you turn the focusing wheel it becomes much easier to pinpoint focus. This is a common situation in close-range and macro photography where depth of field is very short and it's likely that you have a visible unbroken line the plane of focus can wander through.
At longer distances and/or wider angle lenses this is less likely to occur. Due to the relatively large depth of field and the loupe's small field of view it's likely that what you see spans only a very small part of the depth of field, i e everything you see has equal sharpness. This makes it harder to find the peak. The testing made here is a situation just like this when I could only see equal sharpness in the loupe, and also in the 5D mark 2 live view. It would be possible to "cheat" by moving the loupe and looking at nearby parts of the folding rule but I did not do that since I wanted to simulate a likely field situation.
I did not make a formal test on macro focusing but my feeling there is that it's easier to pinpoint and the risk of making large errors is smaller.
If we assume that the 20x loupe focusing is as good as it gets with the Techno, the big question here is is ground glass focusing good enough?
To answer that question we need to relate to depth of field close to the plane of focus. When we look so close to the plane of focus that the circle of confusion (CoC) is smaller than the diffraction Airy disk it's essentially impossible to differ it from the exact plane of focus (regardless of digital back resolution, at least after sharpening). In other words the diffraction masks the exact position of the plane of focus which gives us some margin of error. By looking at my test shots I estimate that the plane of focus is fully indistinguishable from the DoF edge when the CoC is no larger than half the Airy disk diameter.
This small CoC gives a very short depth of field, for f/11 (15/2 = 7.5 um CoC) only 19 cm at 4 meters in the test setup. On the focusing rail the depth of focus get 0.17mm or ±85 um. With the 20x loupe I managed to get within this range 9 out of 10 times with 30% off (9.3 um CoC) in the worst case. With the 10x loupe 6/10 was within and max error was 170% (20 um CoC) off.
If we drop down to f/8 we get 5.3 um CoC and thus ±43 um on the rail and then the 20x loupe hit rate drops to 4 out of 10.
So what does this say? I think that the 10x loupe yields a little bit too poor precision, but the 20x we reach a good enough level for f/11 shots, but it's a little bit tight on f/8 and less. My experience from working in the field is that you don't really get issues from missing focus, but you want to focus-check you pictures on the digital back, and in some occassions you need to correct, almost always when there was lack of concentration in the focusing step so the error is quite large.
Focusing rail with wide angle lenses
A typical statement about view camera focusing is that wide angles are considerably harder to focus than longer lenses, and that lenses wider than about 40mm are near impossible to focus correctly. This is both true and false. Here is why.
If the task is to focus exactly at a specific distance then it becomes more difficult with wider angles. The reason is that the distance on the focusing rail from infinity to close range becomes smaller with wider angles. The formula at play is:
1/<focal length> - 1/<focus distance> =
1/<focusing rail distance>
That is if we focus at infinity focusing rail distance is same as the focal length, and the closer we focus the farther we separate the lens and sensor. An example: for a 35mm lens focused at infinity rail distance is 35mm, focused at 10.0 meters it's 35.12 mm, that is only 0.12mm difference! For a 180mm lens it would be a 3.30mm difference. Obviously higher precision is required for the wide angle.
However, for practical photography we also need to take the depth of field into account. With shorter focal length the depth of field gets longer, and actually this fully compensates the precision challenge, it's a zero-sum game. Depth of field (DoF) range for a specific aperture is on the focusing rail constant regardless of focal length and focus distance (if not in macro space). At f/11 the DoF range translated to the focusing rail is about 0.34 mm (pixelpeep DoF with CoC = Airy disk).
For long focal lengths the DoFs become very short when focused closely, so for the 180mm lens we can stacks 127 adjacent f/11 DoFs between one meter and infinity, while for a 35mm we fit only about 4.
What does this mean? It means that if focus accuracy is evaluated by looking at how well the DoF is centered around the object focused at then the required accuracy on the rail is the same regardless of focal length. Shorter focal lengths indeed have tighter movements concerning focus distance but also wider DoF so you don't have to hit the distance as precisely.
In other words, the statement that wide angle focusing requires more precision is not strictly true in practical photography. However there are other factors that typically makes wide angles more challenging - they are dimmer on the ground glass (due to the low angle of incoming light) structures focused at are often smaller and harder to see with a low-magnification loupe, and there are often smaller structures in the resulting picture which makes focus placement errors more evident. When focusing with a wide angle you also typically see only a small fraction of the depth of field in the loupe's view, that is you don't see an unbroken line of out-of-focus to in-focus, just everything rendered with equal sharpness which makes focus-peaking harder.
So in practice wide angles can indeed be a bit more challenging, but I would say that the problems are generally exaggerated. In my focus precision tests I used a 120mm lens, but the setup I used would be no different in difficulty from focusing in the center of a wide angle. The same concentration and precision is required to fit the DoF around the target.
Retrofocus lenses
Some modern wide angles for large format digital are retrofocus designs (mainly Rodenstock Digarons). This may change the math a bit and give more margins. At the time of writing I have not investigated this though, maybe in a future update.
Review of the new Linhof bright ground glass

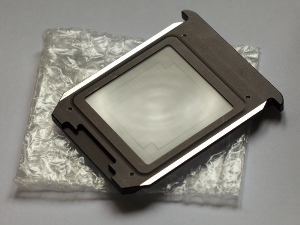
Front and back of the new bright ground glass ("Linhof bright screen"). It comes mounted in a metal frame. The viewable area is 60x60mm, scroings exist for 49x37mm, 54x41mm and 56x36mm. The pictured has the 49x37mm scoring. The fresnel is integrated inside the glass, so the back is the grainy side and the front is smooth glass. The shiny sides of the back is precision-milled naked metal to provide exact image plane alignment to avoid focus shift.
In July 2013 I bought the new bright ground glass which was announced at Photokina 2012. I've had my eyes on it since release, but as it's very expensive (about 700 euro+VAT) I have used the standard ground glass plus fresnel I already owned until now.
The glass is mounted in a metal frame and the viewable area is 60x60mm. Four different scorings exist, for 49x37mm (P45+, CFV-50 etc), 56x36mm (Aptus-II 10) and 53.9x40.4mm (P65+, IQ260 etc), and 43.9x32.9mm (44x33, P40+, IQ140, CFV-50c, etc). I have the 49x37mm version as I have a 48x36mm Dalsa sensor. In addition to the portrait/landscape outlines seen in the pictures there is a very fine grid and a cross in center which is only visible in the loupe. There are no marks to support the stitching positions of the sliding back, which is not surprising as the stitched frame for a 49x37mm sensor gets 71x49mm, ie wider than the glass. The standard ground glass on the other hand covers the full opening, ie 76x82mm, so if you are shooting film larger than 6x6 or want full stitching coverage you need the standard ground glass. The 49x37mm (and legacy 37x37mm) version of the standard ground glass also has scoring for the stitching positions. Personally I like this smaller window, it's nice to see a little more around the sensor area but the extra surface provided with the standard glass is so huge I find it a bit distracting when composing with longer lenses.
Note that if you used the sliding back's ±17mm fixed positions not for stitching but simply to achieve horizontal shifts larger than the ±10 mm horizontal lens shift is limited to, you will with the new ground glass have to do that in the blind. The sliding back can only place the ground glass in the center position, so for the stitching positions to be viewable you need coverage and scoring from the ground glass. Only a slight design change in the sliding back would make it possible to place also the ground glass at offset positions, I hope Linhof adds that to future revisions (maybe they already have? I have a 2010 version).
When measuring the scorings I noted that the 0.7mm wide lines are drawn in the center of the actual 49x36.8mm frame (as the Kodak sensor size is). I would have prefered an exact outline, but corners will be slightly approximate anyway with the ground glass, and raw converters often crop a little too. So I don't worry much about having a slightly smaller sensor, I see the scorings as a very slightly too wide outline for mine.
The standard ground glass has the fresnel mounted in a separate slot in front, and I had it permanently mounted, there is no reason not to. The slots are open and there are light leaks which you need to cover with tape, ie not an elegant design at all. The new ground glass however sits in the first slot and covers the second with it's top lip, so it becomes light tight at the top, there is still a small leak at the bottom though (how hard can it be to make it light tight?). The light hood accessory fits nicely without light leaks. The bottom light leak is so small that taping is not really required but I've taped it anyway.
I have done a careful resolution and focus shift test as follows: I focused on a slanted ruler and used a second camera with a macro lens to photograph the actual ground glass at high magnification, and comparing that with the actual photo when sliding in the digital back.
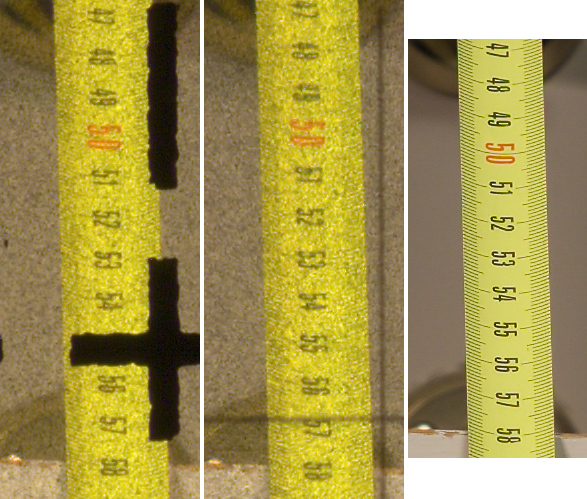
Macro shot of actual ground glass (standard+fresnel to left, new in center) and the resulting 100% crop of a 33 megapixel 48x36mm image to the right. Only crops shown here but the full shot of the slanted ruler was analyzed to verify that there is no focus shift. The shot was made with a 120mm lens at f/5.6. As seen the resolution of the new ground glass is almost exactly the same as the old standard. Possibly the ruler dashes are a little bit better defined on the new, while contrast might be a little bit better on the old, at least with this focal length (the old is a little brighter with longer focal lengths). The difference in the resolution department is so small though I consider it irrelevant.
Concerning grain size and resolution it's almost exactly the same as the standard ground glass, ie very good (for being a ground glass). The new ground glass is a little smoother (more uniform grain size) and possibly has very slightly higher resolution. I've heard some say that the new ground glass has better "snap", ie it's more clearly visible when things go in and out of focus as you turn the focusing wheel. After swapping in and out I'd say that the standard ground glass without fresnel is the snappiest, and with fresnel it gets a bit less snappier than the the new ground glass. But the new is still (very) slightly less snappier than the standard without fresnel. I think the reason is that a fresnel lowers local contrast slightly, more if scratchy.
To double check I also looked at macro photographs of the different ground glasses, if the new ground glass actually would be significantly snappier the out of focus areas would be more fuzzy and the in-focus sharper, but I could not see any such difference. If there are any differences they are very small.
The separate standard fresnel is plastic and will over time get scratches from the loupe viewing, and it's quite prone to gathering dust and particles too and the patterned side is hard to clean. This is significantly improved with the new ground glass, as the fresnel is integrated; the viewing side is smooth glass (not scratched easily I assume) and the image plane side is the finely grained surface, while the fresnel is inside the glass and thus the hard-to-clean pattern is not exposed. So I will not expect the same degradation over time as one can do with the standard fresnel. On the other hand it's not too expensive to buy a new standard fresnel when it has become too scratchy. I've noticed that the plastic standard fresnel could bend a little if you focus in the center and press the loupe more than very lightly, which means that the ultra-thin high magnification loupe depth of field may get outside the grain; you will not have this problem with the new ground glass.
As the fresnel pattern is closer to the grain one worry could be that it would get within the loupe's depth of field and disturb the viewing, but with a 10x loupe or higher magnifcation it will not, so don't worry. The only interference is the possibly slightly lower local contrast which I think is a general tradeoff you do when you have a fresnel.
What about focus shift? For focus shift to be relevant it must be visible at the resolution the ground glass provides, ie you can never focus more precisely than what the ground glass can resolve. In my test setup I cannot see any shift difference between the two ground glasses, and they match the actual photo taken by the digital back, ie there is no detectable focus shift. Be aware though that ground glass focusing cannot be as precise as live view focusing due to limits in resolution, I would not recommend it for larger apertures than f/11. A detailed analysis on focusing precision is found in another appendix to the Linhof Techo review, it's made with the standard ground glass but as the resolution is the same with the new the same analysis applies.
Same resolution, no snappier, less viewing area, so what's the deal? Brightness is. Ground glass is well-known to be dim, and extremely dim with non-retrofocus wide-angle lenses. I have the Schneider Digitar 35mm, a symmetrical wide angle lens design and it's about as bad as it can get concerning dimness. The Rodenstock wides are more retrofocus and has one stop wider aperture and are thus brighter, but then also much more expensive, heavier and have a bit more distortion.
The fresnel is there to make the ground glass brighter through bending in light on the sides towards the viewer. I assume that integrating it into the glass reduces light loss compared to having a separate, but the key difference seems to be that the fresnel in the new ground glass is designed for shorter focal lengths.
In the center the light comes straight at you so both new and standard+fresnel are equally bright there, and approximately equally bright for all focal lengths (assuming same max aperture and no center filter). The difference is how strong falloff there is towards the corners where the light does not fall in perpendicularly, becoming worse with wide angles. Symmetrical wide angles have very high natural vignetting too (hence the use of center filters) and the fresnel cannot improve on that, just minimize further vignetting by trying to bend the light back to perpendicular.
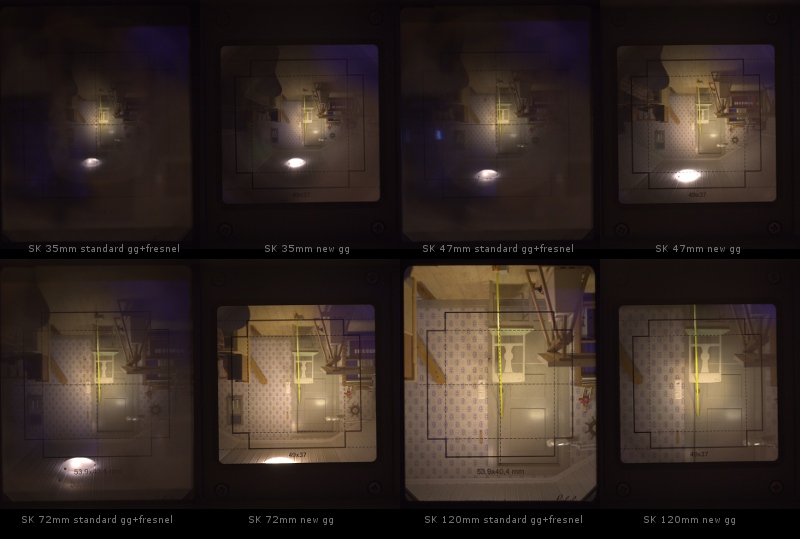
Shots of standard+fresnel and the new ground glass on different focal lengths for comparison. This is shot in a dimly lit indoor scene. The brightness of the pictures is tuned to give a reasonable sense of how dim it actually is, but bright surroundings on the screen may make it look worse than it is - with the dimmest focal lengths you would put your head under a focusing cloth in this weak lighting condition. In this scene with the 35mm+standard gg you cannot see the corners without moving your head, but you can with the new although the corners are faint.
Please note when comparing that my standard gg has a 54x41mm scoring and my new has 49x37mm. The corner improvement of the 35 and 47 is about 1.6 stop, and 2 stop on the 72. On the 120 you start to pay for the wide-angle-tuned fresnel and the new actually gets 1.2 stop darker in the corners. No center filters where used for the 35 and 47. A real picture with the 35mm + center filter at f/11 required 16 second exposure at ISO 50, ie it's a dim scene.
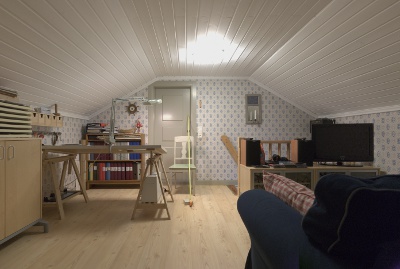
The scene used for the tests. Here shot with SK 35mm in portrait stitch. 35mm, center filter, f/11, ISO 50, 16 seconds. The dark sofa in the corner was a bit unfortunate for the ground glass wide angle pictures, that corner is of course rendered near black.
I've tested the Schneider 35, 47, 72 and 120mm on a static indoor scene with standard (ie weak) indoor lighting, photographed the ground glass perpendicularly with a long lens and then compared brightness difference. I used RawTherapee to convert the raws so I could get a neutral exposure-correct output (not possible with most commercial raw converters) so I could make a fair comparison. I did not use center filters on the 35 and 47 which affects the look of the ground glass photographs (more vignetted) but not the measurements.
To get an idea of how weak the light was in this scene: to make a well-exposed photograph of it I used the 35mm with center filter and made a 16 second exposure at f/11 and ISO50, ie a considerable darker setting than the typical outdoor scene.
Here's the results: 35mm and 47mm about 1.6 stop brighter corner, 72mm about 2.0 stop brighter corner, 120mm about 1.2 stop darker(!) corner. I've heard things like "4 stops better" about this ground glass, but that is obviously false and I think it's physically impossible with that kind of improvement, unless you compare to the standard ground glass without fresnel but noone would use it like that for a wide angle lens. It's also interesting to note that it's darker for long focal lengths. You can't do magic and make a fresnel that is optimized for all focal lengths, so there is a tradeoff. Simply put the new ground glass is brighter for anything 100mm and shorter, while the standard+fresnel is brighter for 120 and up. The 72 is actually brighter than the 120 on the new ground glass. To make sure nothing really bad happens I put on a 180mm too and checked visually and it looks okay, probably a little darker than the standard but on this long lens the image does not really look vignetted so striving for the utmost brightness there is not the right design target to have anyway, the challenge to meet is with the wides, and there it provides an improvement.
I think many will consider the 1.6-2 stop corner improvement as quite moderate and was maybe expecting more due to the marketing hype. Does it provide any real advantage? Ground glass dimness is not an on/off problem, ie it's not either bright enough or too dark for any given condition. If shooting in a comfortable environment without stress you can almost shoot in the blind and still have an okay workflow. Outdoor in cold conditions, or with lots of mosquitos attacking you, or an uncomfortable camera placement will lower the acceptance of ground glass dimness. Sometimes I find myself recomposing with trial-and-error (shoot, look at back display, shift-adjust shoot again). This happens more often with dim wide angles, as you may have to move your head to impossible positions to be able to look into the corner. This will for sure still happen with the new ground glass, but less often.
Here's another way to look at it which makes the "moderate" improvement to look better: the 35mm on the new ground glass has actually a little brighter corners than the 47mm on the standard. And the 47 becomes brighter than the 72 was. So wide angle dimness issue is shifted up in focal length. I have quite many lenses in the system, but a favourite focal length of mine is the 47, and brightening that past the old 72 experience is worth it for me.

SK 35mm in an overcast outdoor scene, the camera aimed at a small red house. The lighthood has been pulled out, but still the huge amount of glare is obvious. To work you need to put your face tight against the lighthood and cover the remaining leaks with your hands, or use a loupe lid or focusing cloth. In this light condition corners have good visibility even with this 35mm, but the glare forces you to cover up anyway.
One notable drawback with the new ground glass is glare. It's practically a mirror, and it's really the only aspect of the product that made me a bit disappointed. The standard fresnel has glare too, but not as much. My layman guess is that a more efficient fresnel leads to more glare, so this is what you pay for wide angle brightness. However, for 700 euro I would expect some kind of anti-glare surface treatment, and as far as I can see this has none. I own but don't use the 4x loupe lid as 4x is not enough for critical focusing (so I would have to remove/reattach it all the time) and I have good enough eyes to do composing unmagnified. This means that glare is a problem, too much glare and I need to use the focusing cloth even if the image is bright enough. It does help to pull out the lighthood and put the face against it and cover as much as you can with your hands, but with the sun behind your back you still may need a focusing cloth. I need more field testing to know, but I think there will be some situations when I will due to this glare issue use the focusing cloth when I would not with the standard glass+fresnel. As an experiment I put an ordinary polarizing filter in front of the ground glass in such an impossible glare situation and then most glare disappeared and I could see the image. That cuts 1.5 stop of light though so it's not a real solution. Maybe there is some anti-glare film for phones/laptops that could work.
Note that the viewing angle is narrow, if you like me look at it without a viewing aid at close range you typically get best brightness if you look with only one eye straight at the glass. To get a bright view for both eyes you need to stand about 0.5 meter away from the glass (to get a narrow viewing angle for both eyes) which is not very practical. This is the price you pay for an efficient fresnel that focuses most light straight out, but this is also what makes it brighter.
Let's summarize, this is what I like about this ground glass:
- Brighter corners on wide angles and normal lenses, without sacrificing too much on longer lenses, and no loss of resolution (traditionally brighter glass meant lower resolution).
- Brightness improvement may look only moderate on paper, but the dim Schneider 35mm becomes brighter than the 47 was on the standard, and the 47 brighter than the 72!
- Integrated fresnel, less prone to scratches and collecting dust. I like the smaller viewing window, less distracting when composing. Nicer finish and (almost) no light leaks (but I will tape anyway).
...and this is what you should have in mind if you consider upgrading:
- It's no magic bullet, wide angles will still be dim, you will still be using a focusing cloth (or other covering viewing aid) from time to time.
- The Linhof standard ground glass + fresnel is already quite okay compared to the competition.
- The viewing area is significantly smaller and does not support stitching well.
- The corner improvement is no more than 1.6 - 2 stops and for 100mm+ there is actually a slight darkening of corners. If you have high expectations of brightness improvement this may not be enough to please you for the price you are paying.
- The glare is worse, which can be disturbing if you like to view unmagnified without a covering viewing aid. Personally this is the only aspect that made me a bit disappointed, but after a while using it I got used to the glare and can live with it.
- The resolution is almost exactly the same, and it's not easier to focus-peak ("snappier") than the standard ground glass, so there is no upgrade in that aspect.
So how bright is it compared to the Maxwell Precision Optics ground glass (known for its brightness), available in the third-party Kapture Group's sliding back? Unfortunately I don't know for sure as I don't have access to one, but based on user comments my guess is that they are similar in performance. If you are buying a new system from scratch I'd recommend to look into third-party alternatives and compare if you can as the original Linhof sliding back with this ground glass becomes a much more expensive solution. Update december 2015: I've now seen and make a brief A/B comparison with Maxwell Precision Optics ground glass on Kapture Group sliding back. I didn't have focal length available to compare wide angle brightness, but concerning resolution the Linhof ground glass is considerably better, so much better that I certainly think it's worth the extra expense.
If you had your loupe bases calibrated for the standard glass + fresnel you need to recalibrate them for the new ground glass as you no longer have a separate fresnel. You need about 4mm longer base. If you have a high magnification loupe the depth of field is very short and then there is significant gain if you put in some effort in precisely tuning the base thickness so you get the sharpest image possible. I think it's a bit unfortunate that Linhof does not provide tuned loupes as an accessory, because tuning a loupe yourself is a bit tricky and usually includes layers of tape or some other hackish solution.
Update after a month's use: I'm very happy with the ground glass and I can say that it's for sure a valuable improvement when working with my 72mm and shorter lenses. During this month I've shot quite many times in weaker light, and the improvement in these conditions becomes very clear. I've got quite used to the glare too, so I'm less irritated about that now than in the beginning. If you have a Linhof ground glass holder or sliding back and work with wide angles I strongly recommend this upgrade.
A few words about the 12x Silvestri loupe
In April 2014 I finally got my hands on the Linho Studio / Silvestri 12x loupe. I have not had time to write a full review of it, but meanwhile I thought I'd say a few words about it.
First of all, this is the loupe, you can forget about all other loupes in the Silvestri lineup, this is the one you need for focusing on the ground glass of a digital view camera. For accurate focusing you need this magnification, at least.
Silvestri has had problems manufacturing these to provide for the demand, mine was backordered for several months before I got it, so if it's in stock and you want one, buy one, don't wait!
The loupe is specially designed for the new bright ground glass, and for that you don't need to change focus of it, it focuses on the grain when fully closed. Great when using it with the new ground glass, but this also means that it cannot be used together with the standard ground glass if you have the fresnel in (which you typically want to have), as the distance from the fresnel surface to the ground glass grain becomes too large for the loupe. This is actually the only real complaint I have on this loupe, I would have preferred if it could be made shorter.
The difference in magnification between the Silvestri 10x and this 12x is larger than the numbers indicate. The 10x is more like a 6x, while the 12x is truer to its number. While I think also the Silvestri 10x is okay in optical quality I've heard others say that they think the 10x is bad and the 12x has much better optical quality. In other words, don't expect the 12x be anything similar to the 10x.
The loupe base is square and so becomes the field of view. The idea of a square base is that it can move closer to the corners, it works but I don't find it of much value in practice as one rarely needs to check focus so close to the corners and if the lens is wide angle it won't be practical anyway due to the light angle and vignetting. You would have to tilt the loupe too and as the loupe needs to be at its shortest to focus on the grain you cannot tilt it. I don't see this as a major problem either in practical use. Tilting high magnification loupes is not so good idea anyway as the depth of field is very short.
Don't worry about tilt focusing (the classical use case of edge looking), for longer lenses you can look and get a good image at the edges without needing to tilt the loupe, and for the widest lenses when it becomes difficult, setting tilt based on a table is very effective.
I've heard many users say good things about this loupe, being a good tradeoff between magnification, brightness and field of view. I agree and say that this is probably what most users will like. Therefore it would be a mistake not to recommend it, you will most likely be very satisfied with it.
However, while I bring this loupe I actually rarely use it, I still use my 20x Belomo jewelry loupe. That loupe is much darker, has a silly small field of view, but I've got used to it and I personally prefer a tradeoff which is more weighted towards magnifaction, ie sacrifice some brightness and field of view for more magnification. If I could design my own loupe it would probably be something like 16x. Still I cannot say that I see more details with the 20x, you see the ground glass grain already with the 12x, but I do feel I get a tiny little extra confidence with the 20x, especially for infinity focus and I like to have that.
I don't regret getting the 12x though, I like the extra field of view especially when I focus with tilt/swing, so what I would recommend is to get that first, and then perhaps get a 20x (which is cheap) if you feel that you like me would like even more magnification.
A square filter system for the Techno
I use gradient filters in my landscape photography. Some consider these obsolete due to multishot HDR techniques, and while I do that from time-to-time as well I prefer capturing the scene in one well-balanced exposure if I can. If you got one of the latest digital backs the dynamic range has improved so you may find less need for grads, but some still use them to capture more photons and get better color accuracy in the shadows, or simply to "tonemap" manually directly in the shot.
To use grads with flexbility you need a square filter system. I first used a Cokin 85mm holder together with Formatt Hitech resin filters, but I was not pleased with the quality of the holder and filters, so recently I switched to the even smaller Lee Seven5 system, designed for mirrorless cameras. The quality of holder and filters are much better. Most go for the full-size 100mm system, but it's considerably larger and bulkier and as I hike with my system I wanted as small as possible. The thing is that "large format digital" lenses have quite small diameters thanks to their small max aperture. The Seven5 handles up to 72mm filter thread, and that fits most digital lenses except a few notable exceptions: the Rodenstock Digaron-W 32 (86mm, 105mm with center filter), Rodenstock Digaron-S 23 and 28 (72mm, 95mm with center filter), Schneider Digitar 28 (95 or 112mm depending on filter ring option, and the 115mm center filter if used has no threading at all).
My widest lens is the Schneider Digitar 35mm, which with center filter has 72mm threading. All Digitar lenses except the 28mm can do with the Seven5 72mm limit. However, with the 35mm there is slight vignetting with extreme shifts. Possibly vignetting may be seen with some of the other wides to with extreme shifts, the 35mm is the only one I tested formally: with the standard two slot holder it vignettes at 88 mm vertically (ie only 2mm of the 90mm image circle lost) and 80mm horizontally. The larger loss horizontally is less important for landscape applications. Due to the small filter size (90mm high) one cannot put the transition too high or low as the filter then won't cover the whole frame. However one can have it as high/low about 1/8 to 1/6th from the edge in portrait orientation, which I think is okay.
Due to the short flange distance the 35 sits on a recessed board on the Techno, but despite that the filter doesn't collide with the front standard base, the margin is no more than half a millimeter or so though. The fastening handle of the holder does collide with the base if you try to rotate the holder all way round, but as the handle is on only one side one can still orient the filter any way one likes. All lenses without recessed boards have no collision issues as the filter holder then gets in front of the base.
To summarize, the Lee Seven5 is a great compact choice for digital lenses 35mm or longer, works both for Rodenstock Digaron and Schneider Digitar.
Note that I have not tested the Seven5 hood or the polarizer, or
having two filters in, that will likely introduce some further
vignetting, but probably not too bad. I use the square holder
exclusively for grad filters and only use one filter at a time to
minimize risk of reflections (grads are uncoated). For polarizer and
NDs I use screw in filters which I attach before I attach the filter
holder. A bit less practical, but I get a lot more options for NDs and
polarizers.
Revision history
- January 2019 - I am no longer maintaining this page actively, but added some light in the uncertain future and digital back sections due to the IQ4 150MP release, which uses a Sony sensor with wide angular response, an important technical break-through for wide angle photography with technical cameras.
- May 2016 - modernized web page to display better on mobile devices.
- January 2016 - added a section about the uncertain future of these camera systems, and a few notes about the new IQ3 100MP digital back.
- December 2015 - added a few notes about Kapture Group sliding back after having a look at one (it's not as good as Linhof's own). Rephrased the concluding discussion to sound a little bit more positive (without removing valid criticism!), as the Techno actually stands up very well to the competition. Added a small section on film usage.
- November 2015 - added few notes about the new Cambo Actus and Arca-Swiss F-Universalis, a mention of the Sony mirrorless cameras. Mentioned that Schneider is probably leaving large format lens production. Showed the use of Hasselblad H back with external battery (which I currently use myself). Added a discussion about wide angle performance in relation to the highly popular Canon TS-E lenses. Extended discussion about tripod heads.
- December 2014 - added note about H-mount adapter plate issue with Hasselblad safety-catch button.
- October 2014 - updated third-party bags section to describe my current solution.
- September 2014 - updates to digital back recommendations to match the current market, and also lifting up Hasselblad 50 megapixel backs due to their good wide angle performance.
- July 2014 - added comments regarding the bellows fastening.
- May 2014 - added comments regarding stitching and the new ground glass, added a few words about the 12x Silvestri loupe.
- April 2014 - added small note regarding focusing rail stability with longer lenses.
- February 2014 - updated with comments regarding live view after the release of the IQ250 digital back.
- January 2014 - updated cold weather shooting section after more experience.
- August 2013 - added comments after a months use of the new ground glass, added information about a suitable square filter system.
- July 2013 - added a review of the new bright ground glass, and more information about the infinity stops, and some overall minor updates.
- March-April 2013 - minor fixes to the text describing movements, added note about infinity stops and zig align.
- December 2012 - updated text about cold weather use after practical experience, added text about using 22 megapixel backs.
- September 2012 - first published
© Copyright 2012 – 2016, 2019 — Anders Torger.